Are you ready to upgrade your home security with a Tru Bolt Electronic Deadbolt but don’t know where to start? Installing this smart lock might seem tricky, but with the right steps, you can do it yourself quickly and easily.
Imagine having keyless entry and full control over your door’s lock right at your fingertips. In this guide, you’ll discover simple, clear instructions that make the installation process smooth and stress-free. Keep reading, and by the end, you’ll have your Tru Bolt lock set up and working like a pro—no hassle, no confusion.

Credit: www.truboltlocks.info
Tools And Materials Needed
Before starting the installation of the Tru Bolt Electronic Deadbolt, gather all necessary tools and materials. Having everything ready makes the process smoother and faster. It also helps avoid interruptions during installation.
Required Tools
- Phillips screwdriver
- Flathead screwdriver
- Power drill with drill bits
- Tape measure
- Level
- Pencil or marker
- Chisel (for door adjustments)
- Batteries (usually AA or AAA)
These tools help you mount the lock securely and align it properly. Keep them within reach to save time.
Components Included
- Exterior keypad assembly
- Interior thumb turn assembly
- Deadbolt latch
- Strike plate
- Screws and mounting hardware
- Installation manual
- Batteries (check package contents)
Check all parts before starting. Make sure nothing is missing or damaged. This ensures a smooth installation process.

Credit: www.ebay.com
Preparing The Door
Preparing your door is the first step to install the Tru Bolt electronic deadbolt. A well-prepared door ensures the lock fits perfectly and works smoothly. Follow these steps carefully to get your door ready for installation.
Remove Existing Lock
Start by removing the old lock from your door. Use a screwdriver to take out all screws holding the lock and latch. Keep these screws aside; you might need them later. Remove the lock parts from both sides of the door. Clear the area where the new deadbolt will go.
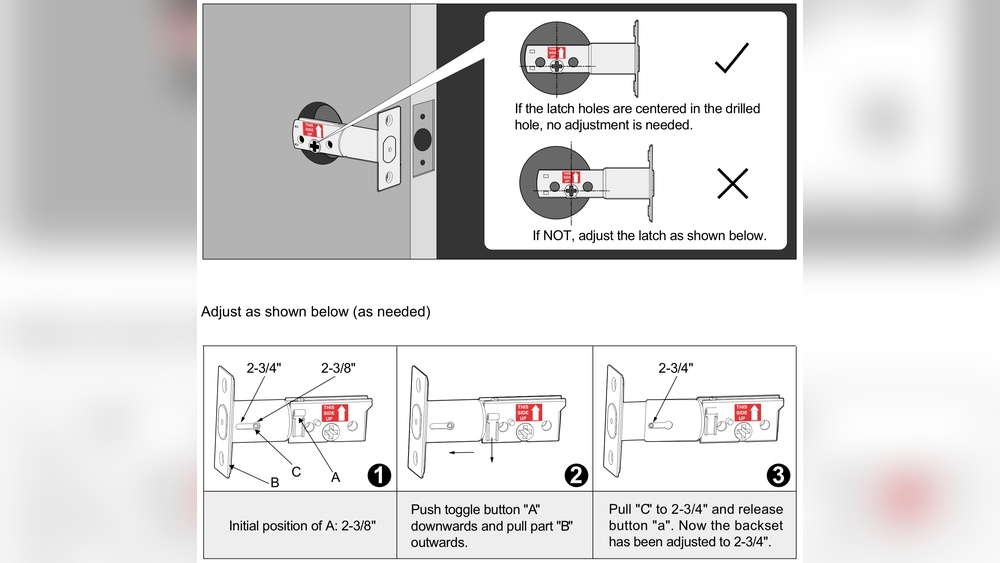
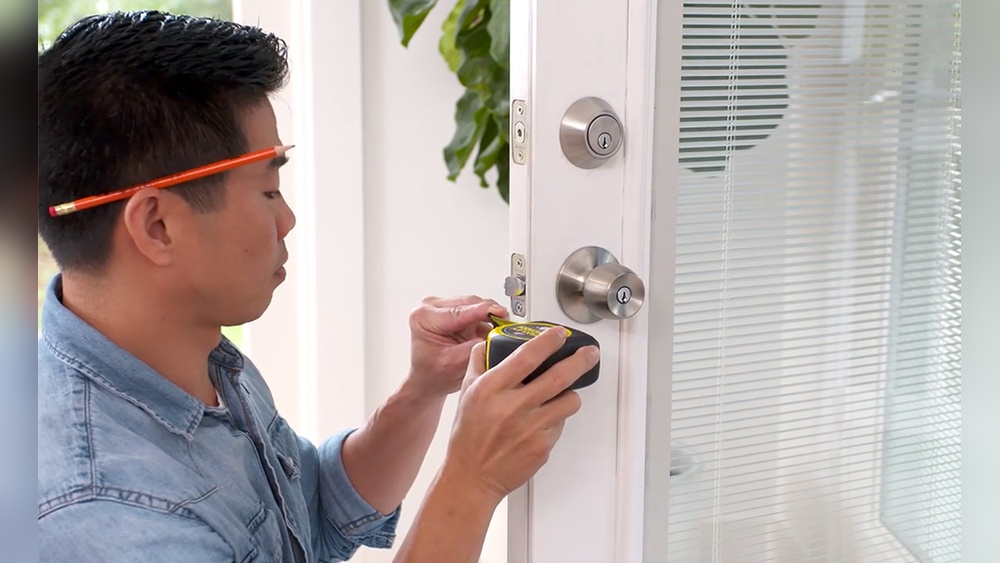
Measure Door Thickness
Measure the thickness of your door using a tape measure. The Tru Bolt lock fits doors between 1 3/8 inches and 2 inches thick. Measure from one side of the door to the other at the point where the lock will be installed. This step ensures your new lock will fit correctly.
Check Door Alignment
Check if your door lines up well with the door frame. The door should close smoothly without gaps or sticking points. Proper alignment helps the deadbolt latch work correctly. Adjust hinges or strike plates if needed to fix any misalignment before installation.
Installing The Deadbolt
Installing the Tru Bolt Electronic Deadbolt is a straightforward process. Follow these steps carefully to ensure a secure and functional lock. The installation involves attaching the exterior and interior parts and then securing the deadbolt. Each step is simple and clear.
Attach The Exterior Assembly
Start by placing the exterior assembly on the outside of your door. Align the keypad and the bolt with the holes in the door. Make sure the cable passes through the hole smoothly. Hold it steady and prepare for the next step.
Install The Interior Assembly
Next, connect the cable from the exterior part to the interior assembly. Position the interior assembly on the inside of the door. Check that it fits correctly over the screws. Press it gently but firmly against the door surface.
Secure The Deadbolt
Insert the screws and tighten them to secure both assemblies. Do not overtighten, as it may damage the lock. Ensure the deadbolt moves smoothly by testing the lock function. Your Tru Bolt Electronic Deadbolt is now installed and ready to use.

Credit: www.youtube.com
Wiring And Power Setup
The wiring and power setup is a key step in installing your Tru Bolt electronic deadbolt. This ensures the lock works smoothly and stays powered. Follow these simple steps to set up the power correctly. Doing this right helps avoid problems later.
Insert Batteries
Start by opening the battery compartment on the lock’s interior side. Use four AA alkaline batteries for best performance. Insert the batteries, matching the positive and negative ends correctly. Close the battery cover securely. Fresh batteries provide steady power for your deadbolt.
Connect Wiring Harness
Next, find the wiring harness inside the lock assembly. Connect the harness plug firmly to the main control board. Make sure the wires are not loose or damaged. Proper connection allows the lock to communicate with the keypad and motor. Check that the cables are tucked neatly to avoid pinching.
Test Power Connection
Turn on the lock using the keypad or button. The LED lights should illuminate, showing power is active. Press a few buttons to see if the lock responds. If nothing happens, recheck battery placement and wiring harness connection. Confirming power now saves troubleshooting time later.
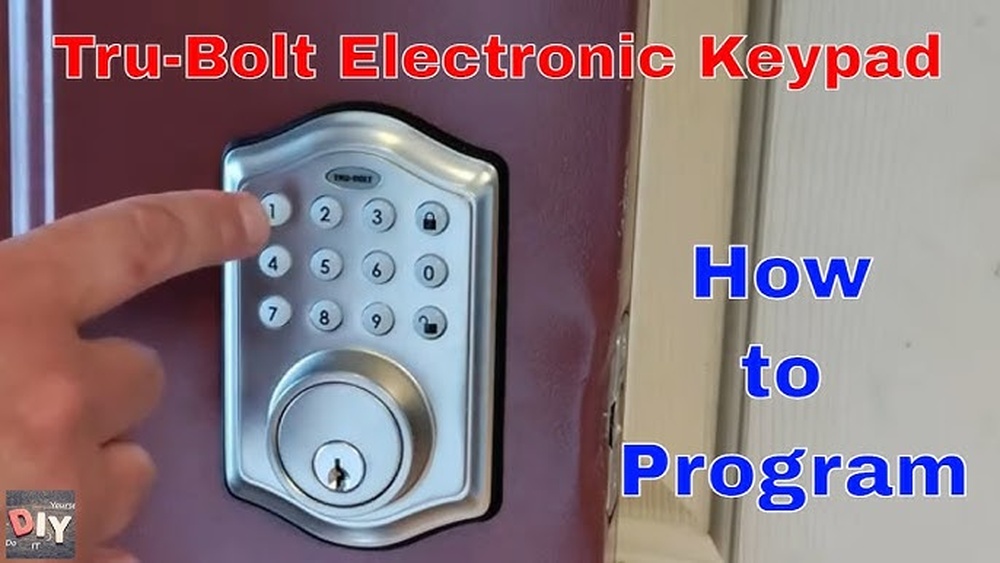
Programming The Lock
Programming the Tru Bolt electronic deadbolt is easy and quick. This step lets you control who can enter your home. You can set codes and change settings to fit your needs. Follow these steps to get started.
Set Master Code
Begin by setting the master code. This code controls the lock and adds new users. Enter the default code first, then choose a new master code. Make sure it is easy to remember but hard to guess. This code keeps your lock secure.
Add User Codes
Next, add user codes for family or friends. Use the master code to enter programming mode. Choose a slot for each user and type their unique code. User codes let others unlock the door without the master code. You can add or delete codes anytime.
Configure Lock Settings
Finally, adjust the lock settings to match your preferences. Change options like auto-lock timing and sound alerts. Use the keypad to navigate through the menu. Setting up the lock correctly improves your security and convenience.
Testing The Deadbolt
Testing the Tru Bolt electronic deadbolt is a key step after installation. It ensures the lock works correctly and keeps your home secure. Take your time to check both manual and electronic functions. This step helps you avoid problems later.
Check Manual Locking
Start by using the key to lock and unlock the door. Turn the key smoothly without force. Make sure the deadbolt extends fully into the door frame. Check the lock from inside using the thumb turn. It should move easily and lock tightly.
Test Electronic Functions
Enter your code on the keypad to unlock the door. Listen for any unusual sounds from the motor. The deadbolt should move quickly after you enter the code. Test the lock with any remote or app features you set up. Confirm the lock responds each time without delay.
Troubleshoot Common Issues
If the deadbolt sticks or does not lock, check battery power first. Replace batteries if the lock does not respond well. Make sure the lock is aligned with the door frame. Tighten screws if the lock feels loose. Reset the lock following the manual if electronic functions fail.
Frequently Asked Questions
How Do I Install A Tru Bolt Electronic Deadbolt?
First, remove your existing deadbolt. Align the Tru Bolt parts with your door holes. Secure with screws. Follow the included manual for wiring and programming. Test the lock before finalizing installation.
What Tools Are Needed For Tru Bolt Installation?
You need a screwdriver, drill, tape measure, and pencil. A power drill with appropriate bits speeds up the process. Having batteries ready for the electronic components is essential.
How Long Does Tru Bolt Installation Take?
Installation typically takes 30 to 45 minutes. It depends on your door type and familiarity with electronic locks. Reading the instructions beforehand saves time.
Can I Install Tru Bolt Without Professional Help?
Yes, Tru Bolt is designed for easy DIY installation. The package includes clear instructions. Basic tools and a bit of patience are all you need.
Conclusion
Installing the Tru Bolt Electronic Deadbolt is simple and quick. Follow each step carefully for the best results. Double-check the battery and wiring before closing the door. Test the lock several times to ensure smooth operation. This electronic deadbolt adds security and convenience to your home.
Enjoy the peace of mind it offers every day. Keep the manual handy for future reference. Now, your door is safer and easier to use.