Looking to upgrade your home security with a Weiser deadbolt? You’re in the right place.
Installing a deadbolt might sound tricky, but with the right steps, you can do it yourself quickly and confidently. Imagine having the peace of mind knowing your door is locked tight, without needing to call a locksmith or wait for help.
In this guide, you’ll find simple, clear instructions that walk you through every step. By the end, you’ll have a secure lock installed and ready to protect your home. Let’s get started!

Credit: www.youtube.com
Tools And Materials Needed
Installing a Weiser deadbolt is easier with the right tools and materials. Preparing these items before starting saves time and frustration.
Gather all necessary tools and materials in one place. This helps keep the process smooth and organized.
Essential Tools
A screwdriver is the main tool needed. A Phillips head screwdriver works best for most screws.
A power drill can speed up the job but is optional. Use a drill bit suitable for wood or metal.
A tape measure helps ensure proper placement of the deadbolt. Accuracy is key for security and function.
A pencil or marker is useful for marking holes. This prevents mistakes when drilling or screwing.
Required Materials
The Weiser deadbolt lock kit contains most needed parts. Check the package to confirm everything is included.
Wood screws often come with the kit. Use these for attaching the lock securely to the door.
A door latch strike plate may be part of the set. It protects the door frame and ensures a tight fit.
Optional materials include wood filler or putty. These help fix old holes if replacing an old lock.
Preparing The Door
Preparing the door is the first step in installing a Weiser deadbolt. A properly prepared door makes the installation smooth and ensures the lock works well. This stage involves removing any old hardware and checking if the door fits correctly.
Taking time here saves problems later. The door must be ready to hold the new deadbolt securely. Follow these simple steps to get started.
Remove Old Deadbolt
Start by unscrewing the old deadbolt from the door. Keep the screws in a safe place in case you need them later. Pull out both the interior and exterior parts of the lock carefully.
Remove the latch from the edge of the door by unscrewing it. Clean the area around the hole to clear any dirt or paint. This helps the new deadbolt fit properly without obstruction.
Check Door Alignment
Close the door and see how it fits in the frame. The door should close smoothly without sticking or gaps. Check if the latch lines up with the strike plate on the frame.
If the door is misaligned, adjust the hinges or the strike plate. A well-aligned door prevents the deadbolt from jamming or failing to lock. This step is important for security and ease of use.
Installing The Deadbolt
Installing the deadbolt is a simple process that improves your door security. Follow each step carefully to ensure the lock fits perfectly. Keep your tools ready and work patiently. This guide helps you install the Weiser deadbolt smoothly and correctly.
Insert The Latch
Start by placing the latch into the edge of the door. Make sure the curved side faces the door jamb. Push it in until it fits flush with the door edge. Use screws to secure the latch tightly in place. Check that the latch moves freely by sliding it back and forth.
Attach Exterior Assembly
Take the exterior part of the deadbolt and align it with the latch. Feed the tailpiece through the latch hole carefully. Hold the exterior assembly firmly against the door surface. Ensure the keypad or keyhole faces outward. Do not tighten screws yet; hold it steady for the next step.
Secure Interior Assembly
Position the interior assembly on the inside of the door. Align it with the exterior part and the latch tailpiece. Insert screws through the interior plate and tighten them evenly. Check that the thumb turn moves smoothly to lock and unlock. Test the deadbolt several times before finishing.
Aligning And Testing
Aligning and testing your Weiser deadbolt ensures it works smoothly and securely. This step is key to avoid jams or trouble locking the door. Taking time here saves future headaches.
Proper alignment helps the bolt slide into the strike plate easily. Testing the lock checks if everything fits and moves as it should.
Adjust Strike Plate
Check the strike plate on the door frame. It must line up with the deadbolt. If the bolt does not fit, the plate needs moving.
Loosen the screws of the strike plate. Shift it slightly until the bolt fits well. Tighten screws firmly once aligned. Use a chisel if needed to widen the hole for the bolt.
Test Lock Function
Close the door fully. Turn the key or thumb turn to lock and unlock. The bolt should move smoothly without force.
Try locking and unlocking several times. Make sure the door stays secure when locked. Check both sides of the door for ease of use.
Troubleshooting Common Issues
Troubleshooting common issues during Weiser deadbolt installation can save time and frustration. Many problems occur due to small errors or misalignments. Knowing how to identify and fix these issues helps ensure a smooth installation. This guide covers frequent problems and easy solutions to keep your deadbolt working perfectly.
Incorrect Deadbolt Alignment
If the deadbolt does not slide smoothly, check its alignment. The bolt should fit perfectly into the strike plate. Adjust the strike plate position by loosening screws and moving it slightly. Tighten screws once the bolt slides in easily without sticking.
Key Does Not Turn Easily
A key that sticks or is hard to turn often means the lock is not installed straight. Loosen the screws on the lock and realign it so the key can turn smoothly. Avoid forcing the key, as it may break inside the lock.
Deadbolt Does Not Extend Fully
If the deadbolt does not extend all the way, check for obstructions in the door frame or strike plate. Clear any debris and make sure the bolt moves freely. Adjust the strike plate if necessary to allow full bolt extension.
Lock Cylinder Spins Without Locking
This issue happens when the tailpiece inside the lock does not connect with the bolt mechanism. Remove the lock and check if the tailpiece is properly aligned and inserted. Reinstall the lock carefully, ensuring all parts fit well.
Door Won’t Close Properly
A door that won’t close after installing the deadbolt may have a misaligned strike plate. Check if the strike plate is blocking the bolt or door frame. Adjust the plate or sand the door edge slightly for a better fit.

Credit: www.youtube.com
Maintenance Tips
Proper maintenance keeps your Weiser deadbolt working smoothly and lasting longer. Small care steps stop problems before they start. Simple checks help avoid lock jams or key issues. Regular attention saves time and money on repairs.
Cleaning The Deadbolt
Clean the outside of the deadbolt with a soft cloth. Avoid harsh chemicals that can damage the finish. Use mild soap and water for tough dirt. Dry the lock completely after cleaning. Keep dirt and dust from entering the keyhole.
Lubricating The Lock
Apply graphite or silicone spray to the keyhole. Do not use oil-based lubricants. They attract dirt and cause sticking. Use lubricant every six months or when the lock feels stiff. Insert the key and turn it several times to spread lubricant inside.
Checking Screws And Parts
Tighten all screws on the lock and door plate. Loose screws make the lock unstable and hard to use. Inspect the lock parts for wear or damage. Replace any broken pieces quickly to keep security strong.
Testing The Lock Function
Test the deadbolt regularly by locking and unlocking it. The key should turn smoothly without force. Check the bolt extends fully into the door frame. Adjust the strike plate if the bolt does not fit well. Early testing finds problems before they become serious.

Credit: device.report
Frequently Asked Questions
What Tools Are Needed To Install A Weiser Deadbolt?
You need a screwdriver, tape measure, pencil, drill, and the Weiser deadbolt kit. These tools ensure a smooth installation process.
How Long Does It Take To Install A Weiser Deadbolt?
Installing a Weiser deadbolt typically takes 20 to 40 minutes, depending on your experience and door type.
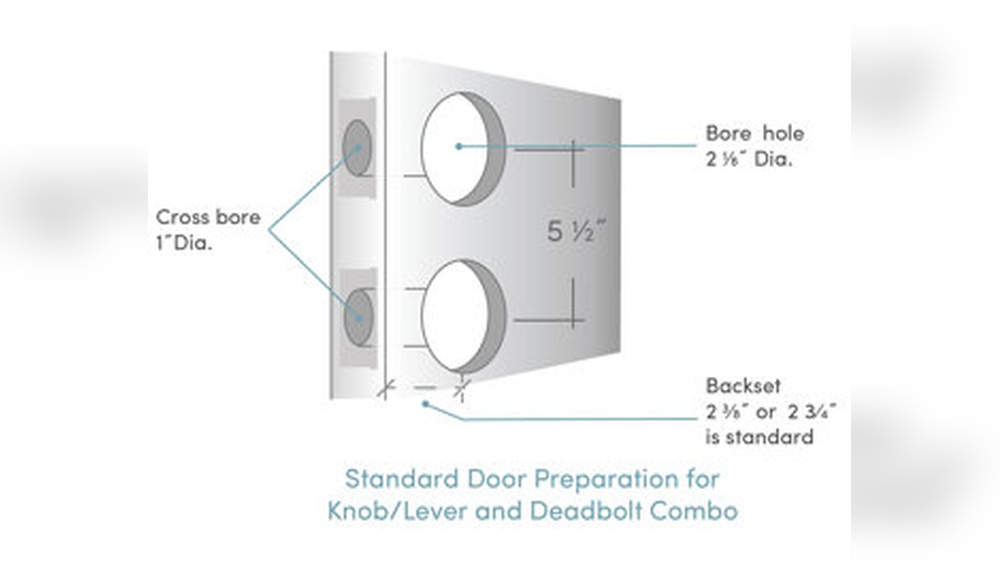
Can I Install A Weiser Deadbolt On Any Door?
Yes, Weiser deadbolts fit most standard doors, but check thickness and backset measurements first.
How Do I Ensure My Weiser Deadbolt Is Secure?
Tighten all screws firmly and test the lock’s function. Proper alignment ensures maximum security.
Conclusion
Installing a Weiser deadbolt adds extra security to your home. Follow each step carefully for the best results. Take your time and use the right tools. Double-check the lock fits well and works smoothly. This simple project saves money and increases safety.
You can feel proud of doing it yourself. Now, enjoy peace of mind knowing your door is secure.