Are your floor joists sagging or uneven? Knowing how to jack floor joists can save you from costly repairs and keep your floors strong and level.
Whether you’re fixing a creaky floor or preventing future damage, this skill puts you in control of your home’s foundation. You’ll discover simple, step-by-step methods to safely lift and support your floor joists. Ready to strengthen your floors and protect your investment?
Keep reading, and you’ll learn exactly what to do.
Tools And Materials Needed
Jacking up floor joists needs specific tools and materials. Using the right gear makes the job safer and easier. Prepare these items before starting.
Hydraulic Jack
A hydraulic jack lifts the joist smoothly. It provides strong, steady support. Choose a jack with enough capacity for your floor load.
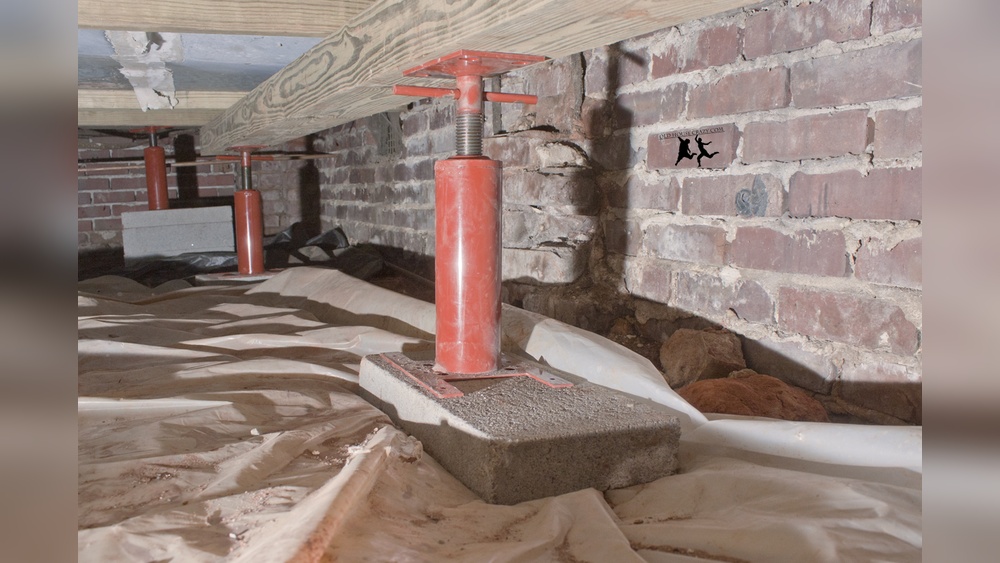
Steel Jack Posts
Steel jack posts hold the joist in place after lifting. They prevent the joist from falling back down. Adjustable posts are best for different heights.
Wooden Shims
Wooden shims fill small gaps between the post and joist. They help make the support firm and stable. Use several thin shims for better fit.
Safety Gear
Wear gloves and safety glasses to protect your hands and eyes. Use sturdy shoes and a dust mask if the area is dusty.
Measuring Tools
Measure the height and gap accurately with a tape measure. A level helps check if the joist is straight after jacking.
Support Blocks
Support blocks made from strong wood give extra stability under the jack or posts. Make sure blocks are solid and even to avoid slipping.
Credit: rogueengineer.com
Assessing The Floor Joist
Assessing the floor joist is an important first step before jacking it. This process helps find problems early and ensures safe repair work. A careful check of the joist’s condition avoids surprises later.
Start by looking closely at the wood’s surface. Check for cracks, bends, or signs of rot. These issues can weaken the joist and cause floor problems. Knowing the joist’s size and shape helps pick the right tools.
Identifying Damage And Weakness
Look for dark spots or soft areas on the wood. These may show water damage or rot. Check for cracks or splits along the joist. Small cracks can grow and cause big problems.
Notice any warping or bending in the wood. Warped joists do not hold weight well. Look for insect damage too. Tiny holes or sawdust can mean wood pests.
Measuring The Joist
Use a tape measure to find the joist’s width and depth. Write down these numbers for reference. Measure the length between supports or beams. This helps understand how much the joist carries.
Measure the spacing between joists as well. Joists spaced too far apart may need extra support. Accurate measurements guide the jacking process. They help choose the right jacks and braces.
Preparing The Area
Preparing the area is the first step to jack floor joists safely and effectively. A clean and secure workspace helps prevent accidents. It also makes the job easier and faster. Taking time to prepare ensures you can focus on the task without distractions.
Clearing The Workspace
Remove all furniture and items from the work area. This gives you room to move and place tools. Sweep the floor to clear dust and small debris. A tidy space reduces tripping hazards. Clear access to the joists by lifting floorboards or removing coverings. Make sure you can see the joists clearly before starting.
Setting Up Safety Measures
Wear safety goggles and gloves to protect your eyes and hands. Use a dust mask to avoid breathing in particles. Place sturdy supports or blocks under the joists for extra strength. Keep a fire extinguisher nearby if you use power tools. Make sure the area is well-lit so you can work safely. Double-check tools and equipment to ensure they are in good condition.
Installing Temporary Supports
Installing temporary supports is a key step in jacking floor joists. These supports hold the weight while you work. They keep the structure safe and stable. Proper installation prevents damage to floors and walls. This process needs care and the right tools.
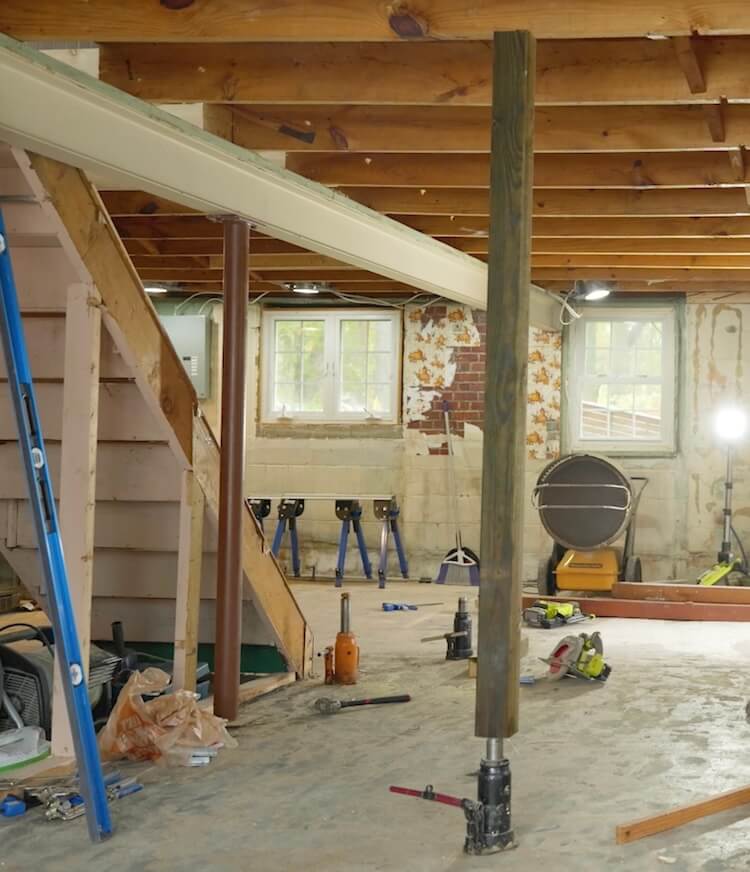
Placing Jack Posts
Jack posts are strong vertical supports. Place them under the joist that needs lifting. Set the base on a solid surface. Use a wooden board under the post to spread the load. Adjust the post height to fit tightly against the joist. Make sure the post is straight and secure. Check the post’s stability before lifting the joist. Add more posts if the area is large or heavy.
Using Adjustable Steel Columns
Adjustable steel columns work well for temporary support. They allow fine height adjustments with a screw mechanism. Position the column under the joist near the jack post. Tighten the screw until it fits firmly against the joist. These columns are strong and resist bending. Use a steel plate between the column and joist to protect the wood. Double-check the column’s alignment and stability. These columns can hold heavy loads safely during the job.
Lifting The Floor Joist
Lifting the floor joist is a key step in jacking your floor. It helps fix sagging or uneven floors. This process needs care and patience to avoid damage. Proper lifting brings the joist back to its correct level. It also stops further floor problems and improves home safety.
Use the right tools and follow safety steps closely. Watch the joist as you lift to keep control. Small movements work best to avoid sudden shifts. Let’s explore how to operate the hydraulic jack and monitor the joist’s movement carefully.
Operating The Hydraulic Jack
Place the hydraulic jack under the floor joist carefully. Make sure the jack stands on a stable surface. Pump the jack handle slowly and steadily. Raise the joist in small, even steps. Stop often to check the joist’s position. Avoid lifting too fast to prevent damage. Use gloves and safety gear while operating the jack. Keep hands clear of moving parts at all times.
Monitoring Joist Movement
Watch the joist closely as it lifts. Look for any cracks or unusual shifts. Use a level tool to check the height. Stop lifting if the joist moves unevenly. Adjust the jack position if needed. Keep checking the joist every few pumps. Make sure the floor stays stable and safe. This careful monitoring helps prevent accidents and damage.

Credit: www.youtube.com
Reinforcing The Joist
Reinforcing the joist is key to strengthening your floor structure. It helps spread the load evenly and prevents sagging or damage. Simple steps can boost the support and extend the life of your floor joists. Focus on adding new joists and securing them properly.
Proper reinforcement improves safety and keeps your floors stable. It also reduces noise and movement. Let’s explore two effective ways to reinforce joists.
Sistering New Joists
Sistering means attaching a new joist next to an old one. This adds extra strength and support. Use a joist of the same size and length. Position it tightly against the damaged or weak joist.
Secure the sister joist with nails or screws every 12 inches. Make sure both joists align well and are level. This method shares the load and reduces bending. It is a simple fix that lasts long.
Adding Blocking And Bracing
Blocking involves placing short pieces of wood between joists. It stops joists from twisting and keeps them in place. Use solid blocks fitted tightly between each joist. Nail them securely on both sides.
Bracing adds diagonal support under the joists. It prevents movement and adds stability. Use metal straps or wood braces at angles. Attach braces firmly to joists and beams. Together, blocking and bracing make the floor stronger and quieter.
Securing The Supports
Securing the supports is a crucial step when jacking floor joists. It ensures the structure stays safe and steady during repairs or adjustments. Proper support prevents accidents and damage to the building.
Supports must be firmly placed and fastened. Loose supports can shift, causing instability. Taking time to secure them properly will save effort later.
Fastening The Jack Posts
Start by positioning the jack posts under the joist. Make sure they are vertical and aligned. Use screws or bolts to fasten the posts to the floor or beams.
Fasten tightly to avoid any movement. Check the hardware for strength and quality. Avoid using nails alone, as they may not hold well.
Checking Stability
Once fastened, test the stability of the supports. Push gently on the posts to see if they move. If they wobble, tighten the fasteners or reposition the posts.
Use a level tool to check vertical alignment. Stable supports keep the joist steady during lifting. Repeat checks regularly during the jacking process.
Final Inspection And Cleanup
After jacking floor joists, the final inspection and cleanup are vital. This step makes sure the floor is safe and steady. Proper checks and tidying keep your work clean and ready for the next phase.
Ensuring Proper Alignment
Check each joist for straightness and height. Use a level to confirm they are even. Make sure the joists line up with nearby beams. Adjust any joist that looks out of place. Proper alignment prevents uneven floors and future problems.
Removing Temporary Tools
Take out all jacks and supports carefully. Do this only after the joists feel secure. Remove nails, screws, and scraps left behind. Clean the work area to avoid hazards. A neat space helps you move safely and prepare for the next steps.

Credit: oldhousecrazy.com
Frequently Asked Questions
What Is The Purpose Of Jacking A Floor Joist?
Jacking a floor joist lifts and supports sagging or damaged joists. It helps restore structural integrity and level floors. This process prevents further damage and maintains safety in your home.
When Should You Jack A Floor Joist?
Jack a floor joist when floors sag, creak, or show signs of damage. It’s essential during renovations or after water damage. Early jacking prevents costly repairs and improves floor stability.
What Tools Are Needed To Jack A Floor Joist?
You need a hydraulic jack or a screw jack, a strong support beam, and safety gear. A pry bar and measuring tools also help ensure proper leveling and support.
How Much Can A Floor Joist Be Safely Jacked?
A floor joist can be safely jacked up to about 1 to 2 inches. Excessive jacking may cause damage. Always jack slowly and monitor for any signs of stress or cracks.
Conclusion
Jacking floor joists helps fix sagging or uneven floors safely. Use the right tools and work slowly to avoid damage. Check the joists often during the process for best results. Keep safety in mind and never rush the job. With careful steps, your floors will feel strong and steady again.
This simple task can save you money and effort over time. Remember, patience and care make all the difference.