
Changing the keys to your Kwikset deadbolt lock might sound tricky, but it’s easier than you think. Whether you’ve lost a key, moved into a new home, or want to boost your security, rekeying your lock puts control back in your hands.
In this guide, you’ll discover simple steps that save you time and money—no need to call a locksmith. Keep reading, and you’ll have your Kwikset deadbolt working with new keys in no time.

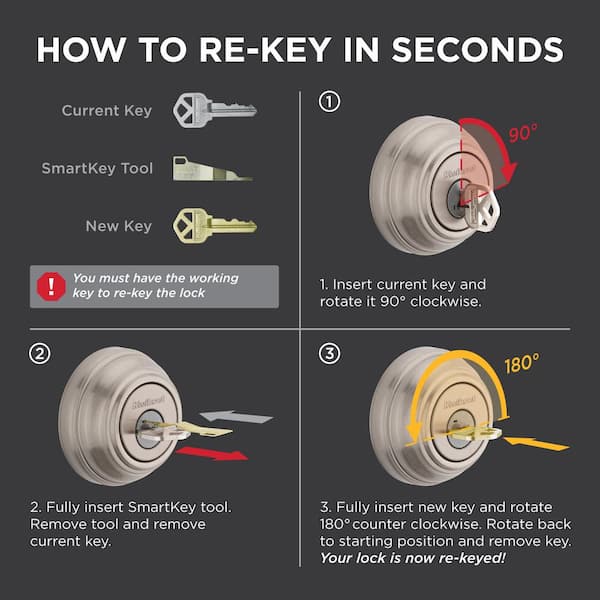
Credit: www.ifixit.com
Tools Needed
Before starting to rekey a Kwikset deadbolt lock, gather the right tools. Having the correct tools makes the process easier and faster. It helps avoid damage to the lock or door. Some tools are essential, while others make the task more convenient. Knowing what each tool does improves your confidence and results.
List Of Essential Tools
- Phillips head screwdriver – to remove screws from the lock.
- Flathead screwdriver – helps pry parts gently.
- Kwikset rekeying kit – includes new keys and pins needed for rekeying.
- Tweezers – to handle small pins inside the lock cylinder.
- Plug follower – pushes the plug out without losing pins.
Optional Tools For Convenience
- Magnifying glass – helps see tiny pins clearly.
- Small tray – keeps pins and screws from getting lost.
- Work gloves – protect your hands during the process.
- Flashlight – provides extra light in tight spaces.
- Needle-nose pliers – useful for gripping and adjusting small parts.
Preparing The Lock
Preparing the Kwikset deadbolt lock is the first step to rekeying it. This part is important to do the job right. You need to handle the lock carefully to avoid damage. Follow each step slowly and clearly.
Removing The Deadbolt
Start by removing the screws on the inside of the door. These screws hold the lock together. Use a screwdriver that fits well. Keep the screws safe for later use.
Next, pull off the interior lock plate. This gives access to the lock mechanism. Then, slide out the deadbolt from the door edge. Be gentle to avoid breaking any parts.
Inspecting Lock Components
Check all parts of the lock for damage or dirt. Look at the cylinder, pins, and springs. Clean any dust or grime with a soft cloth. Replace parts that look worn or broken.
Make sure the cylinder turns smoothly. If it sticks, fix it before rekeying. Proper inspection saves time and avoids problems later.
Removing The Cylinder
Removing the cylinder is the first key step in rekeying a Kwikset deadbolt lock. This part holds the pins and springs that control the lock’s operation. Taking it out carefully helps avoid damage and makes rekeying easier.
Follow clear steps to find and remove the cylinder safely. Keep tools ready and work slowly to prevent mistakes.
Locating The Cylinder Retaining Screw
Start by opening the door and looking at the edge where the lock sits. Find the small screw that holds the cylinder in place. This screw is usually near the bottom of the lock body.
Use a screwdriver to loosen this screw. Do not remove it completely yet; just loosen it enough to allow the cylinder to move.
Extracting The Cylinder Safely
With the retaining screw loose, gently pull the cylinder out from the lock. Hold the cylinder firmly but do not force it. If it does not come out easily, check if the screw is fully loosened.
Once free, place the cylinder on a clean surface. This part is delicate and must stay clean for rekeying. Avoid dropping or damaging it during removal.
Changing The Pins
Changing the pins in your Kwikset deadbolt is a key step to match the lock with your new keys. This process makes sure only your new keys can open the door. It involves picking pins that fit the cuts on your new keys. Each pin must be the right size for smooth operation.
Matching Pins To New Keys
Each key cut has a specific depth. Pins must match these depths exactly. Use your new key as a guide. Hold the key next to a set of pins. Choose pins that line up with the key’s cuts. This step ensures the lock turns easily with your new key.
Using The Pinning Chart
A pinning chart helps you find the correct pin sizes. It shows the pin size for each cut depth. Use the chart to check the pins before putting them in. This reduces mistakes and saves time. Keep the chart handy throughout the process.
Inserting New Pins Correctly
Insert pins carefully into the plug holes. Make sure each pin sits fully inside. Avoid pushing pins too deep or leaving them too high. The pins should sit flush with the plug surface. Test the key to confirm pins fit well and turn smoothly.
Reassembling The Lock
Reassembling the lock is the final step in rekeying your Kwikset deadbolt. This step ensures that the lock works smoothly with the new key. Careful assembly keeps your door secure and functional.
Take your time to put the parts back correctly. Missing or misplacing small pieces can cause the lock to jam or fail. Follow each step with focus and patience.
Reinstalling The Cylinder
Start by placing the cylinder back into the lock housing. Align it carefully so the keyway fits perfectly.
Push the cylinder until it sits flush with the lock face. Avoid forcing it to prevent damage.
Secure the cylinder using the retaining clip or screws you removed earlier. Tighten them firmly but gently.
Test the cylinder by inserting the new key. It should turn smoothly without resistance.
Securing The Deadbolt
Slide the deadbolt into the door edge. Make sure it moves freely inside the lock case.
Attach the lock assembly to the door with screws. Use a screwdriver to tighten them evenly.
Check the deadbolt’s operation by turning the key and thumb turn. Both should extend and retract the bolt easily.
Adjust any parts if the deadbolt sticks or feels loose. Proper fitting ensures your door locks securely.
Credit: www.homedepot.com
Testing The Rekeyed Lock
Testing the rekeyed Kwikset deadbolt lock is a key step in the process. It ensures the lock works smoothly and keeps your home safe. This step confirms the new key fits correctly and operates the lock without any problem.
Without proper testing, the lock might jam or fail to turn. Testing helps catch these issues early. It saves time and effort later on.
Checking Key Operation
Insert the new key into the lock gently. Turn the key slowly to the unlock position. It should turn smoothly without sticking or resistance.
Next, lock the deadbolt by turning the key in the opposite direction. The bolt must extend fully and lock securely. Repeat this process several times to confirm consistent operation.
Try the key in both directions to check full range of motion. The key should slide in easily and turn without force. Any difficulty might mean the lock needs adjustment.
Troubleshooting Common Issues
If the key sticks or won’t turn, remove it and inspect for dirt or debris. Clean the key and lock cylinder with a soft cloth. Avoid harsh chemicals that can damage the lock.
Check if the lock cylinder is seated correctly inside the housing. Sometimes, slight misalignment can cause problems. Loosen screws and realign if needed, then retighten securely.
Try using a small amount of graphite lubricant in the keyhole. It can improve key movement without attracting dust. Avoid oil-based lubricants as they can gum up the lock.
If issues persist, review the rekeying steps. The pins might not be set properly. Recheck the pin sizes and placement to fix common errors.
Tips For Smooth Rekeying
Rekeying a Kwikset deadbolt lock can be a simple task with the right approach. Small details make a big difference. Following some key tips helps the process go smoothly and avoids common mistakes. This section shares practical advice to keep your work easy and efficient.
Maintaining Clean Work Area
Keep your work area tidy and free of clutter. A clean space helps you find tools and parts quickly. Dust and dirt can cause problems inside the lock. Wipe surfaces before you start and clear away any trash. Good lighting also helps you see small parts clearly. Organize tools within reach to save time.
Handling Small Parts Carefully
Kwikset locks have tiny pins and springs that are easy to lose. Handle each piece with care and place them on a flat surface. Use a small container or tray to hold parts safely. Avoid rushing to prevent dropping or mixing parts. Use tweezers if needed for better control. Take your time for better results.

Credit: www.youtube.com
Frequently Asked Questions
How Do I Rekey A Kwikset Deadbolt Lock?
To rekey a Kwikset deadbolt, remove the lock cylinder first. Use a rekeying kit to change the pins inside. Follow the kit’s instructions carefully for smooth rekeying. Test the new key before reinstalling the lock.
What Tools Are Needed To Rekey Kwikset Locks?
You need a Kwikset rekeying kit, a screwdriver, and a follower tool. The kit includes replacement pins and keys. These tools help you remove and reassemble the lock cylinder safely and correctly.
Can I Rekey A Kwikset Deadbolt Myself?
Yes, rekeying a Kwikset deadbolt is DIY-friendly. It requires basic tools and a rekeying kit. Follow step-by-step instructions carefully to avoid damage. It saves money compared to calling a locksmith.
How Long Does It Take To Rekey Kwikset Locks?
Rekeying a Kwikset deadbolt typically takes 15 to 30 minutes. Time varies depending on your experience. With practice, the process becomes quicker and easier to perform at home.
Conclusion
Rekeying a Kwikset deadbolt is easier than it seems. Follow each step with care and patience. Take your time to avoid mistakes. You can save money by doing it yourself. Keep your home safe with a fresh key setup. Practice helps you get better at the process.
Don’t forget to test the new key before finishing. Stay confident and protect your space. Simple tools and clear steps make rekeying smooth. Try it today and feel the difference.


