Have you ever tried to hang something on your wall, only to have the anchor break off inside? It’s frustrating, isn’t it?
That little broken anchor can leave you stuck, unsure how to fix the problem without damaging your wall. But don’t worry—you’re not alone, and there’s a way to get it out quickly and easily. You’ll discover simple, effective steps to remove that broken anchor and get your wall ready for your next project.
Keep reading, because the solution is easier than you think.
Identify The Anchor Type
To remove a broken anchor from a wall, you must first identify its type. Each anchor works differently and needs a unique approach. Knowing the kind of anchor helps you choose the right tools and method. This step saves time and prevents damage to your wall.
Plastic Expansion Anchors
Plastic expansion anchors are common in drywall. They are small, hollow tubes that expand when a screw is inserted. These anchors are easy to spot because they are usually white or beige plastic. They grip the wall by pressing outward as the screw goes in.
Toggle Bolts
Toggle bolts have metal wings that open inside the wall. These wings provide strong support behind the drywall. They are larger and heavier than plastic anchors. You can identify them by a long bolt with a spring-loaded wing.
Molly Bolts
Molly bolts are metal anchors that expand inside the wall. They have a sleeve that spreads open when tightened. These anchors look like small metal tubes with a screw inside. They provide strong hold in drywall and plaster.
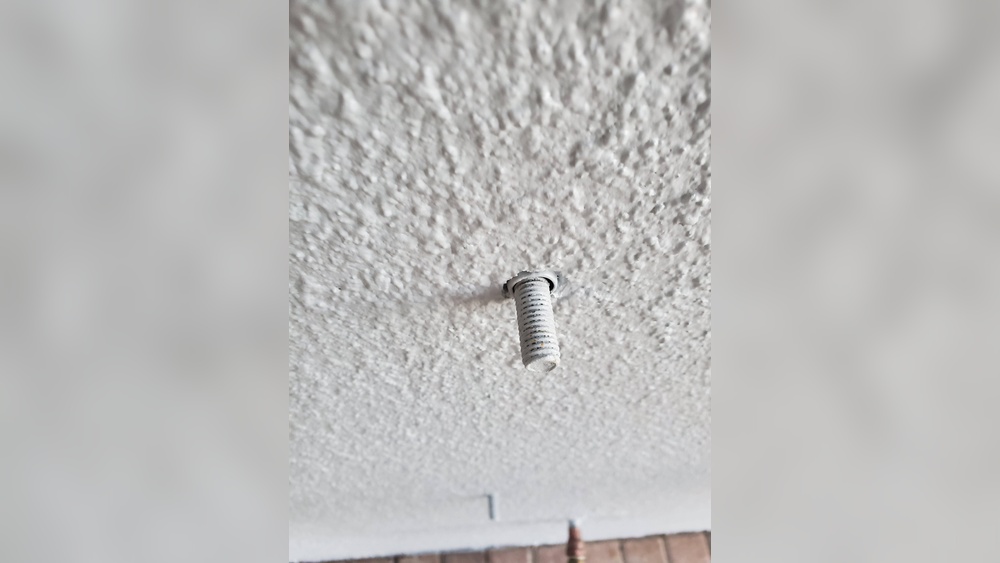
Threaded Drywall Anchors
Threaded drywall anchors screw directly into the wall without a drill. They have sharp threads and are often plastic or metal. These anchors look like large screws with wide threads. They create their own hole and hold tightly.

Credit: www.reddit.com
Gather Necessary Tools
Before removing a broken anchor from a wall, gather the right tools. Having these tools ready makes the task easier and faster. It also helps protect your wall from damage during the process. Here is a list of essential tools you will need.
Screwdrivers And Pliers
Screwdrivers help you unscrew any visible parts of the anchor. Use a flathead or Phillips screwdriver depending on the anchor type. Pliers are useful for gripping and pulling out the broken piece. Needle-nose pliers work best for small or hard-to-reach anchors.
Drill And Drill Bits
A drill can create holes around the anchor if it is stuck deep inside the wall. Choose drill bits that match the size of the broken anchor. Drilling carefully around the anchor loosens it without harming the wall too much.
Utility Knife
Use a utility knife to cut around the anchor or remove excess drywall. It helps clean the area and gives better access to the broken piece. Be careful while cutting to avoid making large holes in the wall.
Vacuum Cleaner
Removing a broken anchor often creates dust and small debris. A vacuum cleaner helps keep the work area clean. Use a vacuum with a narrow nozzle to suck up dust from the wall and floor.
Remove The Broken Anchor
Removing a broken anchor from a wall can be tricky. The anchor may be stuck deep or broken inside the hole. Careful removal avoids wall damage and prepares the spot for a new anchor. Several simple methods help pull out or push through the broken piece.
Pulling Out With Pliers
Try grabbing the broken anchor with needle-nose pliers. Grip it firmly and pull straight out. Wiggle the anchor gently if it feels stuck. This method works best when part of the anchor sticks out. Avoid squeezing too hard to prevent breaking it further.
Pushing The Anchor Through
If the anchor sits flush or below the wall surface, push it through. Use a long, thin tool like a screwdriver or punch. Tap the tool gently with a hammer to move the anchor inside the wall cavity. This clears the hole for patching or a new anchor.
Drilling Out The Anchor
Drill the anchor out with a bit slightly smaller than the anchor’s diameter. Drill slowly to avoid wall damage. The anchor will break up or spin inside the hole. Remove any loose pieces with pliers or a vacuum. This method suits plastic or metal anchors.
Cutting And Extracting Remnants
Use a utility knife or small saw to cut off any anchor parts flush with the wall. Then, insert a hook or thin tool to pull out remaining bits. Clean the hole fully before filling or installing a new anchor. This step ensures a strong hold next time.
Repair The Wall Hole
Repairing the wall hole after removing a broken anchor is an important step. It restores the wall’s look and prepares it for new use. Fixing the hole properly prevents damage and keeps the wall strong.
Cleaning The Hole
Start by removing loose debris inside the hole. Use a brush or vacuum to clear dust and dirt. A clean hole helps the filler stick better. Check for any remaining anchor pieces and remove them.
Filling With Spackle Or Joint Compound
Apply spackle or joint compound with a putty knife. Press the filler into the hole firmly. Smooth the surface by spreading the compound evenly. Let it dry fully according to the product instructions.
Sanding For Smooth Finish
Once dry, sand the filled area gently. Use fine-grit sandpaper to avoid rough spots. Sand until the surface is flush with the wall. Wipe away dust with a damp cloth after sanding.
Priming And Painting
Apply a coat of primer to the repaired spot. Primer helps paint stick and hides the patch. After the primer dries, paint over the area. Match the wall color for a seamless finish.
Prevent Future Anchor Issues
Preventing future anchor problems starts with smart choices and careful work. Avoiding broken anchors saves time, effort, and wall damage. Follow these tips to keep anchors secure and strong.
Choosing The Right Anchor Type
Select anchors that match your wall material and project needs. Drywall, concrete, and brick each need different anchors. Use plastic anchors for light loads and metal ones for heavier items. Right anchors hold better and reduce breakage risk.
Proper Installation Techniques
Drill holes to the correct size, not too big or small. Clean holes before inserting anchors. Push anchors flush with the wall surface. Tighten screws gently to avoid stress on the anchor. Proper steps prevent anchors from breaking or slipping.
Weight Limits And Load Considerations
Check the weight capacity of each anchor type. Avoid placing heavy objects on anchors made for light loads. Spread weight across multiple anchors if needed. Respecting weight limits keeps anchors intact and walls safe.

Credit: diy.stackexchange.com

Credit: www.youtube.com
Frequently Asked Questions
How Can I Safely Remove A Broken Anchor From Drywall?
To safely remove a broken anchor from drywall, use pliers to grip and pull it out gently. If it’s stuck, create a small hole around it and pry carefully. Avoid damaging the wall further during removal.
What Tools Do I Need To Extract A Broken Wall Anchor?
Common tools include needle-nose pliers, a screwdriver, a drill, and a utility knife. These help grip, loosen, or cut the anchor for easy removal without damaging the wall.
Can I Patch The Wall After Removing A Broken Anchor?
Yes, after removing the anchor, fill the hole with spackle or wall filler. Sand the area smooth once dry, then repaint for a seamless finish.
Why Did My Wall Anchor Break Inside The Wall?
Wall anchors can break due to over-tightening, using the wrong size, or poor-quality materials. Applying too much force often causes the anchor to snap inside the wall.
Conclusion
Removing a broken anchor from a wall does not have to be hard. With the right steps and tools, you can fix it quickly. Take your time and follow the tips carefully. This will help you avoid damage and get the job done right.
Soon, your wall will look clean and ready for new anchors. Keep calm, work safely, and you will succeed.