Want to hang something on your wall but don’t have a drill? You’re not alone.
Many people struggle with finding the right tools or worry about making holes the wrong way. The good news is, you don’t always need a drill to put anchors in your wall. In this guide, you’ll discover simple, effective ways to secure anchors without any heavy equipment.
By the end, you’ll feel confident tackling your wall projects quickly and easily. Keep reading, and learn how to get the job done right—no drill required!

Credit: www.reddit.com
Choose The Right Anchor
Choosing the right anchor is key to hanging items without a drill. The right anchor holds weight and fits the wall type. Using the wrong anchor can cause damage or failure. Understanding different anchors helps you pick the best one for your project.
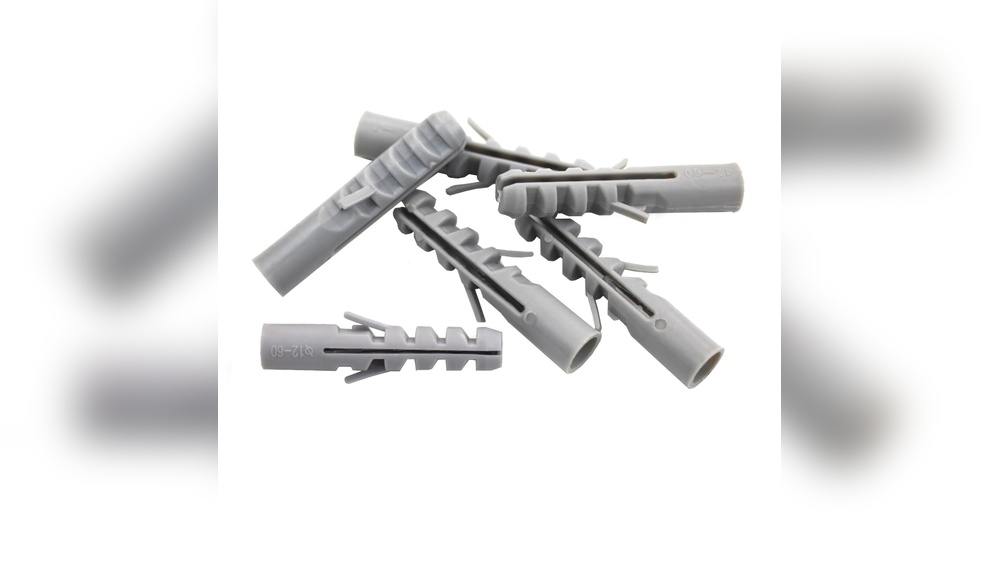
Types Of Anchors For Drill-free Use
Self-drilling anchors work well in drywall and plaster. They have sharp tips that twist into the wall. Plastic expansion anchors expand as you push a screw in. They fit tightly without a drill hole. Adhesive anchors stick to the wall surface. They hold light items without drilling. Toggle anchors use a spring mechanism to open behind the wall. They support heavier loads without a drill hole.
Materials Suitable For Anchors
Drywall is the most common surface for drill-free anchors. Plastic and metal anchors work best here. Plaster walls need anchors that won’t crack the surface. Self-drilling and toggle anchors are good choices. Hollow walls require anchors that spread the load wide. Toggle anchors fit this need perfectly. Concrete or brick walls usually need a drill. But some adhesive anchors can work on smooth concrete surfaces.
Prepare The Wall Surface
Preparing the wall surface is the first step to put anchors without a drill. A clean and well-marked wall makes the job easier. It also helps the anchors hold strong. Taking time to check the wall type is important. Different walls need different anchor methods. Proper preparation saves effort and prevents damage.
Cleaning And Marking Spots
Start by cleaning the wall area. Remove dust, dirt, and grease with a cloth. A clean surface helps anchors stick better. Next, mark the exact spots for your anchors. Use a pencil for light, clear marks. Measure twice to place marks correctly. Precise marks guide you during the anchor installation.
Checking Wall Material
Identify what type of wall you have. Is it drywall, plaster, brick, or concrete? Each wall type needs a different anchor approach. Drywall requires special anchors that spread behind the wall. Brick and concrete may need tougher anchors. Knowing the wall type helps choose the right anchor and tools.
Use Hammer-in Anchors
Using hammer-in anchors is a quick way to hang items without a drill. These anchors work well on drywall and plaster walls. They need only a hammer for installation. This method saves time and effort.
Selecting Hammer-in Anchors
Choose anchors based on the wall type and weight of the item. Plastic or metal anchors work well for light to medium loads. For heavier items, use metal anchors with larger wings. Check the package for weight limits. Pick anchors that fit the screw size you plan to use.
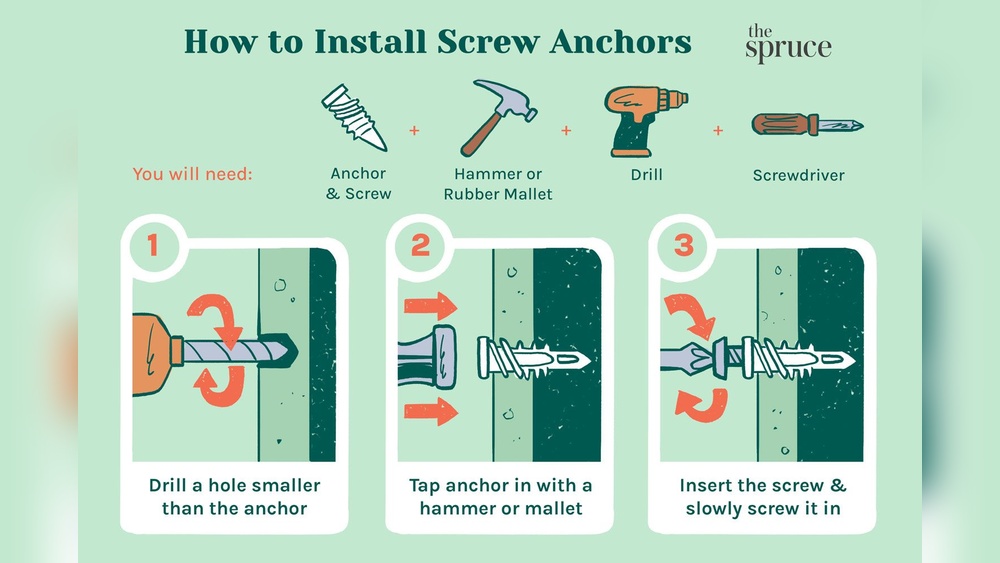
Step-by-step Installation
First, mark the spot on the wall for the anchor. Hold the anchor against the mark. Tap the anchor gently with a hammer. Push it until the anchor is flush with the wall surface. Insert the screw into the anchor. Tighten the screw slowly until secure. Avoid overtightening to prevent damage.
Try Adhesive Wall Hooks
Adhesive wall hooks offer a simple way to hang items without drilling holes. They stick directly to the wall using strong glue. This method protects your walls and saves time. It works well for renters or anyone avoiding damage to surfaces. These hooks hold various items like pictures, keys, or small shelves. Choose the right hook for the weight and type of wall. Proper use ensures they stay in place and hold well.
Best Adhesive Hooks For Heavy Loads
Heavy-duty adhesive hooks are designed to hold more weight safely. Look for hooks with strong adhesive backing. Brands often list weight limits on packaging. Metal hooks with wide bases offer better support. Hooks with rubber grips help prevent slipping. Some hooks use gel adhesive for extra strength. Choose hooks tested for your wall type, like drywall or tile.
Proper Application Techniques
Clean the wall surface before applying the hook. Use rubbing alcohol to remove dirt and grease. Let the surface dry completely. Peel off the backing carefully without touching the adhesive. Press the hook firmly against the wall for 30 seconds. Avoid hanging items immediately; wait 1 hour or more. This allows the glue to bond fully. Check the hook regularly to ensure it stays secure.
Employ Push-in Plastic Anchors
Employing push-in plastic anchors offers a simple way to hang items without a drill. These anchors work well in drywall and light materials. They provide solid support for small to medium objects. Installation is quick and needs only a few basic tools. This method suits beginners and quick fixes around the house.
When To Use Push-in Anchors
Use push-in anchors for lightweight items like picture frames or small shelves. They work best in drywall or plaster walls. Avoid using them on very heavy objects or brick walls. These anchors hold well in areas that don’t bear much weight. They are ideal for renters who cannot drill holes.
Installation Tips
Start by marking the spot where the anchor will go. Use a nail or small screwdriver to create a pilot hole. Push the plastic anchor into the hole until it sits flush with the wall. Tap gently with a hammer if needed, but do not force it. Insert the screw into the anchor and tighten carefully. Avoid over-tightening, which can damage the wall or anchor.

Credit: www.youtube.com
Use Self-drilling Anchors
Using self-drilling anchors is a smart way to hang things without a drill. These anchors work by cutting their own hole as you screw them in. They save time and effort, especially for small jobs around the house.
How Self-drilling Anchors Work
Self-drilling anchors have sharp tips that cut into drywall or plaster. You start by pushing the anchor against the wall. Then, turn it with a screwdriver or a drill on low speed. The anchor screws itself into the wall without needing a separate hole.
As the anchor goes in, its threads grip the wall tightly. This creates a strong hold for screws. The anchor also spreads out behind the wall to hold heavy items.
Benefits Without A Drill
No drill needed. That means less noise and dust. You can work quietly and cleanly. Self-drilling anchors are easy to use with a simple screwdriver.
They are perfect for quick fixes or small projects. These anchors save space since you don’t need to carry a drill. Also, they reduce the risk of making big holes by mistake.
Utilize Alternative Tools
Putting anchors in a wall without a drill is possible with simple tools. You can use tools found in most homes. These alternatives work well for light to medium tasks. They save time and avoid extra costs. Choose the right tool based on your wall type and anchor size.
Using A Screwdriver And Hammer
Start by marking the spot on the wall. Place the anchor where you want it. Use the hammer to gently tap the anchor into the wall. Tap slowly to avoid damage. Once the anchor is in, use a screwdriver to twist it further. This helps the anchor grip the wall tightly. Stop when the anchor feels secure. This method works well on drywall and plaster walls.
Making Pilot Holes With Nails
Choose a nail slightly smaller than the anchor. Hold the nail at the marked spot. Tap the nail gently with a hammer to create a small hole. Remove the nail carefully. The hole helps insert the anchor without cracking the wall. Push the anchor into the pilot hole by hand. Use a hammer if needed, but tap lightly. This method prepares the wall for anchors in hard materials like wood or drywall.
Safety Tips For Drill-free Anchoring
Putting anchors in a wall without a drill is possible and safe. Following safety tips helps protect your wall and keeps the anchor strong. This guide shows key points to avoid damage and secure your items.
Avoiding Wall Damage
Choose the right anchor for your wall type. Use anchors made for drywall or plaster if needed. Test the anchor in a small, hidden area first. Press gently to avoid cracks or holes. Use a hammer softly to tap the anchor in place. Stop if you see cracks or dents forming. Always wear safety glasses to protect your eyes from dust or debris.
Ensuring Secure Hold
Check the anchor fits tightly in the hole. Make sure the wall surface is clean and dry. Avoid heavy items on weak anchors. Use multiple anchors for heavy objects to spread weight. Test the hold by gently pulling on the item. Replace the anchor if it feels loose or slips. Secure anchoring keeps your items safe and stable over time.

Credit: www.youtube.com
Frequently Asked Questions
How Can I Install Wall Anchors Without A Drill?
You can use a hammer and a nail to create a pilot hole. Then, gently tap the anchor into the hole. This method works for drywall anchors and lightweight fixtures.
What Tools Are Needed To Insert Anchors Without Drilling?
You’ll need a hammer, nail or awl, and the appropriate wall anchors. These simple tools help create a hole and secure the anchor without power tools.
Are Wall Anchors Secure Without Drilling?
Yes, if inserted correctly, wall anchors can hold light to medium loads securely. Always choose the right anchor type for your wall material and weight requirements.
Can I Use A Screwdriver To Install Anchors?
A screwdriver helps twist certain anchors into drywall after a pilot hole is made. It’s useful for plastic anchors that screw directly into the wall.
Conclusion
Putting anchors in a wall without a drill is easier than you think. You just need simple tools and a little patience. Using a hammer, screwdriver, or even a nail can work well. Take your time and be careful with the wall material.
This method saves money and avoids noise. Now, you can hang shelves, pictures, or decorations without a drill. Try these steps next time you want to fix something on the wall quickly and safely. Practice makes perfect. You will get better with each try.