If your Sears floor jack isn’t working like it used to, you don’t have to rush out and buy a new one. You can bring it back to life with a simple rebuild.
Imagine saving money and feeling proud as you get your jack lifting smoothly again. In this guide, you’ll find clear, step-by-step instructions that anyone can follow—even if you’re not a mechanic. Keep reading, and you’ll discover how easy it is to fix your floor jack and get back to work without stress or extra costs.

Credit: us.amazon.com
Tools And Materials Needed
Rebuilding a Sears floor jack requires the right tools and materials. Having these items ready makes the job easier and safer. This section lists all essentials for the rebuild process.
Essential Tools
- Socket wrench set for bolts and nuts
- Screwdrivers (flathead and Phillips)
- Pliers for gripping and pulling parts
- Hammer for light tapping
- Wire brush to clean rust and dirt
- Drain pan to catch old hydraulic fluid
- Clean rags for wiping parts
- Lubricant spray for smooth movement
Replacement Parts
- Hydraulic fluid compatible with Sears jacks
- New seals and O-rings to prevent leaks
- Pressure relief valve if damaged
- Replacement pins and springs
- New pump piston or cylinder if needed
Safety Gear
- Safety goggles to protect your eyes
- Mechanic gloves to protect your hands
- Work apron or clothes to stay clean
- Face mask if working with dust or fluid fumes
- Proper lighting to see all parts clearly
Preparing The Floor Jack
Preparing your Sears floor jack is the first step in rebuilding it safely and correctly. This step ensures the jack works well and lasts longer. Taking time to prepare the jack helps avoid problems during the rebuild. It also keeps you safe while working on the jack.
Cleaning The Jack
Start by cleaning the jack thoroughly. Use a cloth to wipe off dirt, grease, and dust. For hard-to-reach areas, use a brush or compressed air. Clean parts show damage better and make rebuilding easier. Avoid water; it can cause rust inside the jack.
Inspecting For Damage
Check the jack carefully for cracks, bends, or broken parts. Look at the lifting arm, wheels, and frame. Notice any rust or worn-out seals. Small issues can cause big problems later. Replace damaged parts before starting the rebuild.
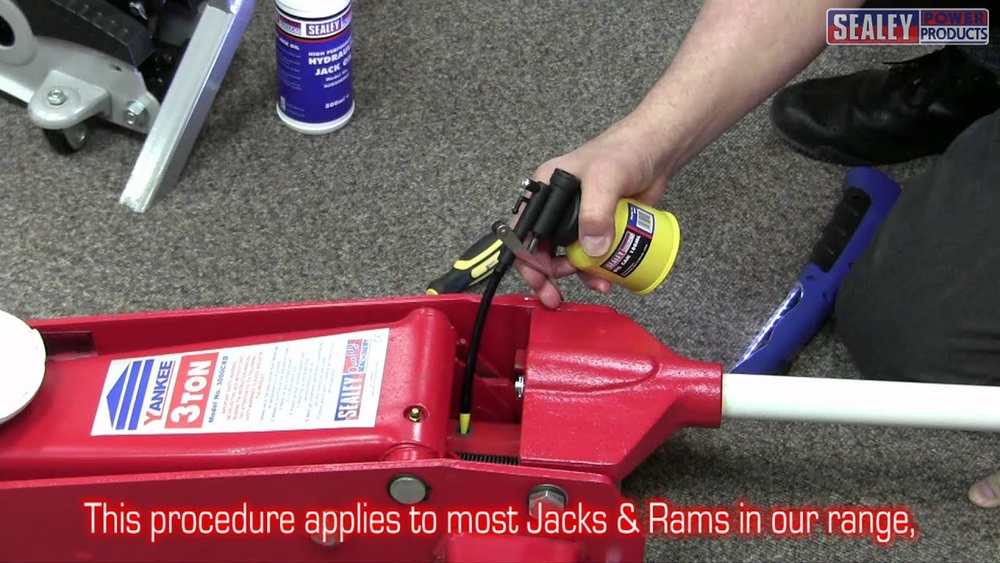
Draining Hydraulic Fluid
Drain the old hydraulic fluid completely. Find the drain plug or remove the pump cover. Let the fluid flow into a container for safe disposal. Old fluid can contain dirt and metal bits. Fresh fluid helps the jack work smoothly and safely.
Disassembling The Jack
Disassembling the Sears floor jack is the first step in rebuilding it. This process helps you see all parts clearly. It also makes cleaning and fixing easier. Be careful and patient while taking the jack apart. Keep all small pieces safe to avoid losing them. Follow each step closely for best results.
Removing The Handle
Start by removing the jack handle. Look for the pin or bolt holding it in place. Use pliers or a wrench to pull out the pin. Slide the handle out gently. Set the handle aside on a clean surface. This step frees the handle from the jack body.
Taking Apart The Hydraulic System
Next, focus on the hydraulic system. Remove the hydraulic cylinder cover carefully. Use a wrench to loosen bolts around the cylinder. Pull the cylinder from the frame slowly. Watch for hydraulic fluid leaks. Drain the fluid into a container. Keep the seals and pistons safe for later cleaning or replacement.
Separating The Frame Components
Finally, separate the main frame parts. Unscrew all bolts connecting the base and lifting arm. Remove the lifting arm from the base. Check for rust or damage on all frame parts. Clean each part with a cloth before rebuilding. Organize the pieces to keep track of them easily.
Replacing Worn Components
Replacing worn components is a key step in rebuilding a Sears floor jack. Old parts can cause leaks and reduce lifting power. Changing these parts restores the jack’s strength and safety. This section covers the main parts that often need replacement.
Changing Seals And O-rings
Seals and O-rings keep the hydraulic fluid inside the jack. Over time, they dry out and crack. This leads to leaks and weak lifting. Remove the old seals carefully using a small tool. Clean the grooves before placing new seals. Lubricate the new O-rings with hydraulic oil. Press them firmly in place to prevent leaks.
Replacing The Hydraulic Piston
The hydraulic piston pushes the fluid to lift heavy loads. A worn piston can cause slow or uneven lifting. Remove the old piston by loosening the retaining bolts. Check for scratches or damage on the piston surface. Install a new piston that fits your jack model. Tighten the bolts securely to avoid leaks and ensure smooth operation.
Fixing Or Replacing Springs
Springs help return the jack to its resting position. Broken or weak springs cause the jack to stay down or move slowly. Inspect the springs for any signs of wear or damage. Small bends can be fixed by carefully bending back to shape. Replace springs that are broken or too weak. Use parts designed for your Sears floor jack model.
Reassembling The Floor Jack
Reassembling the floor jack is the final step in bringing it back to life. Careful attention ensures it works smoothly and safely. Follow each step with patience. Organize parts and tools before starting.
Start by putting the hydraulic parts back. These parts control the lifting power and need correct placement. Then, seal and lubricate all moving parts. This keeps the jack working without friction or leaks. Lastly, reattach the handle. The handle lets you pump the jack up and down.
Reinstalling Hydraulic Parts
Place the hydraulic cylinder carefully into its housing. Make sure the piston moves freely without sticking. Insert the seals and rings exactly where they were before. Tighten any bolts or screws securely. Check for any damage before final assembly. Proper fitting prevents fluid leaks and loss of pressure.
Sealing And Lubricating Moving Parts
Apply a thin layer of grease on all pivot points. Use hydraulic oil for seals and internal parts. Avoid over-lubricating to prevent dirt build-up. Replace any worn seals with new ones. Proper sealing stops fluid from leaking out. Lubrication ensures smooth movement and less wear.
Reattaching The Handle
Align the handle with the pump shaft carefully. Insert the handle pin or bolt to secure it. Test the handle by pumping slowly at first. It should move smoothly without resistance. Tighten all fasteners firmly but avoid overtightening. A good handle fit gives full control over lifting.

Credit: www.youtube.com
Refilling And Testing
Refilling and testing are key steps in rebuilding a Sears floor jack. These steps ensure the jack works safely and smoothly. Proper fluid levels and no air in the system keep the jack strong. Testing confirms it can lift loads without issues. Follow each step carefully for the best results.
Adding Hydraulic Fluid
Start by removing the fill plug on the jack. Use the correct hydraulic fluid for your model. Slowly pour the fluid into the reservoir. Fill until the fluid reaches the recommended level. Avoid overfilling, as it can cause leaks or damage. Replace the fill plug securely after filling.
Bleeding Air From The System
Air trapped inside the hydraulic system can cause poor lifting. Open the release valve slightly. Pump the handle several times to push air out. Watch for bubbles escaping with the fluid. Close the release valve once no more air appears. Repeat if the jack feels spongy or weak.
Performing Load Tests
Place the jack under a sturdy object for testing. Pump the handle to lift the load slowly. Check for smooth, steady lifting without jerks. Hold the load lifted for a few minutes. Watch for any fluid leaks or pressure drops. Lower the load carefully and test again if needed.
Maintenance Tips For Longevity
Keeping your Sears floor jack in good shape helps it last longer. Simple care routines protect its parts. These steps save you time and money. Follow easy maintenance tips to ensure smooth operation every time.
Regular Cleaning
Remove dirt and grease after each use. Wipe the jack with a clean cloth. Avoid using harsh chemicals that may damage metal. Clean moving parts carefully to prevent buildup. This stops rust and keeps the jack working well.
Proper Storage
Store the floor jack in a dry place. Avoid wet or damp areas to prevent rust. Keep it covered to block dust and debris. Store the jack lowered to reduce pressure on parts. Proper storage protects the jack’s condition over time.
Routine Inspections
Check the jack before each use. Look for leaks, cracks, or worn parts. Test the handle and wheels for smooth movement. Tighten any loose bolts or screws. Early detection of problems prevents bigger damage later.

Credit: us.amazon.com
Frequently Asked Questions
How Do I Rebuild A Sears Floor Jack Safely?
Start by cleaning all parts thoroughly. Inspect for worn or damaged components. Replace seals, gaskets, and hydraulic fluid. Follow the manufacturer’s manual step-by-step. Use proper tools and wear safety gear. Test the jack after reassembly to ensure safety and function.
What Tools Are Needed To Rebuild A Sears Floor Jack?
You need wrenches, screwdrivers, pliers, a hammer, and a hydraulic fluid pump. Also, have replacement seals, gaskets, and hydraulic oil ready. A clean workspace and safety gloves help. Proper tools ensure smooth disassembly and reassembly without damage.
How Often Should I Rebuild My Sears Floor Jack?
Rebuild your floor jack every 2 to 3 years or when it shows leaks or poor lifting. Regular maintenance extends its lifespan and ensures safe operation. Check hydraulic fluid and seals periodically to decide if rebuilding is necessary.
What Common Problems Require Rebuilding A Sears Floor Jack?
Leaking hydraulic fluid, poor lifting performance, or a jack that won’t hold pressure. Worn seals, gaskets, or rusty parts often cause these issues. Rebuilding fixes these problems and restores proper function for safe use.
Conclusion
Rebuilding a Sears floor jack is a useful skill to save money. Take your time and follow each step carefully. Clean parts well and replace any worn pieces. Test the jack often to ensure it works safely. With patience, you can restore your jack to good condition.
This project helps keep your tools working longer. Keep your jack maintained to avoid future problems. Simple care makes a big difference in performance. Now, you can handle repairs with confidence and ease.