Are you struggling to remove a Kwikset deadbolt but don’t see any screws? You’re not alone.
Many people get stuck trying to take off these locks because they look different from regular deadbolts. But don’t worry — removing a Kwikset deadbolt without visible screws is easier than you think. In this guide, you’ll discover simple, step-by-step methods to get the job done quickly and safely.
Keep reading, and you’ll have your deadbolt off in no time.
Identify The Kwikset Deadbolt Type
Identifying the type of Kwikset deadbolt is the first step in removing it without screws. Different models have different designs. Knowing your deadbolt type helps choose the right removal method. This prevents damage and saves time.
Kwikset deadbolts come in screw and screwless versions. Each has unique features. Understanding these differences makes the removal process clearer and easier.
Differentiate Between Screw And Screwless Models
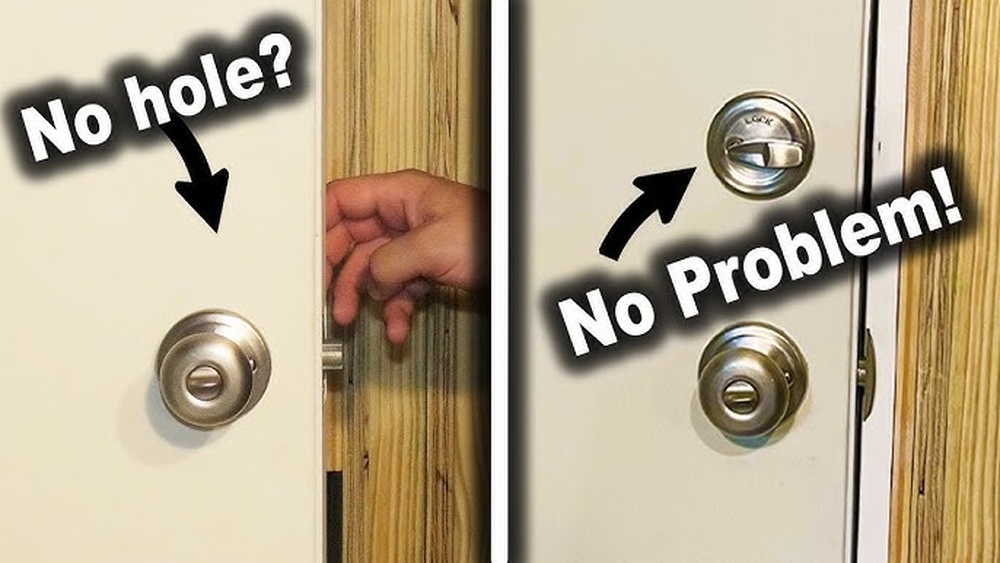
Screw models show visible screws on the faceplate or inside the lock. These screws hold the lock parts firmly in place. Screwless models hide these screws well or use clips instead. Look closely at both sides of the lock. If you see no screws, it is likely a screwless model.
Screwless models often have smooth, clean surfaces. The lock might seem like one solid piece. This design can confuse many. Check for small gaps or seams that might hide clips or fasteners.
Check For Hidden Fasteners
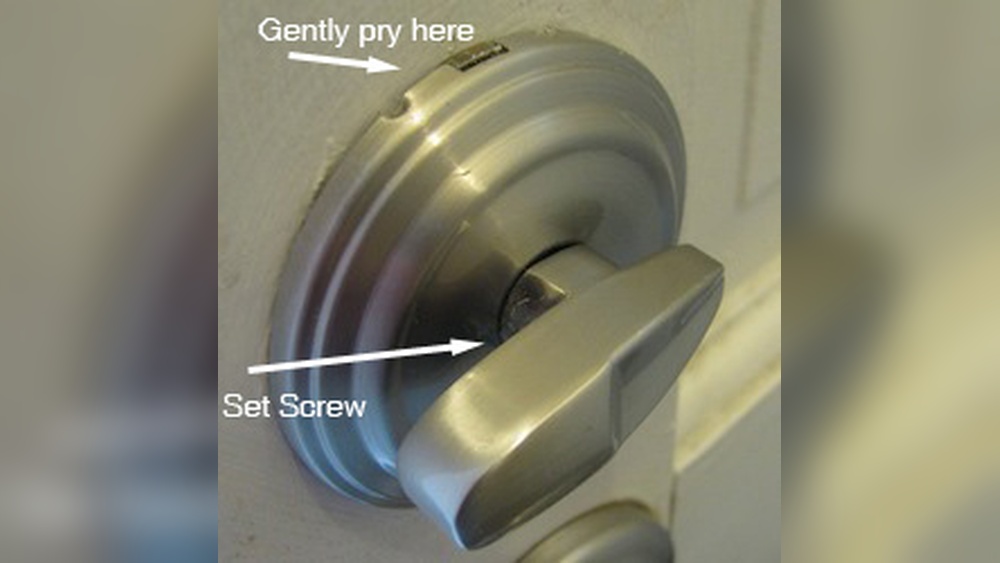
Some Kwikset deadbolts use hidden fasteners instead of screws. These can be small clips or pins inside the lock. Use a flashlight to look inside the keyhole or bolt area. Look for tiny holes or slots. These often hold the clips or release mechanisms.
Try gently pressing or sliding parts near the seam. Some clips release with slight pressure. Use a flat tool to carefully pry around edges. Avoid forcing the lock to prevent damage. Knowing where hidden fasteners are makes removal easier and safer.

Credit: diy.stackexchange.com
Gather Necessary Tools
Gathering the right tools is the first step to remove a Kwikset deadbolt with no visible screws. Having these tools ready makes the process smoother and faster. It helps avoid damage to the lock or the door.
Essential Tools For Removal
A flathead screwdriver is a must-have for prying and gently lifting parts. A Phillips screwdriver might come in handy for some models. A small putty knife can help to slide between parts without scratching the door. Needle-nose pliers are useful for pulling out small pieces or pins. A flashlight helps to see inside tight spaces.
Optional Tools For Stubborn Locks
A hairdryer can soften any glue or paint blocking the lock. A rubber mallet helps tap parts loose without damage. A thin metal shim or credit card may slide between the lock and door to release clips. A drill with a small bit is a last resort to create a small hole if needed. Safety gloves protect your hands from sharp edges and pinches.
Prepare The Lock For Removal
Preparing the Kwikset deadbolt for removal is important for a smooth process. This step helps avoid damage to the door and lock. Taking time to prepare ensures easier handling of the lock parts.
Ensure The Door Is Unlocked
First, check if the door is unlocked. This makes removing the lock simpler and safer. Try turning the knob or handle to confirm the lock is open. Do not force the lock if it does not move easily.
Protect Door Surface
Next, protect the door surface from scratches or dents. Use painter’s tape or a soft cloth around the lock area. This layer acts as a shield during lock removal. It keeps the door looking good after the job is done.

Credit: www.youtube.com
Remove The Interior Thumb Turn
Removing the interior thumb turn is the first step in taking off a Kwikset deadbolt with no screws. This part controls the lock from inside the door. Removing it allows access to the lock mechanism. The process is simple but needs care.
Start by finding the right spot on the thumb turn. Then use a flat tool to gently release it. This step lets you pull the thumb turn off smoothly.
Locate The Release Mechanism
Look closely at the base of the thumb turn. You will see a small slot or tab. This is the release mechanism. It holds the thumb turn in place. Press or slide it gently. This action frees the thumb turn from the lock body.
Use A Credit Card Or Flat Tool
Take a plastic card or a flat tool like a flathead screwdriver. Insert it into the slot or under the thumb turn edge. Push the release mechanism carefully. Do not force it to avoid damage. Once the lock releases, pull the thumb turn straight off. Keep the tool handy for the next steps.
Separate The Exterior Lock Cylinder
Separating the exterior lock cylinder is a key step in removing a Kwikset deadbolt without screws. This part holds the keyhole and controls the lock’s internal mechanism. Removing it carefully prevents damage and makes the rest of the process easier.
Take your time and follow the steps below to slide off and handle the lock cylinder safely.
Slide Off The Exterior Part
Start by locating the small gap between the lock’s exterior and the door. Gently push or wiggle the exterior part to slide it off. Avoid using too much force to stop scratches or breaks.
If it feels stuck, try turning the key slightly while sliding. This can help release the lock cylinder smoothly.
Handle Lock Cylinder Carefully
Once removed, hold the lock cylinder with care. It contains delicate parts that can break if dropped. Place it on a soft surface to protect it from damage.
Keep track of any small pieces or springs that may come loose. These parts are important for reassembly or replacement.

Credit: www.youtube.com
Detach The Deadbolt From The Door
Detaching a Kwikset deadbolt from a door without screws may seem tricky. This step is key to removing the lock safely. Follow clear steps to avoid damage to the door or lock. Focus on careful handling and patience.
Remove The Faceplate
The faceplate covers the deadbolt mechanism on the door edge. It usually snaps or slides in place. Use a flat tool like a putty knife to gently pry it off. Work slowly to prevent scratching the door. Once loose, pull the faceplate away from the door.
Slide Out The Deadbolt Mechanism
The deadbolt mechanism sits behind the faceplate inside the door. With the faceplate removed, grip the deadbolt firmly. Slide it straight out from the door edge. Sometimes it needs a small wiggle to free it. Keep the movement steady to avoid damage.
Troubleshoot Common Issues
Troubleshooting common issues helps you remove a Kwikset deadbolt with no screws. Some problems can block your progress. Understanding these issues can save time and effort. The right approach makes the process easier and safer.
Handle Stuck Or Jammed Deadbolts
A stuck or jammed handle stops the deadbolt from moving. Dirt and rust often cause this problem. Try to gently wiggle the handle back and forth. Use a flat tool to lift the cover plate carefully. Avoid forcing the handle to prevent damage. Check if the latch moves freely inside the door edge. Sometimes, the deadbolt needs a small push to unlock.
When To Use Lubricants
Lubricants help when parts feel tight or sticky. Use graphite or silicone spray for locks, not oil-based products. Spray a small amount into the keyhole and around the bolt. Wait a few minutes to let the lubricant work. Avoid overuse, as this can attract dust and dirt. Proper lubrication improves the lock’s movement and makes removal easier.
Tips For Installing A New Deadbolt
Installing a new deadbolt can improve your door’s security and appearance. Follow some simple tips to make the process smooth and effective. Proper steps help avoid mistakes and ensure the lock works well.
Take your time and prepare all tools before starting. Clear instructions make the job easier and faster. Focus on the details to get the best results.
Choose The Right Replacement
Pick a deadbolt that fits your door’s thickness and style. Match the finish with your other door hardware for a neat look. Check the lock type for your security needs. Some locks have extra features like keyless entry or reinforced bolts. Choose one that suits your budget and safety requirements.
Align Components Properly
Make sure the deadbolt parts line up correctly. The bolt should slide smoothly into the strike plate. Use a level to keep the lock straight on the door. Tighten screws evenly to avoid loose parts. Proper alignment prevents jamming and extends lock life.
Frequently Asked Questions
How Do You Remove A Kwikset Deadbolt Without Screws?
To remove a Kwikset deadbolt with no visible screws, locate the small slot or hole on the interior knob. Insert a thin tool like a flathead screwdriver or pin, then press or twist to release the knob. This allows you to pull the deadbolt apart safely.
Why Are There No Screws On My Kwikset Deadbolt?
Kwikset deadbolts often use hidden screws for a cleaner look and better security. The screws are concealed beneath the knob or faceplate, requiring special removal methods. This design prevents tampering and maintains the door’s aesthetic appeal.
What Tools Do I Need To Remove A Kwikset Deadbolt?
You typically need a flathead screwdriver, an Allen wrench, or a small pin to remove a Kwikset deadbolt without screws. These tools help you access hidden release mechanisms or set screws, enabling you to detach the lock components easily.
Can I Remove A Kwikset Deadbolt Without Damaging It?
Yes, you can remove a Kwikset deadbolt without damage by carefully using the proper tools. Avoid forcing the lock; instead, gently press release tabs or unscrew hidden fasteners. This ensures the deadbolt remains functional for reinstallation or replacement.
Conclusion
Removing a Kwikset deadbolt without screws is simpler than it seems. Start by locating the small slot or hole on the lock. Use a thin tool to press inside gently. Twist and pull the lock parts carefully. Patience helps avoid damage to the door or lock.
This method saves time and avoids extra tools. Remember, practice makes the process easier each time. Keep these steps in mind for a smooth removal experience.