If you have a metal loft bed, you know how great it is for saving space. But have you thought about how to keep it stable and safe?
Anchoring your metal loft bed to the wall is the best way to prevent it from tipping or wobbling. In this guide, you’ll learn simple steps to secure your bed firmly, giving you peace of mind every night. Keep reading to discover easy tips that will make your loft bed safer and more reliable without any hassle.

Credit: www.reddit.com
Choosing The Right Spot
Choosing the right spot to anchor your metal loft bed is very important. It keeps the bed stable and safe. Picking a good place helps avoid damage to your walls and makes the bed last longer. Follow these steps to find the best spot for your loft bed.
Check Wall Material
First, look at the wall where you want to anchor the bed. Some walls are made of drywall, others of brick or concrete. Drywall alone cannot hold heavy weight. Metal loft beds need a strong wall to stay secure. Use a drill or screw to test the wall. If it feels soft, find another spot or use special anchors for drywall.
Locate Studs For Support
Studs are wooden beams inside the wall. They provide strong support for heavy items. Use a stud finder to locate them. Mark the spots with a pencil. Always anchor the bed to these studs. Screwing into studs keeps the loft bed steady and safe. Avoid just screwing into drywall without studs.
Avoid Electrical And Plumbing
Check the wall for wires and pipes before drilling. Drilling into electrical wires or plumbing can cause serious damage. Use a wire detector tool to find any hidden cables. Avoid spots near switches, outlets, or water pipes. Choose a clear area to keep the bed safe and prevent accidents.
Gathering Tools And Materials
Before anchoring your metal loft bed to the wall, gather all necessary tools and materials. This step saves time and ensures a smooth installation. Having everything ready helps avoid interruptions and keeps the project safe.
Essential Tools List
- Drill with drill bits
- Screwdriver (manual or electric)
- Stud finder
- Measuring tape
- Level
- Pencil or marker
- Wrench or pliers
Recommended Anchors And Screws
Choose anchors made for your wall type. For drywall, use toggle bolts or molly bolts.
For concrete or brick, use sleeve anchors or masonry screws.
Select screws that fit the anchor size and metal bed frame holes.
Safety Gear
- Safety glasses to protect your eyes
- Work gloves to protect your hands
- Dust mask if drilling into drywall or concrete
Preparing The Metal Loft Bed
Preparing your metal loft bed before anchoring it to the wall is very important. This step ensures safety and stability. It also makes the anchoring process easier and more effective. Taking time to prepare the bed well will help avoid future problems.
Inspect Frame For Attachment Points
Look closely at the metal frame for strong spots to attach anchors. These points should be solid and not bent or weak. Check corners and joints carefully. Avoid thin or rusted areas. Good attachment points keep the bed steady and safe.
Clean And Clear Surfaces
Remove dirt, dust, and grease from the frame and wall. Use a cloth or brush to clean well. Clean surfaces help anchors stick better. Clear the area around the bed to work easily. A tidy workspace reduces mistakes and accidents.
Mark Anchor Locations
Use a pencil or marker to show where anchors will go. Mark spots on both the wall and bed frame. Measure twice to place them evenly and correctly. Clear marks guide you during drilling and fastening. Proper marks save time and ensure safety.
Marking The Wall
Marking the wall is the first important step to anchor your metal loft bed safely. This step helps you place the bed’s brackets in the right spots. Proper marks ensure the bed will be steady and secure. Take your time and be precise for the best results.
Use A Level For Accuracy
Start by using a level to draw a straight line on the wall. This line shows where the bed frame will sit. A level keeps your marks even and prevents the bed from leaning. Hold the level firmly and adjust it until the bubble is centered. Draw the line lightly with a pencil along the edge.
Measure And Mark Stud Positions
Find the wall studs behind the drywall. Studs provide strong support for the bed anchors. Use a stud finder or tap to locate them. Mark each stud along the level line. Space the marks to match the loft bed’s bracket holes. Accurate stud marking keeps the bed from pulling away.
Double-check Measurements
Before drilling, check all your marks twice. Compare the distance between marks with the bed frame’s bracket size. Make sure the level line is still straight. Double-checking prevents mistakes and saves time. Adjust any marks that seem off before moving forward.
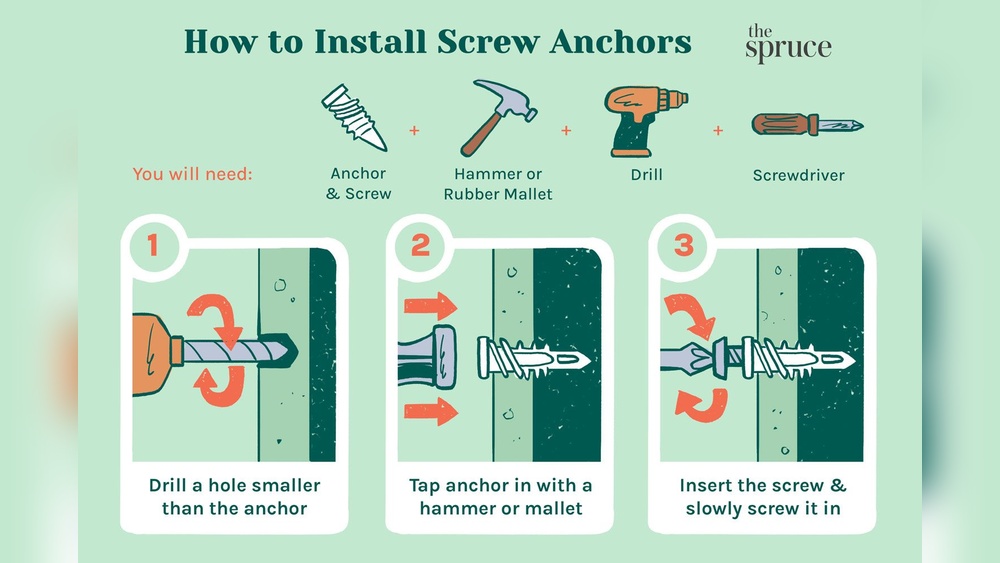
Drilling And Installing Anchors
Drilling and installing anchors is a key step to secure your metal loft bed safely to the wall. This process helps keep the bed steady and prevents it from tipping or wobbling. Proper drilling and anchor installation make sure the bed stays in place even with daily use. Follow these simple steps for a strong hold.
Choose Drill Bits
Pick a drill bit that matches your wall anchor size. Check the anchor package for the right diameter. Use a masonry bit for brick or concrete walls. For drywall, a standard bit works fine. Using the correct bit ensures a clean hole and strong anchor grip.
Drill Pilot Holes
Mark the spots where the anchors will go. Hold the drill steady and drill straight into the wall. Drill slowly to avoid cracking the wall. The hole should be just deep enough for the anchor. Clean out dust from the hole before inserting anchors.
Insert Wall Anchors
Push the wall anchors into the drilled holes. Tap gently with a hammer if needed. Make sure anchors fit snugly without wobbling. The anchors hold screws firmly, securing the loft bed. Double-check the anchors before attaching the bed frame.

Credit: www.reddit.com
Securing The Bed To The Wall
Securing the bed to the wall is important for safety and stability. It stops the bed from moving or tipping. A metal loft bed needs strong attachment to the wall. Follow these simple steps to secure your bed properly. This will help keep the bed steady and safe for use.
Align Bed Frame With Anchors
Start by placing the bed frame near the wall. Match the frame’s attachment points with the wall anchors. Make sure the anchors are in solid wall areas like studs. Adjust the bed frame until it lines up perfectly with the anchors. Proper alignment helps in strong and secure fixing.
Attach With Bolts Or Screws
Use heavy-duty bolts or screws to connect the frame to the wall anchors. Choose hardware that fits the anchor size and the bed frame holes. Tighten the bolts or screws firmly but avoid over-tightening. Over-tightening can damage the wall or frame. Secure connections prevent wobbling or shifting during use.
Check Stability
After attaching, test the bed’s stability. Shake the bed gently to feel for any movement. Tighten bolts or screws again if you notice any looseness. Make sure the bed feels solid and steady. Regularly check the attachments for safety over time.
Final Safety Checks
After anchoring your metal loft bed to the wall, final safety checks are essential. These checks keep the bed steady and safe for use. Regularly checking the setup prevents accidents and damage.
Safety is not a one-time task. It requires ongoing attention to ensure the bed stays secure. Follow these simple steps to keep your loft bed safe and stable.
Test For Movement
Gently shake the bed to check for any movement. The bed should feel solid and not wobble. Move the ladder and frame slightly to detect loose spots. If you feel any shake, tighten the anchors immediately. A firm bed means a safer sleep space.
Inspect Hardware Regularly
Look at all screws, bolts, and anchors every few months. Check for rust, wear, or looseness. Replace any damaged parts right away. Use the same size and type of hardware as before. Keeping hardware in good shape keeps the bed strong and secure.
Maintain Clear Area Around Bed
Keep the space around the bed free of clutter. Remove toys, boxes, and other items that may cause trips. A clear area helps prevent accidents when climbing up or down. Make sure the wall near the bed is clean and dry. This supports the anchors and avoids damage.

Credit: www.reddit.com
Frequently Asked Questions
How Do You Safely Anchor A Metal Loft Bed?
To safely anchor a metal loft bed, locate wall studs first. Use heavy-duty brackets and screws designed for metal frames. Secure the brackets to both the bed frame and the wall studs. This prevents wobbling and increases overall stability and safety.
What Tools Are Needed To Anchor A Metal Loft Bed?
You will need a stud finder, drill, screwdriver, level, measuring tape, and heavy-duty brackets or anchors. These tools help locate wall studs and securely attach the bed frame. Proper tools ensure a safe and sturdy installation.
Can You Anchor A Loft Bed To Drywall Alone?
No, anchoring a loft bed to drywall alone is unsafe. Drywall cannot support heavy weight without wall studs or anchors. Always secure the bed frame to wall studs to ensure stability and prevent accidents.
How High Should The Anchors Be Placed On The Wall?
Place anchors at the bed frame’s height where it meets the wall. Typically, this is near the bed’s upper support bars. Proper height ensures the bed is firmly secured and minimizes movement or tipping.
Conclusion
Anchoring a metal loft bed to the wall keeps it safe and steady. Follow the steps carefully for a strong hold. Use the right tools and materials to avoid damage. Double-check all connections before use. A secured loft bed prevents accidents and gives peace of mind.
Take your time and do it right. Safe beds mean better sleep and happy rooms.