Have you ever found yourself stuck trying to remove a Kwikset deadbolt and feeling frustrated? Whether you’re upgrading your lock, fixing a jam, or simply replacing it, knowing how to get a Kwikset deadbolt off quickly and easily can save you time and stress.
In this guide, you’ll discover simple steps that anyone can follow—no special tools or skills needed. Keep reading, and you’ll be unlocking this task in no time.
Tools Needed
Removing a Kwikset deadbolt requires the right tools. Using proper tools makes the job easier and safer. Prepare these tools before starting the removal process.
Screwdriver
A screwdriver is essential for removing screws from the deadbolt. Most Kwikset deadbolts use Phillips head screws. A flathead screwdriver may also be needed for some parts.
Tape Measure
A tape measure helps check the size of the deadbolt and door thickness. This ensures you have the correct replacement lock or parts if needed.
Pliers
Pliers assist in gripping and pulling out parts that are hard to remove by hand. They provide extra strength for tight or stuck components.
Allen Wrench
Some Kwikset deadbolts have small set screws that need an Allen wrench. This tool is useful for loosening or tightening these screws.
Utility Knife
A utility knife helps cut through paint or sealant that covers screws or edges. It makes removing the deadbolt smoother and prevents damage.

Credit: www.youtube.com
Identify Your Kwikset Deadbolt Type
Identifying your Kwikset deadbolt type is the first step to removing it safely and correctly. Kwikset makes different models, each with its own design and removal method. Knowing which type you have will save time and prevent damage.
Look at your deadbolt closely. Notice the shape, screws, and keyhole. These details tell you what type it is. Some deadbolts have visible screws, while others hide them under covers. Some use a simple turn knob, others a more complex mechanism.
Single Cylinder Deadbolt
This type has a keyhole on the outside and a thumb turn on the inside. It is the most common Kwikset deadbolt. Usually, you can see screws on the interior side. These screws hold the lock in place.
Double Cylinder Deadbolt
Double cylinder deadbolts need a key on both sides. They do not have a thumb turn. This type adds extra security but can be harder to remove. Check for screws on the inside plate and the keyholes on both sides.
Smart Lock Deadbolt
Smart locks combine electronic parts with traditional deadbolts. These may have keypads or Bluetooth features. Removing them requires extra care. Look for battery compartments and small screws on the interior side.
Keypad Deadbolt
Keypad deadbolts have buttons on the outside for code entry. They often have a thumb turn inside. The screws are usually behind the interior cover. Removing the cover reveals the screws holding the lock.
Remove The Interior Thumb Turn
Start by locating the small screw holding the interior thumb turn. Use a screwdriver to remove this screw carefully. Gently pull off the thumb turn to access the deadbolt for removal.
Understanding The Interior Thumb Turn
The interior thumb turn controls the lock from inside the door. It allows easy locking and unlocking without a key. Removing this part is the first step in taking off a Kwikset deadbolt. Handle it carefully to avoid damage.
Locate The Set Screw
Look closely at the base of the thumb turn. You will see a small set screw holding it in place. This screw is often hidden under a small cover or plug. Use a flathead screwdriver or your fingernail to remove the cover.
Unscrew The Set Screw
Use a proper screwdriver to turn the set screw counterclockwise. Turn it slowly to avoid stripping the screw. Once loose, the thumb turn will slide off easily. Keep the screw safe for reassembly later.
Remove The Thumb Turn
After loosening the screw, gently pull the thumb turn away from the door. It should come off without much force. If it feels stuck, check the screw again or wiggle the thumb turn slightly. Avoid using excessive force to prevent damage.
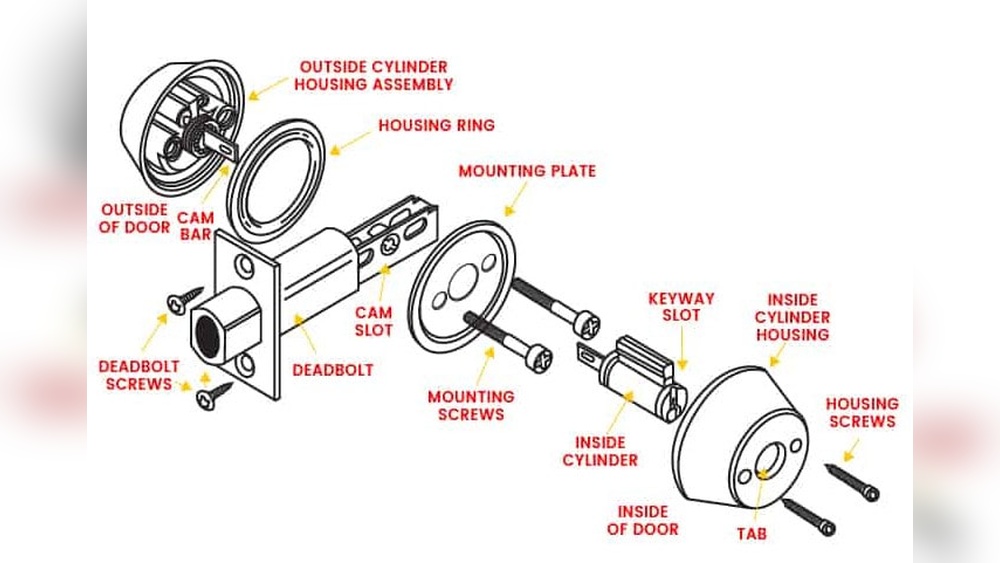
Unscrew The Exterior Lock Cylinder
Unscrewing the exterior lock cylinder is a key step in removing a Kwikset deadbolt. This part holds the lock’s keyhole and connects the exterior to the interior parts. Removing it carefully prevents damage to the lock and door.
Start with the right tools. Most Kwikset deadbolts use a Phillips screwdriver. Keep the screws safe to use later or replace the lock.
Locate The Screws Holding The Cylinder
Look on the edge of the door near the lock. You will see two screws. These screws hold the exterior lock cylinder in place. Identify them before you start unscrewing.
Use A Screwdriver To Remove The Screws
Insert a Phillips screwdriver into the screws. Turn counterclockwise to loosen. Apply steady pressure. Avoid stripping the screws by moving slowly. Remove both screws completely.
Gently Pull Out The Exterior Cylinder
With screws removed, pull the cylinder out. Hold the lock firmly. Pull straight out from the door. Do not force or twist too hard. The cylinder should slide out easily.
Detach The Deadbolt From The Door
Detaching a Kwikset deadbolt from a door is a straightforward task. It requires some basic tools and careful steps. This section guides you through the process to remove the deadbolt safely. Follow each step to avoid damage to your door or lock.
Locate And Remove The Screws
Start by finding the screws on the interior side of the door. These screws hold the deadbolt plate in place. Use a screwdriver to turn them counterclockwise. Keep the screws safe; you may need them later.
Pull The Interior Plate Away
After removing the screws, gently pull the interior plate away from the door. It may need a little wiggling to come free. Be careful not to force it, which can cause damage.
Remove The Exterior Assembly
Once the interior plate is off, the exterior part of the lock should slide out easily. Hold the door steady and pull the exterior assembly away from the door. This part includes the keyhole and thumb turn.
Take Out The Deadbolt Mechanism
Look at the edge of the door to find the deadbolt mechanism. Unscrew the faceplate covering it. Then, slide the deadbolt mechanism out of the door. This removes the locking part completely.
Credit: www.homedepot.com
Troubleshooting Common Issues
Removing a Kwikset deadbolt can sometimes cause problems. These issues can stop you from taking the lock off easily. Knowing common problems helps fix them fast. This section covers frequent troubles and their simple solutions. Follow these tips to remove your deadbolt smoothly.
Stuck Deadbolt Cylinder
The cylinder may not turn or move. Dirt or rust often causes this. Spray a little lubricant into the keyhole. Gently work the key back and forth. This loosens the cylinder. Avoid using too much force. It can break the lock.
Missing Or Hidden Screws
Some Kwikset deadbolts hide screws under the faceplate. Check for small covers or tabs. Pry them open carefully with a flat tool. Use a screwdriver to remove all screws. Without removing screws, the lock will not come off.
Broken Or Stripped Screws
Screws can break or strip during removal. Use a screw extractor kit to remove them. Another option is to use pliers to turn the screw. Work slowly to avoid damage. Replace broken screws with new ones after removal.
Deadbolt Not Retracting
The bolt may stay in the locked position. This blocks removal. Try turning the key while pushing the bolt. Tap the bolt lightly with a hammer. This may release it. If it stays stuck, the lock might need replacement.
Faceplate Stuck To Door
The faceplate can stick to the door wood. Use a flathead screwdriver to gently pry it. Avoid damaging the door surface. Work slowly around the edges. Remove the faceplate fully before pulling out the lock.
Tips For Reinstalling Or Replacing The Deadbolt
Reinstalling or replacing a Kwikset deadbolt needs care and attention. Doing it right ensures your door stays secure and works smoothly. Follow simple tips to avoid common mistakes and save time.
Preparing The Door For The New Deadbolt
Check the door edge and face for damage or dirt. Clean the area before installing the new lock. Make sure the holes match the deadbolt size and shape. Sand or adjust them slightly if needed.
Aligning The Deadbolt Properly
Position the deadbolt so it fits flush with the door. The bolt should slide in and out easily. Use a level tool to keep it straight. Tighten screws evenly to avoid misalignment.
Testing The Lock Function
Turn the key and thumb turn several times. Check if the bolt moves smoothly without sticking. Close the door and lock it to test security. Adjust the strike plate if the bolt does not fit well.
Securing All Screws Firmly
Use a screwdriver to tighten all screws firmly. Loose screws can cause the lock to wobble or fail. Avoid over-tightening, which can strip the screws or damage the lock. Double-check each screw before finishing.
Choosing The Right Replacement Deadbolt
Select a deadbolt that matches your door thickness and style. Choose one with good security ratings. Pick a finish that matches your door hardware. Check if the lock is easy to install and use.

Credit: diy.stackexchange.com
Frequently Asked Questions
How Do I Remove A Kwikset Deadbolt Easily?
To remove a Kwikset deadbolt, start by unscrewing the interior plate. Then, pull both sides of the lock apart. Finally, slide out the deadbolt mechanism from the door edge. Use a screwdriver and keep screws safe for reinstallation.
What Tools Are Needed To Remove A Kwikset Deadbolt?
You need a Phillips screwdriver, flathead screwdriver, and possibly pliers. These tools help remove screws and pry off the lock parts safely. Having a flashlight can assist in seeing screws clearly during the removal process.
Can I Remove A Kwikset Deadbolt Without A Key?
Yes, you can remove it without a key by unscrewing the interior side. Once screws are out, the lock can be pulled apart manually. This method works if you have access to the inside of the door.
How Long Does It Take To Remove A Kwikset Deadbolt?
Removing a Kwikset deadbolt typically takes 5 to 10 minutes. Time depends on your familiarity with tools and lock parts. Careful handling prevents damage and speeds up the process.
Conclusion
Removing a Kwikset deadbolt is easier than it seems. Follow the steps carefully and take your time. Use the right tools to avoid damage. Stay safe and work slowly. Now you can change or fix your lock with confidence. Practice makes perfect.
Keep this guide handy for future reference. Simple tasks become easier with clear instructions. You got this!