Have you ever tried to remove a butterfly anchor from your wall, only to find it stuck fast and frustrating? Those little metal or plastic pieces are great for holding heavy items, but taking them out can be tricky.
If you’re staring at your wall, wondering how to get that stubborn butterfly anchor out without causing damage, you’re in the right place. This guide will walk you through simple, effective steps that make the process easier than you think.
Keep reading, and you’ll soon know exactly how to free your wall—and your frustration.

Credit: www.youtube.com
Tools Needed
Removing butterfly anchors from the wall requires the right tools. Having the correct tools makes the job easier and prevents damage. Some tools are common in most homes. Others are made specifically for anchor removal. Prepare these tools before starting the task.
Common Household Tools
Many butterfly anchors can be removed using simple tools found at home. A flathead screwdriver helps to pry the anchor gently. Needle-nose pliers provide a good grip to pull the anchor out. A hammer can tap the screwdriver or pliers for better leverage. Keep a utility knife handy to cut any loose drywall around the anchor. These tools often work well for small anchors and light jobs.
Specialized Removal Tools
Some anchors need special tools for safe removal. An anchor removal tool is designed to grip and pull anchors smoothly. A drywall saw helps cut precise holes around stubborn anchors. A stud finder locates wall studs to avoid damage during removal. Using these tools reduces the risk of wall damage and saves time. Consider these tools for frequent or larger removal jobs.
Why Remove Butterfly Anchors
Removing butterfly anchors from walls is important for several reasons. These anchors hold items securely but can cause problems if left in place unnecessarily. Knowing why to remove them helps protect your walls and maintain their appearance.
Sometimes, removing anchors is needed to fix or change wall fixtures. Other times, leaving them can cause damage or make repairs harder. Understanding these reasons guides you on when and how to remove butterfly anchors safely.
When Removal Is Necessary
Remove butterfly anchors if you plan to repaint or wallpaper the wall. They can leave holes or bumps that show through new finishes. Also, take them out when changing or moving wall decorations. Old anchors may not hold new items well. If an anchor is loose or damaged, it can fall out and harm the wall. Removing bad anchors stops further damage and keeps your wall strong.
Potential Wall Damage
Butterfly anchors expand inside the wall, which may cause cracks or holes. Leaving them inside can weaken the drywall over time. When you remove anchors incorrectly, they may tear the wall paper or drywall surface. This can lead to costly repairs and repainting. Removing anchors carefully helps avoid large holes or broken drywall pieces. Proper removal keeps walls smooth and ready for new fixtures.
Preparation Steps
Preparing the workspace is crucial before removing butterfly anchors from walls. Proper preparation helps avoid damage and makes the process easier. Take time to clear and protect the area around the anchor. These steps will keep your wall safe and your work smooth.
Clearing The Area
Remove furniture or objects near the wall. This gives you enough space to work freely. Dust and debris can fall during removal. Cover the floor with a drop cloth or old sheet. Keep tools handy and organized. Clearing the area reduces accidents and saves time.
Protecting The Wall Surface
Butterfly anchors can damage paint or drywall. Use painter’s tape around the anchor to shield the surface. This tape prevents scratches and chips. A small piece of cardboard can also protect the wall. Take care to avoid extra holes or dents. Protection keeps the wall ready for repairs or repainting.
Credit: bahumathigifts.com
Method 1: Using Pliers
Method 1: Using pliers is a straightforward way to remove butterfly anchors from walls. This method works best for anchors that are slightly loose or easy to grab. Pliers give you good control and grip to pull the anchor out without damaging the wall too much.
Make sure to choose the right type of pliers. Needle-nose pliers or slip-joint pliers work well for this task. They fit easily into tight spaces and help you hold the anchor firmly. Keep calm and take your time to avoid breaking the anchor or making a bigger hole.
Grip And Pull Technique
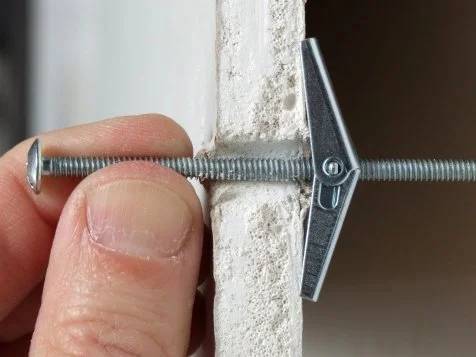
First, open the pliers wide enough to grip the wings of the butterfly anchor. Hold the anchor’s metal part tightly but gently. Pull straight out from the wall. Do not twist or wiggle too much. A steady pull helps loosen the anchor from the drywall or plaster.
If the anchor does not move, stop pulling. Trying too hard can damage the wall or break the anchor. Instead, try to adjust your grip for better hold. Pull slowly and steadily until the anchor releases.
Handling Stubborn Anchors
Some anchors stick very tightly. Use pliers to wiggle the anchor slightly from side to side. This loosens the grip inside the wall. Avoid bending the wings too much as they can snap off inside.
If the anchor stays stuck, push it gently deeper into the wall with a screwdriver. This can collapse the wings behind the drywall and allow easier removal. Then, use pliers to pull out the remaining piece.
For very stubborn anchors, drilling a small hole in the center can help. This weakens the anchor and makes pulling easier. Always wear safety glasses to protect your eyes during this step.
Method 2: Pushing Through
Method 2: Pushing Through is a simple way to remove butterfly anchors. It works by pushing the anchor through the wall instead of pulling it out. This method avoids wall damage and is quick to do.
It is useful when the anchor is stuck tight or the wall material is thin. Pushing the anchor inside creates a clean hole that you can fill later. This keeps your wall neat and ready for new anchors.
Tools For Pushing
You need a few basic tools to push butterfly anchors out. A screwdriver or a punch tool works well to apply pressure. A hammer helps gently tap the tool to push the anchor inside. Use pliers to hold the anchor steady if needed.
When To Use This Method
Use pushing through when pulling the anchor risks wall damage. This method suits drywall or plaster walls. It works best if the anchor is flush or slightly inside the wall. Avoid this method if the wall is very thick or the anchor is loose.
Method 3: Cutting The Anchor
Method 3: Cutting the Anchor is a practical way to remove stubborn butterfly anchors. This technique works well when pulling the anchor out is difficult. By cutting the anchor inside the wall, you can push the remaining parts deeper without damage.
This method requires simple tools and care. It is effective for hollow walls where the anchor wings expand behind the drywall. Cutting the anchor allows you to finish the job smoothly.
Using A Utility Knife
Start by choosing a sharp utility knife. Insert the blade carefully next to the anchor’s outer edge. Cut through the plastic or metal part that holds the wings open. Make slow, controlled cuts to avoid wall damage.
Once the anchor is cut, use a screwdriver or a blunt tool. Push the cut parts gently inside the wall cavity. They will fall behind the drywall and stay hidden. Fill the hole with spackle or wall putty to complete the repair.
Safety Tips
Always wear safety glasses to protect your eyes from flying debris. Use gloves to avoid cuts from the utility knife. Work in a well-lit area to see clearly. Keep your fingers away from the blade’s path.
Take your time. Rushing can cause accidents or wall damage. If unsure, ask for help or use another removal method. Safety is the top priority when cutting anchors.
Repairing The Wall After Removal
Removing butterfly anchors leaves holes that need fixing. Repairing the wall helps restore its smooth look. Proper repair also prevents damage from spreading. Follow simple steps to fill, sand, and paint the area. This makes the wall ready for new decorations or painting.
Filling The Hole
Start by cleaning the hole from dust and debris. Use a putty knife to apply wall filler or spackle. Press the filler firmly into the hole to fill it completely. Smooth the surface with the putty knife to remove excess. Let the filler dry fully, following package instructions. Dry filler is firm and ready for the next step.
Sanding And Painting
Use fine-grit sandpaper to smooth the dried filler. Sand gently until the surface feels even with the wall. Wipe away dust with a damp cloth before painting. Choose paint that matches your wall color. Apply paint in thin, even coats over the repaired area. Let each coat dry before adding another layer. The repaired spot will blend perfectly with the wall.
Credit: www.ottawadrywallpros.ca
Preventing Damage In Future Installations
Preventing damage in future installations keeps walls strong and clean. Careful planning helps avoid holes and cracks. Good habits protect the wall and save time and money. Focus on the right tools and techniques for lasting results.
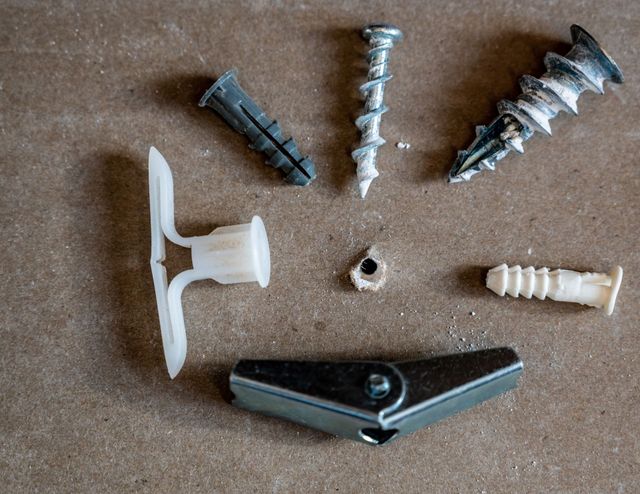
Choosing The Right Anchor
Select anchors based on wall type and weight load. Drywall, plaster, and concrete require different anchors. Use plastic anchors for light items, metal for heavier ones. Match anchor size to the screw and object weight. Avoid oversized anchors that can crack the wall. A proper anchor holds tight without damaging the surface.
Proper Installation Tips
Drill a hole slightly smaller than the anchor diameter. Insert the anchor gently to prevent wall cracks. Use a level to keep items straight and avoid extra holes. Tighten screws slowly to avoid over-stressing the anchor. Remove anchors carefully by backing out screws first. Follow these steps to keep walls neat and strong.
Frequently Asked Questions
How Do You Safely Remove Butterfly Anchors From Walls?
To safely remove butterfly anchors, first unscrew the anchor’s screw. Then, gently pull the anchor out with pliers. If stuck, push it through the wall cavity carefully to avoid damage.
Can Butterfly Anchors Be Reused After Removal?
No, butterfly anchors usually cannot be reused. They expand inside the wall, losing their grip once removed. Always use new anchors for secure installation.
What Tools Are Needed To Remove Butterfly Anchors?
You need a screwdriver to remove the screw and pliers to pull out the anchor. A utility knife may help to cut around the anchor if necessary.
Will Removing Butterfly Anchors Damage The Wall?
Removing butterfly anchors can cause minor damage, like small holes or wall surface tears. Patch these holes with spackle or wall filler for a smooth finish.
Conclusion
Removing butterfly anchors from walls can be simple and quick. Use the right tools and gentle force to avoid damage. Take your time and be patient during the process. Fix holes afterward with spackle or putty for a clean look.
These steps help keep your walls neat and ready for new decor. Practice makes it easier each time you do it. You can handle this task with confidence and care.