Is your floor sagging and making you worry about safety and damage? You’re not alone, and the good news is that you can fix it.
Learning how to jack a sagging floor might sound complicated, but with the right steps, you can lift and level it yourself. Imagine walking on a solid, steady floor again—no more creaks, dips, or worries. Keep reading, and you’ll discover simple, practical tips to restore your floor’s strength and stability.
Your home deserves it, and you’re just a few easy moves away from making it happen.
Credit: rogueengineer.com
Signs Of A Sagging Floor
Noticing signs of a sagging floor early helps prevent bigger problems. Sagging floors can cause safety risks and damage to your home. Spotting the signs early allows you to act fast and fix the issue before it worsens. Here are some clear signs to check for.
Visible Floor Dips And Slopes
Look closely at your floor surface. Notice any uneven areas or low spots? These dips and slopes show the floor is sagging. The floor may feel bumpy or wavy underfoot. You can also use a level to spot any slants. Sagging floors often have visible dips that catch your eye.
Squeaky Or Creaky Areas
Walk around your room and listen carefully. Do some spots make squeaking or creaking sounds? These noises often mean the floor joists are loose or damaged. Loose boards rub together, causing these sounds. Squeaky floors signal a lack of stability beneath.
Doors And Windows Misalignment
Check your doors and windows for proper fit. Are they hard to open or close? Gaps or rubbing can mean the frame shifted due to floor sagging. Misaligned doors and windows show the structure is moving. This is a common sign of foundation or floor issues.

Credit: oldhousecrazy.com
Tools And Materials Needed
Fixing a sagging floor needs the right tools and materials. These help you lift the floor safely and keep it stable. Without proper tools, the job can be hard or unsafe.
Gather everything before starting. This saves time and avoids problems during the work.
Types Of Floor Jacks
Floor jacks lift the sagging area. There are different types. Bottle jacks are small and strong. They work well in tight spaces.
Floor jacks with a wide base give more balance. They are good for heavy loads. Hydraulic jacks make lifting easier with less effort.
Supporting Beams And Blocks
After lifting, support the floor with beams and blocks. Use solid wood or metal beams. Place blocks under beams for extra strength.
These supports hold the floor in place. Choose beams that fit the space well. Check that blocks are sturdy and stable.
Safety Gear Essentials
Wear safety gear to protect yourself. Gloves keep your hands safe from splinters. Safety glasses protect your eyes from dust and debris.
Wear a hard hat if working under the floor. Use sturdy shoes to avoid injuries. Safety gear helps prevent accidents during lifting.
Preparing The Area
Preparing the area is the first step to jack a sagging floor safely and effectively. Proper preparation helps avoid accidents and makes the job easier. It involves clearing the work space, finding the right spots to place the jack, and checking how bad the floor damage is. Follow these steps carefully before starting the repair.
Clearing Furniture And Debris
Remove all furniture from the room. Clear small items and debris from the floor. This gives you enough space to work freely. A clear area prevents accidents and damage to your belongings. Sweep the floor to get rid of dust and dirt. A clean surface helps you see the problem clearly.
Locating Floor Joists
Find the floor joists under the sagging area. Joists are the wooden beams that hold the floor up. Use a stud finder to locate them easily. Mark their positions on the floor with chalk. Knowing where the joists are helps place the jack correctly. This ensures a safe and strong lift.
Assessing The Damage
Look closely at the sagging floor. Check how deep and wide the sag is. Inspect the joists for cracks or rot. Notice any signs of water damage or insect problems. Understanding the damage helps plan the repair better. It also tells you if you need extra support or materials.
Step-by-step Jacking Process
Jacking a sagging floor can restore strength and safety to your home. The process requires patience and care. Follow these clear steps to lift the floor evenly and securely.
Positioning The Floor Jack
Start by finding the lowest sagging spot on the floor. Place the floor jack directly under a floor joist there. Use a sturdy wood block between the jack and the joist to spread the pressure. Make sure the jack sits on a solid, flat surface. This prevents slipping or damage during lifting.
Slowly Raising The Floor
Turn the jack handle gently to raise the floor. Lift only a small amount at a time, about 1/8 inch per turn. Stop often to check the floor’s level. Do not rush. Lifting too fast can crack walls or cause other damage. Keep raising until the floor is level or slightly higher than before.
Installing Temporary Supports
Once lifted, place temporary supports under the joists. Use strong wooden posts or adjustable metal supports. These keep the floor in place while you work. Position supports close to the jack and along the joist length. Double-check the floor level before removing the jack. Temporary supports prevent the floor from sagging again.
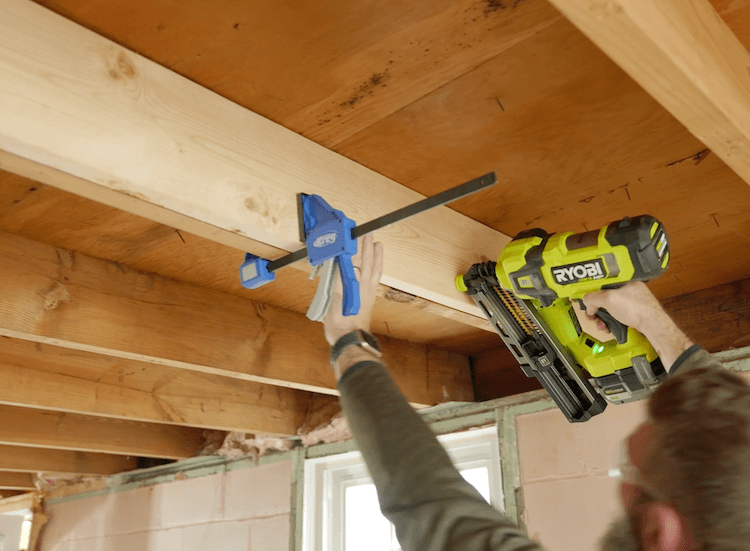
Reinforcing The Floor Structure
Reinforcing the floor structure is key to fixing a sagging floor. Strengthening the framework stops further sagging and spreads the weight evenly. It makes the floor stable and safe again. This step helps support the floor after jacking it up.
Adding Sister Joists
Sister joists are new joists placed next to old ones. They add extra strength and support. Use the same size wood as the original joists. Nail or screw them tightly to the old joists. This makes the floor stronger and less likely to sag again.
Installing Blocking And Bracing
Blocking and bracing fill gaps between joists. They stop joists from twisting or moving. Cut wood pieces to fit snugly between joists. Secure them with nails or screws. This keeps the floor structure firm and stable.
Securing The Floor Deck
Floor deck means the boards on top of joists. Secure these boards to stop any movement. Use screws instead of nails for a better hold. Tighten loose boards to avoid squeaks and weakness. A firm floor deck adds to overall strength.
Finishing Touches
After jacking up a sagging floor, the finishing touches are crucial. These final steps ensure the floor is safe, level, and looks good. Taking time now prevents future problems and keeps your home strong.
Checking Floor Level
Use a level tool to check the floor’s flatness. Move the level across the floor in several spots. Look for any dips or high spots. Adjust the jacks slightly if needed. Repeat until the floor is even throughout.
Repairing Floor Coverings
Lift or remove floor coverings like carpet or tiles carefully. Fix any damage caused during the jacking process. Replace or reattach coverings securely. Make sure the surface looks smooth and natural. This step keeps your floor looking neat and tidy.
Final Safety Inspection
Inspect all jacks and supports to confirm they are stable. Check for any loose nails or screws around the floor. Walk on the floor slowly to test its firmness. Ensure no unusual creaks or movements happen. Safety is key before finishing the job.
Preventing Future Sagging
Stopping a floor from sagging again needs careful care. Fixing the floor is one part. Keeping it strong for years is the next. Simple steps can stop future sagging. These actions protect your home and save money. Learn easy ways to keep your floor firm and safe.
Maintaining Proper Drainage
Water can harm the floor’s base. It weakens wood and soil under the house. Make sure gutters and downspouts direct water away. Check for blocked drains or puddles near the home. Fix these problems fast. Dry ground means a strong floor and fewer problems.
Regular Structural Inspections
Look at your floor and foundation often. Search for cracks, soft spots, or sagging areas. Early signs help catch problems early. Hire a professional every few years. They spot hidden damage before it gets worse. Routine checks keep your home safe and sound.
Controlling Indoor Humidity
High humidity can cause wood to swell and weaken. Use dehumidifiers to keep air dry. Open windows for fresh air when possible. Avoid letting water sit inside the home. Balanced humidity keeps floor materials strong and long-lasting. This simple step protects your floor’s structure.

Credit: oldhousecrazy.com
Frequently Asked Questions
What Causes A Floor To Sag Over Time?
Sagging floors often result from weakened joists, water damage, or settling foundations. These issues reduce floor support, causing uneven surfaces and dips.
How Do I Identify A Sagging Floor Early?
Look for uneven floor surfaces, visible dips, or creaking sounds when walking. Use a level tool to check for slant or depressions.
Can I Jack Up A Sagging Floor Myself?
Yes, with proper tools and safety precautions, you can jack a sagging floor. However, understanding structural support is essential to avoid damage.
What Tools Are Needed To Jack A Sagging Floor?
You will need a hydraulic jack, wooden shims or blocks, a level, and protective gear to safely lift and support the floor joists.
Conclusion
Sagging floors can cause many problems in your home. Fixing them early saves money and stress. Use jacks carefully to lift and support the floor. Check all beams and joists for damage before starting. Take your time and work safely throughout the process.
With patience, your floor will become strong and level again. Regular inspections help catch issues before they worsen. A stable floor makes your home safer and more comfortable. Keep tools ready and follow simple steps to maintain your floor. Small repairs today prevent big problems tomorrow.