Have you noticed that your brake lights aren’t working properly? This can be more than just an annoyance—it’s a safety risk for you and other drivers.
The problem might be your brake light switch. Changing it might sound tricky, but with the right steps, you can fix it yourself quickly and save time and money. In this guide, you’ll learn exactly how to change the brake light switch, even if you’re not a car expert.
Keep reading, and you’ll have your brake lights shining bright again in no time.

Credit: www.youtube.com
Signs Of A Faulty Brake Light Switch
The brake light switch is a small part that plays a big role in car safety. It tells your brake lights when to turn on or off. If this switch fails, you might face trouble on the road. Knowing the signs of a faulty brake light switch helps you fix problems early. This keeps you and others safe.
Pay close attention to how your brake lights behave. Strange actions can point to switch issues. Here are common signs to watch for.
Brake Lights Not Illuminating
One clear sign is when brake lights do not turn on. Press the brake pedal but no light appears. This can confuse drivers behind you. It increases the risk of accidents. Often, a bad brake light switch causes this problem.
Brake Lights Staying On
Brake lights that stay on all the time is another warning. They should only light up when you press the brake. Constant light drains your car battery. It can also make other drivers think you are braking.
Other Electrical Issues
A faulty brake light switch can cause more problems. You may notice trouble starting the car. Or warning lights on the dashboard might flash. Sometimes, the cruise control stops working correctly. These issues often link back to the brake light switch.
Credit: www.yourmechanic.com
Tools And Materials Needed
Changing the brake light switch requires a few simple tools and materials. Having everything ready saves time and avoids frustration. The right tools make the job easier and safer.
Basic Hand Tools
Start with a set of screwdrivers, both flathead and Phillips. A socket wrench set is useful for bolts and nuts. Pliers help with gripping and pulling connectors. A flashlight or work light brightens dark areas under the dashboard.
Replacement Brake Light Switch
Buy a brake light switch that matches your vehicle’s make and model. Check your car manual for the exact part number. Using the correct switch ensures proper function and fit.
Safety Equipment
Wear safety gloves to protect your hands from sharp edges. Safety glasses shield your eyes from dust and debris. Use a sturdy car jack and stands if you need to lift the vehicle for better access.
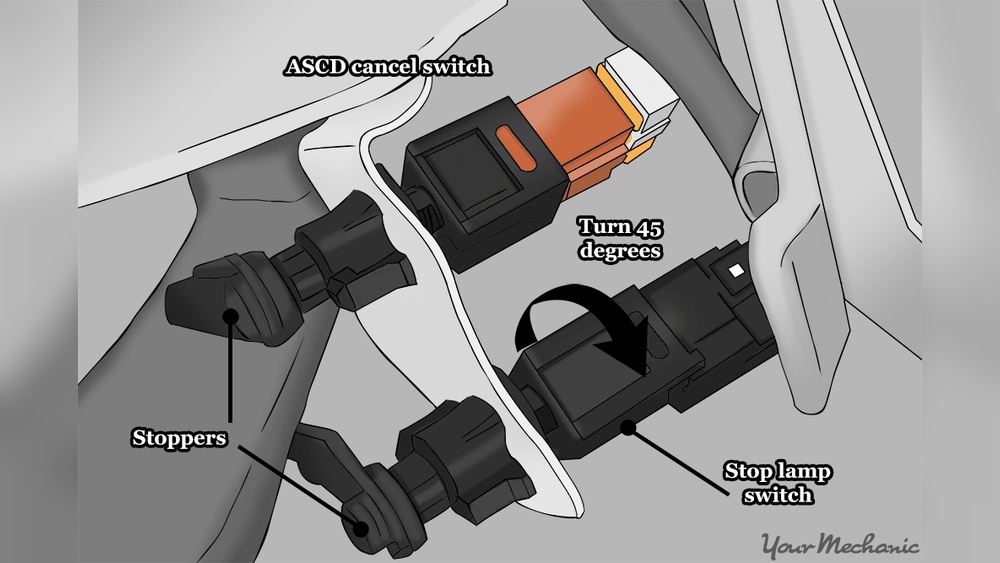
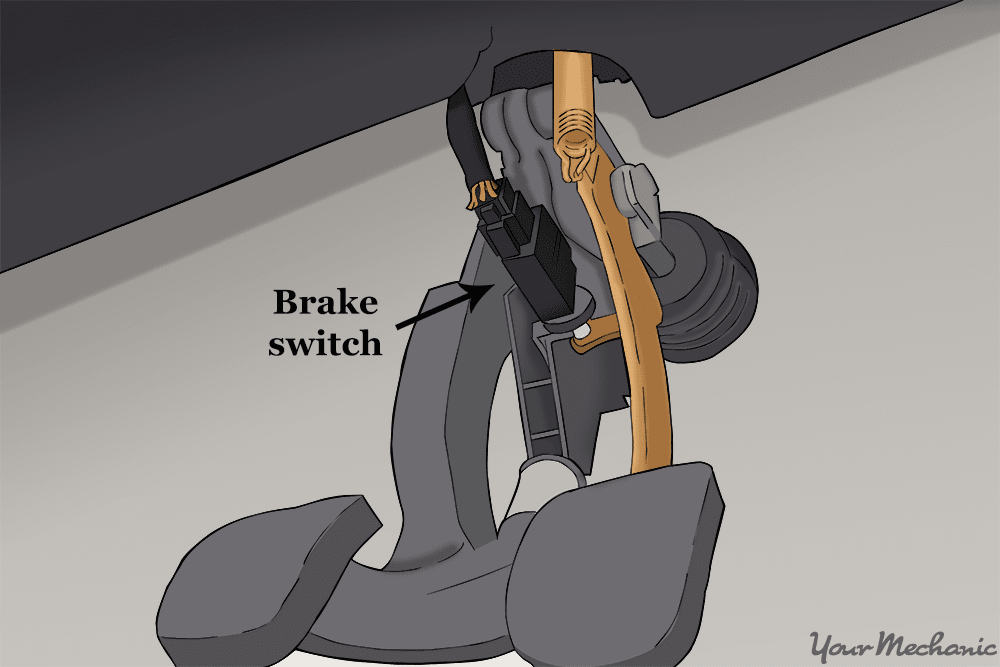
Locating The Brake Light Switch
Finding the brake light switch is the first step to changing it. The switch controls the brake lights. It sends a signal when you press the brake pedal. Knowing where it sits saves time and effort. The switch is small but important. It is usually near the brake pedal.
Common Locations
The brake light switch often sits right above the brake pedal arm. It can be attached to the brake pedal bracket. In some cars, it is near the steering column. Some models place it under the dashboard. The switch looks like a small button or sensor. Its wires connect to the car’s electrical system.
Accessing The Switch Area
Access to the switch needs you to sit in the driver’s seat. Move the seat back to create more space. Look under the dashboard near the pedals. Use a flashlight to see better. Remove any panels blocking the view if needed. Be careful with wires and clips. Clear access makes changing the switch easier and safer.
Removing The Old Brake Light Switch
Removing the old brake light switch is the first step in replacing it. This process involves careful handling of electrical parts and the pedal assembly. Follow each step closely to avoid damage and ensure safety.
Start by making sure the car is off and stable. Then proceed to disconnect and remove the switch carefully.
Disconnecting The Battery
Begin by opening the car hood. Locate the battery and identify the negative terminal. Use a wrench to loosen the nut on the negative terminal. Remove the cable from the battery terminal. This step stops electrical flow and prevents shocks.
Unplugging The Electrical Connector
Find the brake light switch near the brake pedal. Look for the small electrical connector attached to it. Press the tab or clip on the connector to release it. Gently pull the connector away from the switch. Do not pull the wires directly to avoid damage.
Detaching The Switch From The Pedal Assembly
Inspect how the switch is attached to the pedal. It may be held by a clip, screw, or a twist lock. Use the right tool, like a screwdriver or pliers, to loosen or unclip the switch. Carefully pull the switch away from its mount. Keep the old switch for reference or disposal.
Installing The New Brake Light Switch
Installing the new brake light switch is a key step in the brake light replacement process. This part controls the brake lights, turning them on when you press the brake pedal. Proper installation ensures your brake lights work safely and reliably.
Follow these steps carefully to place the new switch correctly and get your brake lights running again.
Positioning The New Switch
Start by aligning the new switch with the brake pedal arm. The switch should fit snugly in the same spot as the old one. Make sure the switch button presses against the pedal arm to detect movement properly.
Securing The Switch
Hold the switch in place and tighten any screws or clips. The switch must stay firm without moving around. Check that it does not interfere with the pedal’s motion.
Reconnecting The Electrical Connector
Attach the electrical connector to the new switch. Push the connector until it clicks securely. This connection sends the signal to your brake lights.
Testing The New Switch
Testing the new brake light switch is a key step after installation. It ensures the switch works correctly and the brake lights respond properly. This process helps keep driving safe and avoids problems on the road.
Verifying Brake Light Operation
Start by turning on the car’s ignition without starting the engine. Press the brake pedal gently. Ask a friend to watch the rear lights. The brake lights should turn on immediately.
If you are alone, use a reflective surface to see the lights. Press and release the brake pedal several times. The lights must turn on and off each time you press the pedal.
Adjusting The Switch If Needed
If the brake lights do not work right, the switch might need adjustment. Locate the switch near the brake pedal arm. Loosen the mounting nut slightly. Move the switch up or down in small steps.
Test the brake lights after each move. Tighten the nut once the lights respond correctly. The switch should activate the lights as soon as you press the pedal.
Tips For Maintenance And Longevity
Maintaining your brake light switch is key to keeping your car safe. Proper care helps the switch last longer and work well. Simple steps can stop problems before they start. Small habits make a big difference.
Focus on regular checks and avoid common errors. These tips save time and money on repairs. Your brake lights will stay reliable every time you drive.
Regular Inspection
Check the brake light switch every few months. Look for loose wires or signs of wear. Make sure the switch moves freely and clicks properly. Dirt and dust can cause it to stick. Clean the area gently with a soft cloth. Test the brake lights after inspection. Replace the switch if it shows damage or does not work.
Avoiding Common Mistakes
Do not rush the replacement process. Avoid using too much force when removing or installing the switch. Double-check the wiring connections before finishing. Using the wrong parts can cause failure. Always pick a switch that fits your vehicle. Avoid ignoring small issues like flickering lights. These can signal switch problems early on.

Credit: www.youtube.com
Frequently Asked Questions
What Tools Are Needed To Change A Brake Light Switch?
You need a screwdriver, pliers, and a replacement brake light switch. These basic tools make the process quick and easy. Always check your vehicle manual for specific tools or instructions.
How Long Does It Take To Replace A Brake Light Switch?
Replacing a brake light switch usually takes 15 to 30 minutes. It depends on the vehicle model and your experience. The process is straightforward and doesn’t require professional help.
What Symptoms Indicate A Faulty Brake Light Switch?
Common signs include brake lights not turning on or staying on continuously. You may also experience cruise control issues or difficulty shifting gears. Timely replacement ensures safety and avoids legal problems.
Can I Replace The Brake Light Switch Myself Safely?
Yes, with basic tools and instructions, you can replace it safely. Make sure to disconnect the battery before starting. Follow your vehicle’s manual to avoid any damage or injury.
Conclusion
Changing the brake light switch is simple with the right steps. Take your time and follow each instruction carefully. Testing the brake lights after replacement is important. It helps keep you and others safe on the road. Regular car care prevents bigger problems later.
Now you can fix the brake light switch yourself and save time. Stay safe and keep your car in good shape.