Are you ready to take control of your home lighting and make your space more convenient? Connecting a 3 gang light switch might sound tricky, but with the right steps, you can do it yourself and save time and money.
Imagine turning on three different lights with just one panel—how easy and stylish would that be? In this guide, you’ll discover simple instructions that anyone can follow, even if you’re not an expert. Keep reading, and by the end, you’ll have the confidence to upgrade your lighting setup like a pro.

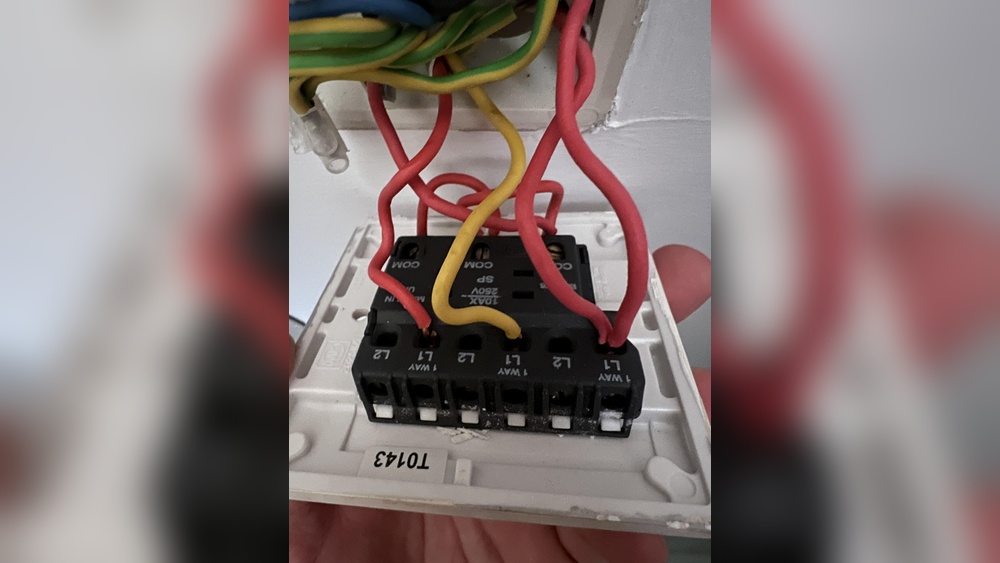
Credit: community.smartthings.com
Tools And Materials Needed
Preparing to connect a 3 gang light switch requires the right tools and materials. Having everything ready makes the process smoother and safer. This section lists essential items for your project.
Basic Electrical Tools
Start with a good screwdriver set, including flathead and Phillips heads. Wire strippers are vital for removing insulation from wires. A voltage tester helps check if power is off. Needle-nose pliers assist in bending and holding wires. A utility knife can cut electrical tape or cable sheathing. Keep a tape measure for accurate wire length.
Safety Gear
Safety is key. Wear insulated gloves to protect from electric shocks. Safety goggles shield your eyes from sparks or debris. A dust mask prevents inhaling dust when drilling. Non-slip shoes help avoid accidents on slippery surfaces. Have a flashlight nearby for clear visibility in dark spaces.
Switch And Wiring Components
Select a 3 gang switch that fits your wall box. Use appropriate electrical wires, usually 14 or 12 gauge. Wire nuts connect wires securely and safely. Electrical tape insulates exposed wire ends. A wall plate covers the switch for a neat finish. Make sure all materials meet local electrical codes.
Safety Precautions
Working with electrical switches can be risky without the right precautions. Safety steps protect you from shocks and accidents. Follow clear rules to keep your work safe and smooth.
Power Shutdown
Always turn off the main power before starting any electrical work. Find the correct circuit breaker and switch it off. Double-check that the power is off to avoid any danger. Never rely on just the switch being off.
Testing For Live Wires
Use a voltage tester to check wires after shutting off power. Test each wire to confirm no electricity flows. This step ensures you do not touch live wires by mistake. Safety testing prevents serious electric shocks.
Proper Handling Techniques
Hold wires by their insulated parts only. Avoid touching metal parts or exposed wires. Use tools with insulated handles to reduce risk. Keep your hands dry and wear rubber-soled shoes for extra safety.
Identifying Wires
Before connecting a 3 gang light switch, identifying the wires is essential. Knowing each wire’s role helps connect the switch safely and correctly. This step prevents electrical problems and ensures your lights work as expected.
Live Wire
The live wire carries electricity from the power source to the switch. It is usually red or brown in color. Handle this wire carefully, as it can cause electric shock if touched.
Neutral Wire
The neutral wire completes the electrical circuit by carrying current back to the power source. It is often blue or black. This wire is important for the switch to function properly.
Ground Wire
The ground wire protects you from electric shocks. It safely directs electricity into the earth during faults. This wire is green or bare copper. Always connect the ground wire to the switch’s grounding point.

Credit: www.youtube.com
Wiring The 3 Gang Switch
Wiring a 3 gang light switch requires careful attention to detail. Each switch controls a separate light or group of lights. Proper wiring ensures safety and functionality. Follow these clear steps for correct connections.
Connecting Live Wires
Start by identifying the live wire in the electrical box. This wire carries power from the main supply. Connect the live wire to the common terminal on the 3 gang switch. Tighten the screw firmly but avoid over-tightening. This connection powers all three switches.
Connecting Load Wires
Each load wire runs to a different light or fixture. Attach each load wire to its corresponding switch terminal. Match wires carefully to avoid confusion later. Secure the wires under the screws or in push-in terminals. Check each connection for firmness before moving on.
Attaching Ground Wire
Locate the ground wire, usually green or bare copper. Connect it to the switch’s ground terminal or grounding screw. The ground wire protects against electrical shocks. Make sure the ground connection is tight and secure. Proper grounding is key for safe operation.
Mounting The Switch
Mounting the 3 gang light switch is an essential step for a neat and safe finish. This process holds the switch securely in place. It also ensures easy access for daily use. Proper mounting prevents damage and electrical hazards. Follow these steps carefully for the best results.
Securing To Wall Box
Start by aligning the switch with the wall box. Make sure the wires are neatly tucked inside. Use the screws provided to fasten the switch firmly. Tighten the screws evenly to avoid tilting. Check the switch feels stable and does not move. Secure mounting protects the wiring and switch from damage.
Installing Faceplate
Place the faceplate over the mounted switch. Line up the screw holes on the faceplate with the switch. Insert the screws and tighten them gently. Do not overtighten to avoid cracking the faceplate. The faceplate hides the wiring and enhances the look. A clean finish improves your room’s overall appearance.

Credit: diy.stackexchange.com
Testing The Installation
Testing the installation of a 3 gang light switch is important to ensure everything works safely. This step helps confirm the wiring is correct and the switch controls each light properly. Follow these simple checks to verify your setup.
Restoring Power
Turn the main power back on at the breaker box. Make sure no tools or wires touch anything. Stand clear of the switch panel. Restoring power lets you test the switch safely.
Switch Function Check
Flip each switch one by one. Watch the connected lights carefully. Each switch should turn its light on and off without delay. If a light does not respond, note which one. This step checks if wiring matches the switch layout.
Troubleshooting Common Issues
If a light does not work, check the bulb first. Replace it if needed. Ensure wires are tight on the switch terminals. Loose wires cause poor connection. Use a voltage tester to check for power. If problems continue, recheck your wiring against the diagram.
Frequently Asked Questions
How Do I Wire A 3 Gang Light Switch Safely?
Turn off the power before wiring. Connect the live wire to the common terminal. Attach each switch to its respective load wire. Use insulated tools and double-check all connections to ensure safety and proper function.
What Tools Are Needed To Connect A 3 Gang Switch?
You need a screwdriver, wire stripper, voltage tester, and electrical tape. These tools help strip wires, tighten screws, test voltage, and secure connections safely during installation.
Can I Replace A Single Switch With A 3 Gang Switch?
Yes, but ensure the wiring supports multiple switches. You may need to run extra wires or use a 3 gang back box to fit the new switch properly.
How To Identify Live, Neutral, And Earth Wires?
Use a voltage tester to find the live wire. Neutral wires are usually blue, and earth wires are green/yellow. Proper identification ensures safe and accurate switch connections.
Conclusion
Connecting a 3 gang light switch is simple with the right steps. Take your time and follow the wiring instructions carefully. Always turn off the power before starting any work. Double-check each connection to avoid mistakes. Proper installation keeps your home safe and your lights working well.
Practice makes perfect, so don’t rush. This guide helps you feel confident and ready for the task. Enjoy the convenience of controlling multiple lights from one place.

