Are you tired of getting up to switch off the light every time you leave a room? Installing a 2 way light switch can solve that problem and make your home more convenient.
With just a bit of guidance, you can easily set it up yourself and enjoy controlling your lights from two different spots. You’ll discover simple, step-by-step instructions that anyone can follow, even if you’re not an expert. Keep reading to learn how to upgrade your lighting setup and add more comfort to your daily life.
Tools And Materials Needed
Installing a 2 way light switch needs the right tools and materials. Using proper tools makes the job safer and faster. Having all materials ready avoids delays and mistakes. This section lists the essential items for your project.
Tools Required
- Flathead screwdriver – for opening switch plates and terminals
- Phillips screwdriver – for securing screws on switches
- Wire stripper – to remove insulation from wires
- Voltage tester – to check if wires are live
- Pliers – to bend and twist wires
- Drill (optional) – for making holes if needed
- Electrical tape – to insulate wire connections
Materials Needed
- Two 2 way light switches – main control points
- Electrical wires (usually 3-core cable) – to connect switches and light
- Wire connectors or terminal blocks – to join wires safely
- Light fixture – the lamp or bulb to control
- Switch boxes – to hold switches securely in the wall
- Wall plate covers – to finish the look and protect wiring
Safety Precautions
Safety is the top priority before starting to install a 2 way light switch. Working with electricity can be dangerous without proper care. Following basic safety rules protects you from shocks and accidents.
Take time to prepare and check everything before you begin. Stay alert and avoid rushing the process to keep safe.
Turn Off The Power
Always switch off the main power at the circuit breaker. Double-check that the power is off using a voltage tester. Do not trust the wall switch alone to cut power.
Use Proper Tools
Choose insulated tools designed for electrical work. This helps prevent electric shocks. Avoid using damaged or worn-out equipment.
Wear Safety Gear
Wear rubber-soled shoes to reduce shock risk. Use safety goggles to protect your eyes from sparks or debris. Avoid loose clothing that can catch on wires.
Work In A Dry Area
Keep the workspace dry to avoid electric hazards. Never handle wires with wet hands. Water increases the risk of shocks.
Follow Instructions Carefully
Read the switch manual before starting the installation. Follow wiring diagrams step-by-step. Mistakes can cause faults or danger later.
Test Before Finalizing
After wiring, turn the power back on carefully. Use a tester to check if the switch works correctly. Turn off the power again before securing covers.
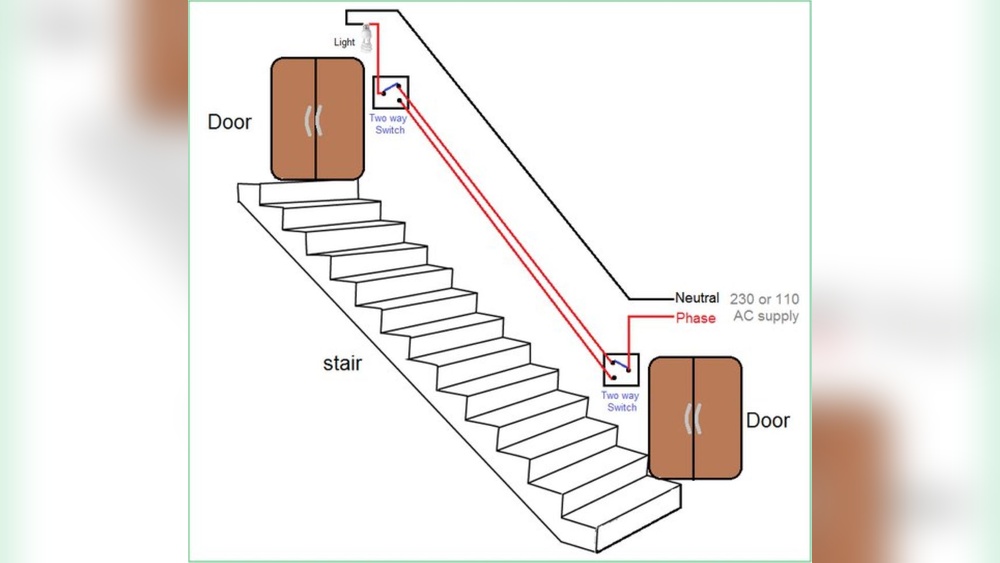
Understanding 2 Way Switch Wiring
A 2 way switch allows control of one light from two different places. This is common in hallways or large rooms. Knowing how the wiring works is key to a safe installation.
Two switches connect to the same light fixture. Each switch can turn the light on or off independently. This setup requires a special wiring method.
Basic Components Of 2 Way Switch Wiring
The main parts include two switches, traveler wires, a common wire, and the light fixture. Traveler wires carry current between the two switches. The common wire connects the power source or the light.
How Traveler Wires Work
Traveler wires run between the two switches. They allow the switches to send signals to each other. These wires control whether the circuit is open or closed.
Role Of The Common Terminal
The common terminal is where the live wire or the light wire connects. It is different from the traveler terminals. This terminal is the key to switching the light on or off.
Understanding The Circuit Path
The power flows through the common terminal to the light. The traveler wires create two possible paths. Switching either switch changes the path, turning the light on or off.
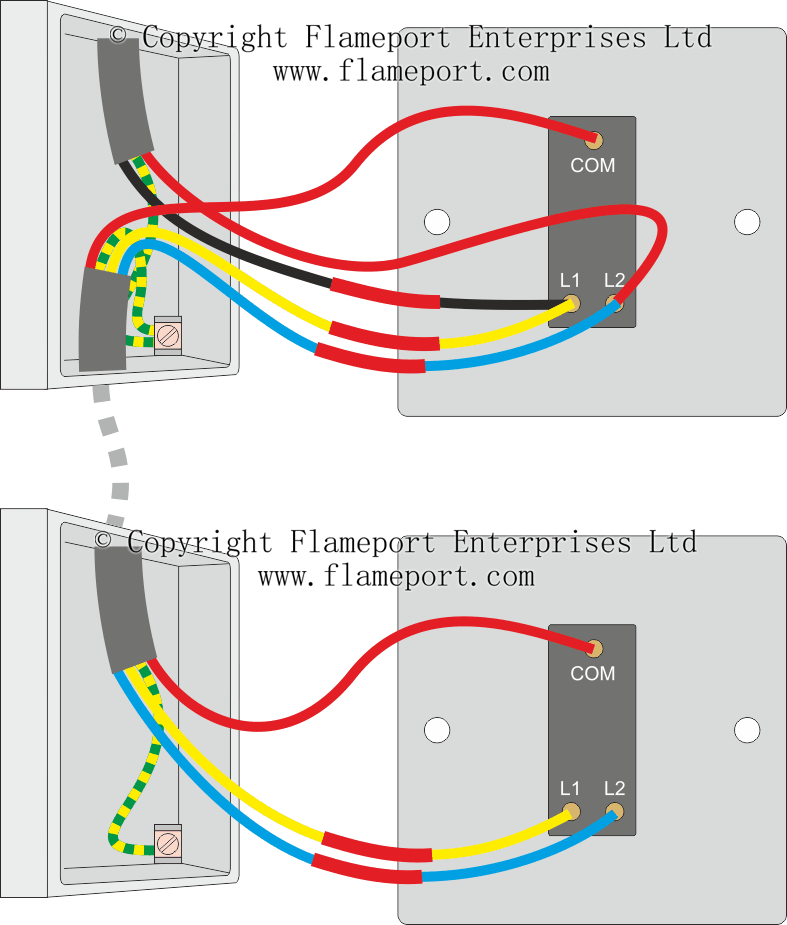
Credit: flameport.com
Preparing The Work Area
Preparing the work area is the first step for installing a 2 way light switch. A clean and safe space makes the job easier and faster. You need to organize your tools and materials before starting.
Safety is very important. Make sure the power is off to avoid electric shock. Use the right tools to prevent damage to wires and switches. Clear the area of any clutter or obstacles. This helps you move freely and work comfortably.
Turn Off The Power Supply
Locate the main circuit breaker. Switch it off to cut power to the room. Use a voltage tester to confirm no electricity flows in the wires. Safety first. Never skip this step.
Gather Your Tools And Materials
Prepare the screwdriver, wire stripper, voltage tester, and electrical tape. Have the new 2 way switch ready. Organize everything within reach. This saves time and avoids interruptions.
Clear And Light The Work Area
Remove objects near the switch box. A tidy space reduces accidents and distractions. Use a portable lamp or flashlight for good visibility. Proper lighting helps you see wires and connections clearly.
Turning Off Power
Turning off the power is the first and most important step before installing a 2 way light switch. It keeps you safe from electric shocks. Safety cannot be ignored in any electrical work.
Always make sure the power is completely off before touching any wires. This prevents accidents and damage to the electrical system.
Locate The Main Circuit Breaker
Find the main circuit breaker box in your home. It is usually in the basement, garage, or utility room. This box controls power for the entire house.
Switch Off The Correct Breaker
Identify the breaker for the room or area where you will work. Flip the switch to the off position. This stops electricity flow to that specific circuit.
Verify Power Is Off
Use a voltage tester or a non-contact tester to check the wires. Make sure no current is running through. This confirms the power is truly off.
Wear Safety Gear
Wear rubber-soled shoes and insulated gloves. These add extra protection during the installation. Better safe than sorry.

Credit: www.realpars.com
Removing Existing Switches
Removing existing switches is the first step in installing a 2 way light switch. It helps to work safely and prepare the wiring for the new switch. Take your time and follow each step carefully.
Always turn off the power at the breaker before touching any wires. Use a voltage tester to confirm the power is off. Safety is the top priority.
Gather Necessary Tools
Prepare a screwdriver, voltage tester, and pliers. These tools make the job easier and safer. Have a container ready to hold screws and small parts.
Remove The Switch Cover Plate
Unscrew the cover plate gently. Keep the screws safe for later. Removing the plate exposes the switch and wiring.
Unscrew The Switch From The Wall Box
Loosen the screws holding the switch. Pull the switch out slowly to see the wires. Avoid pulling too hard to prevent damage.
Identify And Label Wires
Look at the wires connected to the switch. Use tape or markers to label each wire. This helps during installation of the new switch.
Disconnect The Wires
Loosen the screws or remove wire nuts to free the wires. Keep the wires separated to avoid confusion. Handle wires carefully to avoid damage.
Wiring The 2 Way Switches
Wiring the 2 way switches is a crucial step in installing your lighting control system. This process lets you control one light from two different places. Understanding the wiring helps avoid mistakes and ensures safety. Follow each step carefully for a successful setup.
Connecting The Common Terminal
Start by identifying the common terminal on each switch. It is usually marked or colored differently. Connect the live wire from the power source to the common terminal on the first switch. On the second switch, connect the wire going to the light fixture to the common terminal. This setup allows the switches to control the current flow properly.
Wiring The Traveler Terminals
The traveler terminals connect the two switches. Use two wires for this connection. Attach each wire to a traveler terminal on the first switch. Then, connect the other ends of these wires to the traveler terminals on the second switch. These wires carry current between switches, allowing the light to turn on or off from either location.
Securing Ground Wires
Ground wires protect you from electrical shocks. Find the green or bare copper wires in your cables. Connect these ground wires to the green grounding screws on each switch. Also, link any ground wires together using a wire connector. This step ensures your installation is safe and meets electrical codes.
Installing The Switches Into Boxes
Start by placing the switch inside the electrical box carefully. Secure it with screws to keep it stable and safe. Make sure wires are connected properly before fixing the switch in place.
Prepare The Electrical Boxes
Start by turning off power to the circuit. Use a tester to confirm no electricity flows. Remove the old switches carefully. Check the boxes for damage or dirt. Clean the boxes to ensure good contact. Make sure the boxes are deep enough for new switches.
Connect The Wires To The Switches
Identify the common and traveler wires. Attach the common wire to the switch’s common terminal. Connect the traveler wires to the traveler terminals. Tighten all terminal screws firmly. Avoid loose connections that cause flickering lights. Use wire nuts to secure any extra wire ends.
Mount The Switches Into The Boxes
Fold the wires neatly back into the box. Place the switch carefully inside the box. Align the switch with the mounting holes. Secure the switch with screws, but do not overtighten. Make sure the switch sits flush with the wall. Test the switch movement before finalizing.
Testing The Installation
Testing the installation of a 2 way light switch is a key step. It ensures everything works safely and correctly. Without testing, you might face problems like lights not turning on or off. Follow these simple steps to verify your work.
Turn On The Power Supply
First, restore the power at the circuit breaker. This activates the switches and the light. Be careful and make sure the area is dry.
Check Each Switch Function
Operate the first switch. The light should turn on or off. Next, try the second switch. It should also control the light independently.
Test All Switch Positions
Toggle each switch several times. The light must respond every time. If it does, the wiring is correct.
Look For Flickering Or Delays
Watch the light closely. Flickering or delays may show loose wires. Tighten connections if needed.
Use A Voltage Tester
Check the voltage at the switch terminals. This confirms power flow and proper wiring.

Credit: www.realpars.com
Troubleshooting Common Issues
Troubleshooting common issues in a 2 way light switch installation helps ensure proper function. Problems can occur due to wiring mistakes or faulty components. Simple checks often solve the problem without extra cost or time.
Careful inspection and testing are key steps. Understanding typical issues saves frustration and improves safety. Below are common problems and how to fix them.
Check For Loose Or Disconnected Wires
Loose wires cause switches to stop working or flicker. Turn off the power before inspecting. Tighten any loose screws and reconnect wires firmly. Ensure no wires are touching each other or metal parts.
Test The Switches With A Voltage Tester
Use a voltage tester to check if electricity reaches each switch. No voltage means a wiring error or power issue. Confirm the circuit breaker is on. Replace the switch if it shows no response.
Verify Correct Wire Connections
Incorrect wiring causes switches to work improperly or not at all. Double-check the position of live, traveler, and neutral wires. Follow the wiring diagram carefully. Swap wires if the switch does not toggle lights correctly.
Replace Faulty Switches
Old or damaged switches may fail. Signs include burning smell, crackling sounds, or physical damage. Replace with new switches matching your electrical specifications. Always turn off power before swapping switches.
Inspect The Light Fixture
The problem might be in the light fixture, not the switches. Check the bulb and socket condition. Replace burnt-out bulbs or damaged fixtures. Confirm the fixture wiring is secure and connected properly.
Frequently Asked Questions
What Tools Are Needed To Install A 2 Way Light Switch?
You need a screwdriver, voltage tester, wire stripper, electrical tape, and the 2 way switch itself. Safety gloves and a flashlight can help. These tools ensure safe and efficient installation.
How Do You Wire A 2 Way Light Switch Correctly?
Connect the common terminal to the power source, and the two traveler terminals to the other switch. Proper wiring allows control of one light from two locations safely and effectively.
Can I Install A 2 Way Switch Without Electrician Help?
Yes, if you have basic electrical knowledge and follow safety guidelines. Always turn off power before working. If unsure, hire a professional to avoid risks.
How To Test If A 2 Way Switch Is Working?
Use a voltage tester or multimeter to check for current flow. Toggle switches to see if the light responds from both locations. This confirms correct installation and function.
Conclusion
Installing a 2 way light switch is simple with the right steps. Always turn off the power before starting. Follow the wiring instructions carefully to avoid mistakes. Test the switch after installation to ensure it works well. This skill helps control lights from two places easily.
Take your time and stay safe during the process. Now, you can enjoy better lighting control in your home.


