Are you struggling to figure out how to connect a 4 way light switch in your home? You’re not alone.
It might seem tricky at first, but once you understand the simple steps, you can control your lights from multiple locations with ease. Imagine turning your hallway or large room lights on and off no matter where you stand. This guide will walk you through the process clearly and confidently, so you can save money and feel proud of your DIY skills.
Keep reading, and you’ll have your 4 way switch working perfectly in no time.
Tools And Materials Needed
Connecting a 4 way light switch needs the right tools and materials. Using proper equipment makes the job safer and easier. Prepare all items before starting the work. This saves time and avoids interruptions.
Below is a list of tools and materials needed to connect a 4 way light switch correctly. Each item plays an important role in the process.
Tools Required
- Screwdriver set – both flathead and Phillips
- Wire stripper – to remove insulation from wires
- Voltage tester – to check power is off
- Needle-nose pliers – for bending and holding wires
- Electrical tape – to secure wire connections
- Wire nuts – to join wires safely
- Flashlight – for better visibility in dark spaces
Materials Needed
- 4 way switch – the main switch for multi-location control
- 2 three-way switches – to work alongside the 4 way switch
- Electrical wires – typically 14/3 or 12/3 gauge wires
- Light fixtures – connected to the switches
- Wall plates – to cover the switches after installation
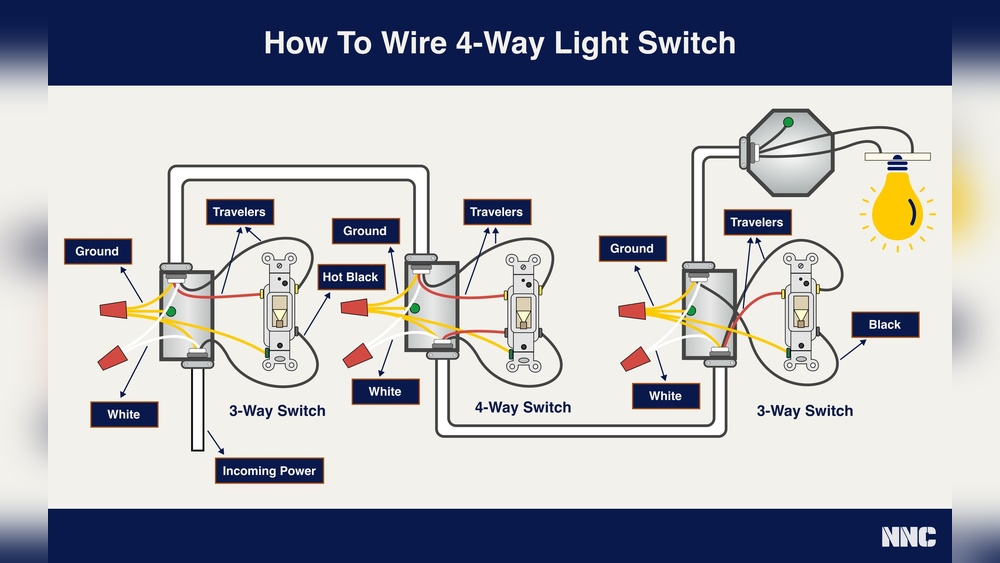
How A 4 Way Switch Works
Connecting a 4 way switch lets you control one light from three or more places. It works by linking two 3 way switches with the 4 way switch in the middle. Wires carry the current through each switch to turn the light on or off.
A 4 way switch allows control of a single light from three or more locations. It works with two 3 way switches placed at the ends of the circuit. The 4 way switch sits between them to change the path of the electrical current.
The switch has four terminals. It connects two pairs of traveler wires. Flipping the switch changes which traveler wires connect, directing the current flow. This action either completes or breaks the circuit.
This setup gives flexible control over lighting. You can turn the light on or off from multiple spots in a room or hallway. The 4 way switch does not directly turn the light on or off. It only changes the current path between the two 3 way switches.
Safety Precautions
Safety is the top priority when working with electrical switches. A 4 way light switch involves multiple wires and connections. Small mistakes can cause shocks or damage. Follow safety steps to protect yourself and your home.
Turn Off The Power
Always switch off the power at the circuit breaker. Do not rely on the wall switch. Use a tester to confirm no electricity flows to the wires. This step prevents electric shock during installation.
Use Proper Tools
Choose insulated tools made for electrical work. Avoid metal tools without insulation. Using correct tools lowers the risk of accidental shorts or shocks. Keep tools dry and clean.
Wear Safety Gear
Wear rubber-soled shoes and safety gloves. These items protect against electric shocks. Avoid loose clothing or jewelry near wires. Stand on a dry surface to stay safe.
Check Wiring Diagrams
Read wiring diagrams carefully before starting. Correct wiring ensures the switch works safely and properly. Mistakes can cause short circuits or fires. Follow diagrams step-by-step.
Work In Good Lighting
Bright light helps you see wires and connections clearly. Avoid working in dim or dark areas. Mistakes happen easily when you cannot see well. Use a flashlight if needed.
Keep Children And Pets Away
Keep children and pets out of the work area. Electrical work can be dangerous for them. It also helps you focus and avoid accidents. Close doors or use barriers if needed.

Credit: community.smartthings.com
Identify Wiring Components
Identifying wiring components is the first step to connect a 4 way light switch. Knowing each part helps you work safely and correctly. This section explains the main wiring parts you will find.
Traveler Wires
Traveler wires carry current between switches in the circuit. Usually, two traveler wires connect the 3 way and 4 way switches. They are often red and black or red and white with tape.
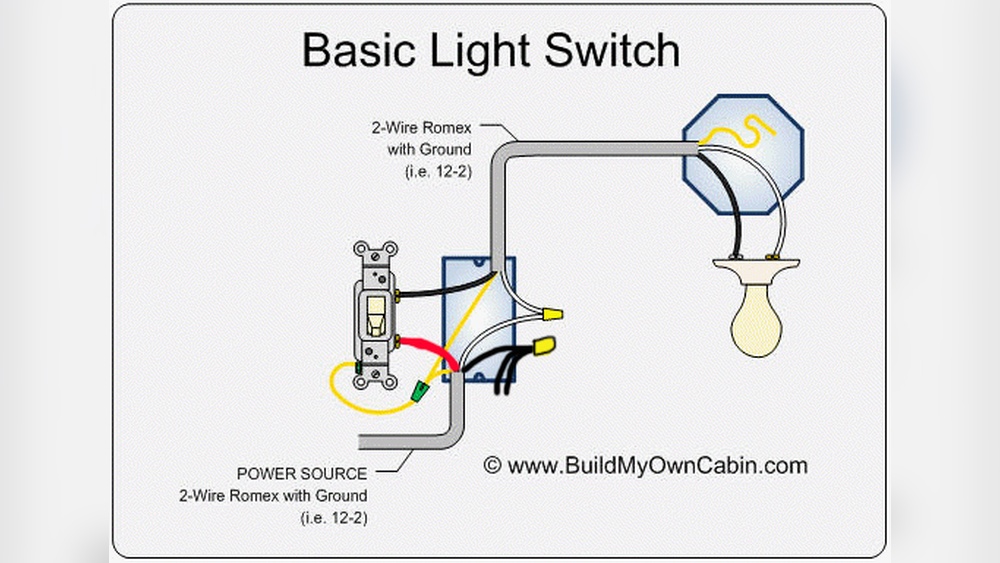
Common Wire
The common wire connects the power source or the light fixture to the switch. It is usually black and screws into a different terminal than the travelers. This wire is key for the circuit to work.
Ground Wire
The ground wire provides safety by preventing electrical shocks. It is bare copper or green and connects to the switch’s ground terminal. Always connect the ground wire to reduce risk.
Neutral Wire
The neutral wire completes the circuit back to the power source. It is usually white and does not connect to the switches in a 4 way setup. Instead, it runs directly to the light fixture.
Turn Off Power
Turning off the power is the first step before connecting a 4 way light switch. Safety must come first. Electricity can cause serious injury or worse. Always make sure no current flows to the switches or wires. This prevents shocks while working.
Locate your home’s main electrical panel. This is where the power supply for your circuits is controlled. You will switch off the correct breaker to cut power to the switch area. Double-check to avoid working on live wires.
Find The Correct Circuit Breaker
Identify which breaker controls the lights you want to work on. Most panels have labels or a map. If not, test by turning off each breaker and checking the light. Mark the right breaker to avoid confusion.
Switch Off The Breaker
Flip the breaker handle to the off position. This stops electricity flow to your light switch. Do not skip this step. Even a small current can be dangerous during wiring.
Verify Power Is Off
Use a voltage tester or multimeter on the switch wires. Confirm no electricity is present before touching any wires. Test all wires in the box. Never assume power is off without checking.

Credit: community.smartthings.com
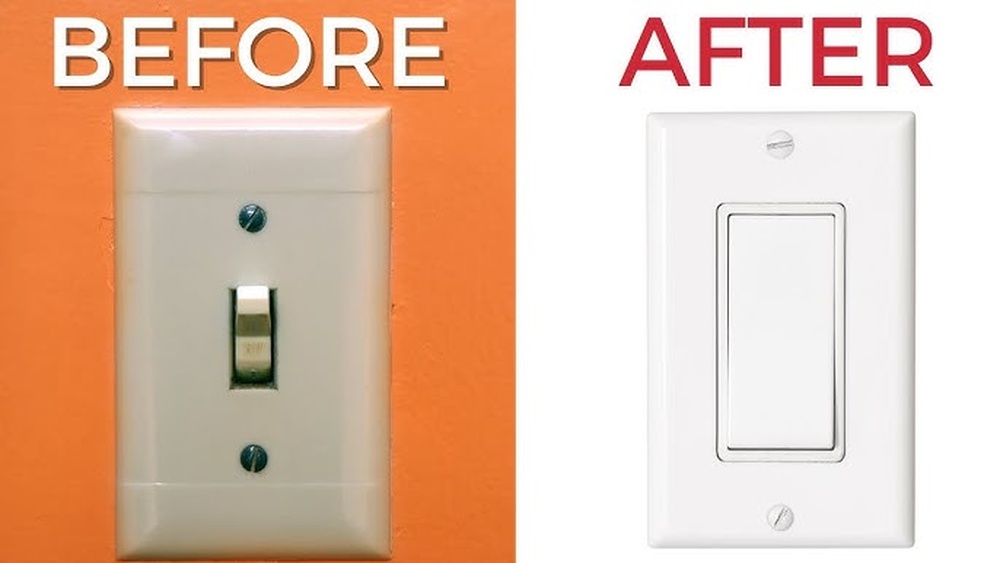
Remove Existing Switches
Start by turning off the power to the switches at the circuit breaker. Carefully remove the switch covers and unscrew the existing switches from the wall. Gently pull the switches out to expose the wiring for the next steps.
Turn Off The Power
Safety is the first step. Switch off the power at the circuit breaker. Double-check by testing the switch with a voltage tester. Never skip this step to avoid electric shock.
Remove The Switch Cover Plates
Use a screwdriver to remove the screws holding the cover plates. Take off the plates carefully. This exposes the switches and wiring behind them.
Unscrew The Existing Switches
Loosen the screws that hold the switches in the electrical box. Pull the switches gently out to see the wires. Keep the wires organized for easier reconnection.
Note The Wiring Setup
Look closely at how wires connect to the switches. Take a photo or write notes. This helps connect the new 4 way switch correctly.
Connect The 3 Way Switches
Connecting the 3 way switches is a key step in wiring a 4 way light switch setup. The 3 way switches act as the start and end points of the circuit. Understanding their wiring is essential for smooth operation. This section explains how to connect these switches correctly.
Identify The Common Terminal
Each 3 way switch has a common terminal. This terminal is usually a different color, often darker. It connects to the power source or the light fixture. Locate this terminal on both 3 way switches before wiring.
Connect The Traveler Wires
Two traveler terminals exist on each 3 way switch. They carry current between the switches. Connect the traveler wires to these terminals carefully. Maintain consistent wire placement on both switches for proper function.
Attach The Ground Wire
Ground wires provide safety by preventing electric shocks. Connect the ground wire to the green screw on each 3 way switch. Ensure a secure and tight connection to avoid hazards.
Double-check All Connections
Review all wire connections before finishing. Loose or incorrect wiring can cause problems. Confirm that the common and traveler wires are correctly attached. Safety first: turn off the power during this process.

Credit: community.inovelli.com
Install The 4 Way Switch
Installing a 4 way switch lets you control lights from three or more places. This setup is common in hallways or large rooms. The 4 way switch works with two 3 way switches to complete the circuit.
Follow these steps to install the 4 way switch safely and correctly. Pay close attention to the wiring connections. Proper installation ensures smooth operation and prevents electrical issues.
Turn Off The Power
Start by turning off the power at the circuit breaker. This step is crucial to avoid electric shock. Use a voltage tester to confirm the power is off before touching wires.
Identify The Traveler Wires
Locate the traveler wires coming from the two 3 way switches. These wires carry current between the switches. Usually, they are red and black or another color combination.
Connect The Traveler Wires To The 4 Way Switch
Attach the traveler wires to the terminals on the 4 way switch. Match the wires from each 3 way switch to the correct terminals. Tighten the screws securely to hold wires in place.
Secure The Switch And Restore Power
Push the wires back into the electrical box carefully. Screw the 4 way switch into the box firmly. Turn the power back on at the circuit breaker and test the switch.
Secure All Connections
Securing all connections is a key step in wiring a 4 way light switch. Loose wires can cause flickering lights or even dangerous shorts. Taking time to make strong, stable connections ensures the switch works safely and smoothly.
Each wire must be tightly fastened to its terminal or wire nut. Check every connection twice before restoring power. A good connection means no sparks or unexpected shutdowns.
Strip Wires Properly
Strip about half an inch of insulation from each wire end. Use a wire stripper for clean cuts. Avoid nicking the wire strands. Exposed copper should be smooth and ready to connect.
Twist Wires Together Firmly
For wire nuts, twist wires clockwise before capping. This helps keep wires snug inside the nut. Loose twisting can cause poor contact and loose connections.
Tighten Terminal Screws Securely
Wrap bare wire clockwise around terminal screws. Tighten screws until the wire does not move. Do not over-tighten, as it can damage the wire or terminal.
Use Quality Wire Nuts
Select wire nuts that fit the wire gauge and number of wires. Cheap or wrong-sized nuts may fail over time. Good wire nuts hold wires tightly and resist corrosion.
Check All Connections Before Closing
Give each wire a gentle tug to test its hold. Inspect wire nuts for full coverage of exposed wire. Confirm no copper is visible outside the connectors.
Test The Switches
Testing the switches is a key step after wiring a 4 way light switch. This step ensures all switches work together to control the light. It helps find any wiring mistakes early. Testing saves time and prevents future problems.
Start testing only after turning the power back on. Use the switches in different orders. Check if the light turns on and off correctly from all switch locations. Each switch should change the light’s state.
Check Power Supply
First, make sure the power supply is on. Use a voltage tester on the switches. Confirm electricity reaches each switch box. No power means a wiring or breaker issue.
Operate Each Switch
Flip each switch one by one. Watch the light carefully. It should turn on or off every time you flip a switch. If the light does not respond, recheck the wiring.
Test Switch Combinations
Try different switch combinations. Turn on one switch, then another. The light must respond correctly to all combos. This confirms proper wiring of the 4 way switch system.
Use A Helper
Ask someone to assist you. One person flips the switches, the other watches the light. This method makes testing faster and easier. It helps detect any missed issues.
Troubleshooting Tips
Troubleshooting a 4 way light switch can seem tricky. Problems often arise from wiring mistakes or faulty parts. Knowing common issues helps fix the switch quickly.
Check each part carefully. Small errors can cause big problems. Follow these simple tips to spot and solve issues fast.
Check The Wiring Connections
Loose or wrong wires cause most problems. Turn off power before inspecting. Make sure all wires are tight and in the correct terminals. Use a diagram to verify connections.
Test The Switches One By One
Test each switch separately. Use a voltage tester or multimeter. A broken switch will stop the circuit. Replace any switch that does not work properly.
Look For Damaged Components
Inspect wires and switches for damage. Burn marks or frayed wires need replacement. Damaged parts can cause shorts or no power.
Verify Power Supply
Check if power reaches the first switch. No power means an issue with the circuit breaker or fuse. Reset the breaker or replace the fuse if needed.
Use A Continuity Test
Continuity tests show if the circuit is complete. Use a multimeter to check wire paths. No continuity means a break in the wiring.
Frequently Asked Questions
What Is A 4 Way Light Switch Used For?
A 4 way light switch controls lighting from three or more locations. It works between two 3 way switches, allowing flexible light control in large rooms or hallways.
How Do You Wire A 4 Way Light Switch?
Wire a 4 way switch by connecting traveler wires between two 3 way switches. The 4 way switch toggles the current flow, controlling the light from multiple points safely.
Can I Install A 4 Way Switch Myself?
Yes, you can install it yourself if you know basic wiring. Always turn off power before starting, follow wiring diagrams, and use proper tools to ensure safety.
What Tools Are Needed For 4 Way Switch Installation?
You need a screwdriver, wire stripper, voltage tester, electrical tape, and wire nuts. These tools help safely connect and secure wires during installation.
Conclusion
Connecting a 4 way light switch is easier than it seems. Follow each step carefully and take your time. Double-check your wiring before turning on power. Safety is key to avoid shocks or damage. Once done, your lights will work from multiple spots.
This setup adds convenience to any room or hallway. Keep this guide handy for future electrical projects. Simple tools and clear instructions make the job smooth. You can enjoy better lighting control with confidence.