Have you ever wanted to control two lights with just one switch but didn’t know how? Connecting two lights to a single switch might seem tricky, but it’s easier than you think.
Imagine flipping one switch and instantly lighting up two different areas in your home. This simple trick can save you time, reduce clutter, and make your space more convenient. Keep reading, and you’ll learn the exact steps to do it safely and effectively—no electrician needed!
Tools And Materials Needed
Before starting to connect two lights to one switch, gather the right tools and materials. This step makes the work easier and safer. Having everything ready helps you avoid interruptions. It also ensures a smooth installation process.
Each item plays a key role. Some tools help with wiring, others with securing parts. Choosing quality materials improves the connection’s durability. Let’s explore what you will need.
Basic Tools
- Screwdriver set for removing and attaching screws
- Wire stripper to remove insulation from wires
- Voltage tester to check if wires are live
- Needle-nose pliers for bending and twisting wires
- Electrical tape to insulate wire connections
Electrical Materials
- Light switch suitable for your circuit
- Electrical wires (usually 14/2 or 12/2 gauge)
- Wire nuts to join wires securely
- Light fixtures or bulbs you want to connect
- Electrical box to house the switch
Safety Equipment
- Insulated gloves to protect from electric shocks
- Safety goggles to shield your eyes
- Flashlight or portable light for visibility

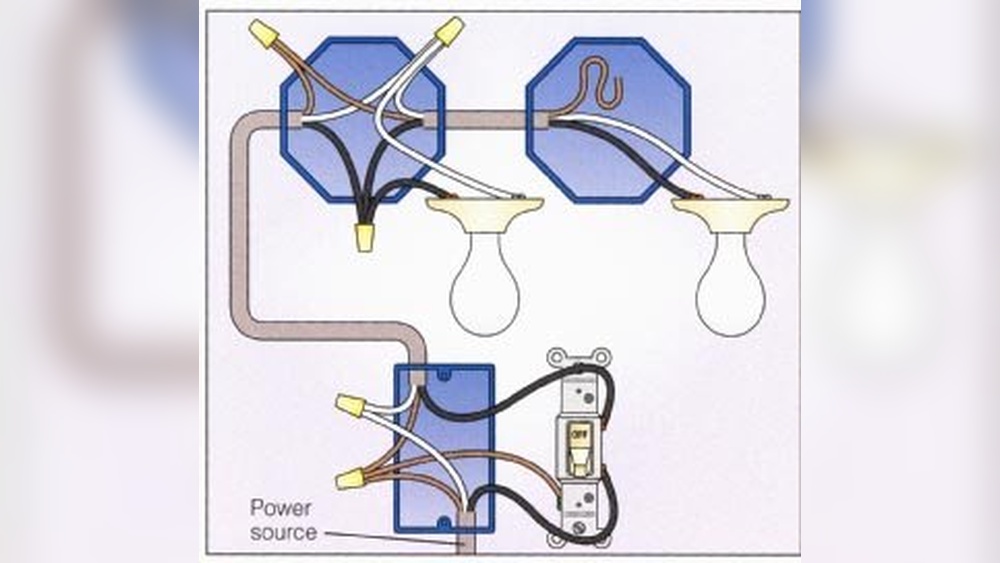
Credit: diy.stackexchange.com
Safety Precautions
Safety comes first when connecting two lights to one switch. Electrical work can be risky without proper steps. Follow these safety tips to avoid accidents and damage. Protect yourself and your home by preparing well before starting.
Turn Off The Power
Always switch off the power at the circuit breaker. Do not rely on the wall switch alone. Use a voltage tester to confirm no electricity flows. This prevents electric shocks while working on wires.
Use Proper Tools And Equipment
Choose insulated tools made for electrical work. Avoid using damaged or worn-out tools. Use wire strippers, screwdrivers, and pliers designed for wiring. Proper tools make the job safer and easier.
Wear Safety Gear
Wear rubber gloves to protect hands from shocks. Use safety glasses to shield your eyes from sparks or debris. Avoid loose clothing that can catch on wires or tools.
Check Local Electrical Codes
Follow your area’s electrical rules and regulations. Codes ensure the work is safe and legal. Check if you need a permit or inspection before starting.
Double-check Connections
Inspect all wire connections carefully before restoring power. Loose or wrong connections can cause shorts or fires. Tighten screws and secure wires properly in terminals.
Identify Existing Wiring
Start by locating the wires connected to the existing switch. Check for the power source and the wires leading to each light. Knowing the wiring setup helps connect two lights safely to one switch.
Understanding Your Current Setup
Start by turning off the power at the breaker. Safety first.
Remove the switch cover plate carefully. Look inside the electrical box.
Identify the wires connected to the switch. Usually, you see black, white, and green or bare copper wires.
The black wire is often the hot wire. It carries power to the switch.
The white wire is the neutral. It completes the electrical circuit.
Green or bare copper wires are ground wires. They protect against electrical faults.
Using A Voltage Tester
Use a voltage tester to check which wires have power.
Touch the tester to each wire carefully. Note the wires that light up.
Mark the hot wire to avoid confusion later.
This step ensures you know which wire controls the switch power.
Tracing Wires To Lights
Follow the wires from the switch box to the light fixtures.
Look for cable bundles that run between the switch and lights.
Identify which wires go to each light. This helps in proper connection.
Label wires if needed to keep track of their paths.
Checking Wire Conditions
Inspect wires for damage or wear. Replace any faulty wires.
Ensure wire insulation is intact to avoid shorts.
Good wiring condition is key for a safe electrical connection.

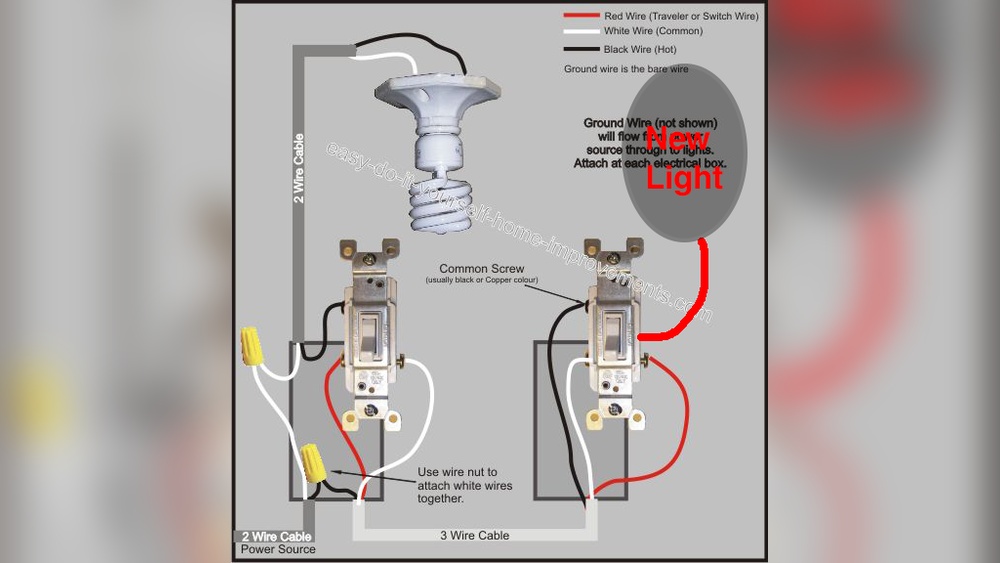
Credit: www.electrical-online.com
Turn Off Power Supply
Always switch off the power supply before starting any electrical work. This prevents shocks and keeps you safe while connecting two lights to one switch. Safety first.
Why Turn Off The Power Supply First
Safety is the main reason to turn off the power supply. Electricity can cause shocks or injuries. Always cut power before starting any electrical work. This step protects you and your home.
Turning off power stops current from flowing to wires. It makes the work area safe to handle wires and switches. Without power, there is no risk of electric shock.
How To Safely Turn Off The Power
Find your home’s main electrical panel. Look for the circuit breaker that controls the lights you want to work on. Flip the breaker switch to the off position.
Use a voltage tester to check if power is off. Test the wires at the switch or light fixture. No reading means it is safe to proceed.
Double Check Before You Start Wiring
Never trust just one check to confirm power is off. Test both the switch and the light fixture wires. This ensures no hidden current is present.
Ask someone to help by turning on the light switch while you test. If the tester stays off, the power is off for sure.
Prepare The Switch Box
Preparing the switch box is a key step before connecting two lights to one switch. This step ensures safety and makes the wiring process easier. Start by turning off the power at the circuit breaker. This prevents any electrical shocks while working.
Next, remove the switch cover plate carefully. Use a screwdriver to take out the screws holding it in place. Gently pull the switch out from the wall to access the wires behind it.
Check the wires inside the switch box. You should see a few different wires, usually black (hot), white (neutral), and green or bare (ground). Make sure these wires are in good condition, without any damage or frays.
Turn Off Power At The Circuit Breaker
Locate the right breaker that controls the switch. Flip it off to cut power to the switch box. Use a voltage tester to confirm the power is off. Safety first.
Remove The Switch Cover Plate
Unscrew the cover plate carefully. Place the screws somewhere safe. Pull the switch gently out from the wall. Avoid pulling too hard on the wires.
Inspect And Identify Wires
Look at all wires in the box. Identify the hot, neutral, and ground wires. Check for damage or loose connections. Proper identification helps in correct wiring.

Credit: www.youtube.com
Connect Wires To The Switch
Start by turning off the power to ensure safety. Connect the live wire from the switch to both light fixtures using wire connectors. Finally, attach the neutral and ground wires to complete the circuit.
Identify The Wires
First, turn off the power at the breaker box. Safety is the top priority. Open the switch box to see the wires. You will find a black (hot) wire, a white (neutral) wire, and a green or bare copper (ground) wire. The black wire carries electricity to the switch. The white wire returns electricity to the panel. The ground wire protects against electrical faults.
Connect The Ground Wire
Start by attaching the ground wire to the green screw on the switch. If the switch box has a ground wire, twist them together with a wire nut. This connection prevents electric shock. Make sure the wires are secure and tight.
Attach The Hot Wires
Connect the black (hot) wires to the switch terminals. One black wire brings power from the panel. The other black wire goes to the first light. Use a screwdriver to tighten the screws. Check that the wires do not touch each other or the box.
Secure The Neutral Wires
Neutral wires usually connect inside the box but not to the switch. Twist the white wires together with a wire nut. This completes the circuit for both lights. Do not attach the neutral wires to the switch terminals.
Double-check All Connections
Make sure all wire connections are tight and secure. Loose wires can cause flickering lights or electrical hazards. Push the wires neatly into the box. Attach the switch to the wall and screw it firmly.
Wire The Two Lights
Wiring two lights to one switch requires careful connection of the wires. Each wire has a specific role in the circuit. Proper wiring ensures both lights work safely and efficiently. Follow these steps to connect the hot, neutral, and ground wires correctly.
Connect Hot Wires
The hot wire carries electricity from the switch to the lights. Usually, this wire is black or red. Connect the hot wire from the power source to the switch’s input terminal. Then, connect the switch output to the hot wires of both lights. Use wire nuts to join the switch wire and the two light wires together. Make sure the connection is tight and secure.
Connect Neutral Wires
Neutral wires complete the electrical circuit. They are usually white. Join the neutral wires from the power source and both lights together. Use a wire nut to connect these three wires. Do not connect neutral wires to the switch. Keep these connections neat and firm.
Connect Ground Wires
Ground wires protect from electrical shocks. These are usually green or bare copper wires. Connect the ground wires from the power source, both lights, and the switch. Twist them together and secure with a wire nut or grounding screw. Ensure all ground wires are connected to maintain safety.
Secure All Connections
Securing all connections is key to safely connecting two lights to one switch. Loose or poor wiring can cause flickering lights or even electric shocks. Taking time to make tight, clean connections ensures your setup works well and lasts long.
Good connections reduce the risk of short circuits and electrical fires. They keep the current flowing smoothly and protect your home’s wiring system. Always double-check each wire before finishing your project.
Use Proper Wire Connectors
Wire connectors join wires firmly. Choose connectors made for electrical use. Twist wires together tightly before placing the connector. Make sure no bare wire shows outside the connector.
Tighten Screws Securely
Switches and outlets have screws to hold wires. Wrap wires around screws in a clockwise direction. Tighten screws firmly. Loose screws cause poor contact and may create sparks.
Check Wire Insulation
Wire insulation protects from shocks and shorts. Do not strip too much insulation. Keep about half an inch of bare wire exposed. Replace damaged wires or insulation before connecting.
Test Connections Before Closing
Turn power back on and test the lights. If lights flicker or do not work, turn off power and check connections again. Fix any loose or faulty wiring before finishing.
Restore Power And Test
After wiring two lights to one switch, restoring power is a crucial step. It lets you check if everything works correctly. Safety comes first. Make sure no tools or wires are exposed before turning the power back on.
Testing the setup confirms the connections are secure. It shows if the lights respond to the switch. This step avoids potential issues later. It also gives peace of mind that the job is done right.
Turn On The Circuit Breaker
Locate the main electrical panel. Find the breaker that controls the lights you worked on. Flip the breaker switch to the ON position. This restores power to your light circuit.
Test The Switch Functionality
Flip the switch connected to the lights. Watch if both lights turn on together. Flip the switch off. Check if both lights turn off without flickering.
Inspect For Any Issues
Look for flickering or dim lights. Listen for buzzing sounds from the switch or lights. If any problem appears, turn off the breaker immediately. Double-check your wiring connections before trying again.
Troubleshooting Tips
Troubleshooting is a key step when connecting two lights to one switch. Problems can happen even with simple wiring. Finding the issue fast saves time and effort.
Check each part carefully. Small mistakes cause big problems. Use these tips to fix common issues and make your lights work perfectly.
Check The Power Source
Make sure the power is off before you start. Use a voltage tester to check the wires. Confirm that the circuit has power. No power means no light.
Inspect Wire Connections
Loose or wrong wire connections are common problems. Tighten all wire nuts and screws. Match wire colors correctly: black to black, white to white.
Test The Switch Functionality
Sometimes the switch itself is faulty. Remove the switch cover and test it with a multimeter. Replace it if it does not work properly.
Look For Damaged Wires
Wires can get cut or damaged. Check for exposed or broken wires. Replace damaged wires to avoid shorts or fire risks.
Verify Light Bulbs
Sometimes the bulbs cause the problem. Try new bulbs to see if the lights turn on. Use the correct wattage bulbs for your fixtures.
Frequently Asked Questions
How Do I Wire Two Lights To One Switch Safely?
To wire two lights to one switch safely, connect the switch’s live wire to the first light’s live terminal. Then, daisy-chain the second light’s live wire to the first light. Ensure all neutral wires are connected together and use proper insulation to avoid short circuits.
Can I Control Two Lights With A Single Switch?
Yes, you can control two lights with a single switch by wiring both lights in parallel. This setup allows the switch to turn both lights on or off simultaneously, making it efficient for rooms requiring multiple light sources controlled by one switch.
What Tools Are Needed To Connect Two Lights To One Switch?
You need a screwdriver, wire stripper, electrical tape, voltage tester, and wire nuts. These tools help you safely strip wires, connect terminals, and test circuits to ensure a proper and secure electrical connection.
Is It Possible To Connect Two Different Light Types To One Switch?
Yes, you can connect two different light types, such as LED and incandescent, to one switch. Ensure the switch and wiring can handle the combined electrical load and check compatibility to prevent flickering or damage.
Conclusion
Connecting two lights to one switch saves space and adds convenience. It allows you to control both lights easily with a single switch. Always turn off the power before starting any wiring work. Use the right tools and follow safety steps carefully.
Double-check your connections to avoid short circuits or damage. This simple setup can brighten rooms and improve your home’s lighting. Take your time and enjoy the process. Soon, you will have a neat and functional lighting solution.