Are you looking to control two lights from one spot without the hassle of multiple switches? Installing a double light switch can simplify your space and give you more control over your lighting.
But if you’ve never done it before, the idea might seem tricky or even risky. Don’t worry—you’re about to discover a clear, step-by-step guide that makes the process easy and safe. Keep reading, and by the end, you’ll have the confidence to upgrade your home lighting like a pro.
Tools And Materials Needed
Installing a double light switch requires the right tools and materials. Using proper equipment makes the job easier and safer. Prepare all items before starting to avoid delays.
Essential Tools
- Screwdriver (flathead and Phillips)
- Wire stripper
- Voltage tester
- Needle-nose pliers
- Electrical tape
- Utility knife
- Drill (optional)
Required Materials
- Double light switch
- Electrical box (if needed)
- Wire connectors (wire nuts)
- Electrical wires (14 or 12 gauge depending on circuit)
- Switch plate cover
Safety Gear
- Insulated gloves
- Safety goggles
- Non-conductive footwear
- Flashlight or work light
Preparing For Installation
Preparing for a double light switch installation is an important first step. It helps you stay safe and work efficiently. You need to follow clear steps before handling any electrical parts.
These steps include turning off the power, removing the old switch, and identifying the wires. Taking your time here prevents mistakes and accidents.
Turn Off Power
Switch off the power at the circuit breaker. This stops electricity from flowing to the switch.
Use a voltage tester to make sure the power is off. Never work on live wires. Safety first.
Remove Existing Switch
Unscrew the switch cover plate carefully. Keep the screws safe for later use.
Remove the screws holding the switch in the box. Pull the switch out gently to see the wiring.
Identify Wiring
Look at the wires connected to the old switch. Usually, you will see a hot wire, neutral wires, and ground wire.
Label each wire with tape or markers. This helps connect the new switch correctly.
Check the wiring diagram that comes with the double switch. Match the wires to the correct terminals.
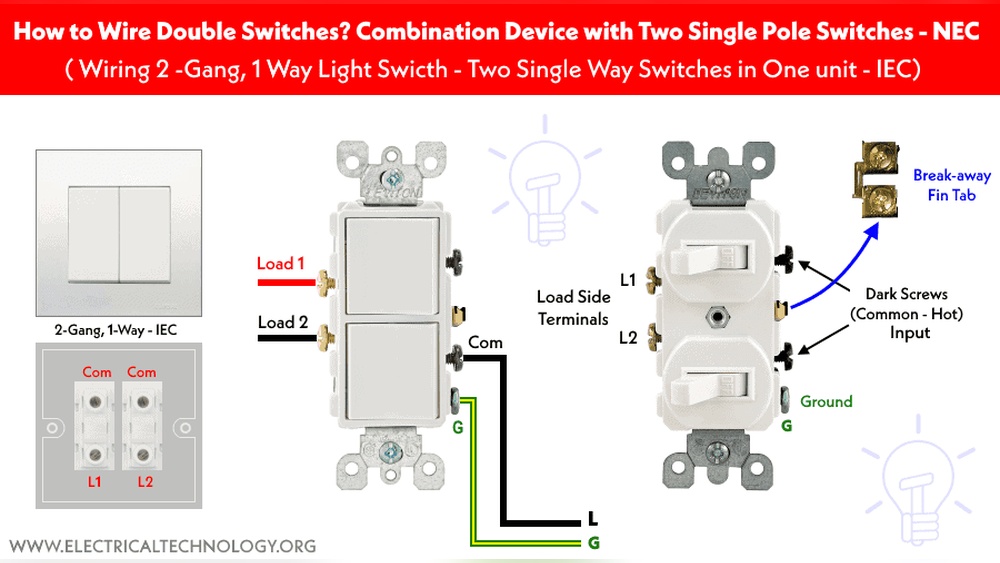
Wiring The Double Switch
Wiring a double light switch is a simple task with careful steps. This part focuses on connecting wires inside the switch box. Proper wiring ensures both switches work safely and correctly. Follow these clear steps for a solid connection and avoid electrical problems.
Connect Ground Wire
Start by locating the ground wire. It is usually a bare copper or green wire. Attach the ground wire to the green screw on the switch. This step protects you from electrical shocks. Make sure the connection is tight and secure. If there is a ground wire in the box, twist all ground wires together with a wire nut.
Attach Hot Wires
Find the hot wires, often black or red. These carry electricity to the switch. Connect the incoming hot wire to the common terminal on the switch. The common terminal is usually marked or a different color. Tighten the screw firmly. Attach the other hot wire to the second switch terminal. This wire controls the second light or fixture.
Connect Load Wires
Load wires go from the switch to the light fixtures. Attach each load wire to its matching switch terminal. Ensure the wires are stripped properly for a good connection. Tighten the screws to hold wires firmly. Check all connections before closing the switch box. Proper load wire connection makes the lights work smoothly.

Credit: diy.stackexchange.com
Mounting The Switch
Mounting the double light switch is a key step in the installation process. It secures the switch in place and protects the wiring inside the wall. Proper mounting ensures safety and a clean finish. Take your time to follow each step carefully for the best results.
Secure Switch To Wall Box
Align the switch with the wall box carefully. Use the screws that come with the switch. Insert screws into the holes on the switch. Tighten screws gently but firmly. Avoid over-tightening to prevent damage. The switch should sit flush with the wall surface. Check that it does not wobble or move.
Attach Switch Cover Plate
Place the cover plate over the mounted switch. Align screw holes on the plate with the switch. Insert screws and tighten them evenly. Do not force the screws. The cover plate should fit snugly against the wall. A clean, neat look improves room appearance. Make sure no wires are visible or pinched under the plate.
Testing The Installation
Testing the installation of a double light switch ensures safety and proper function. This step confirms that both switches work correctly and the wiring is secure. Take your time to follow each instruction carefully for best results.
Restore Power
Turn the circuit breaker back on to restore power to the switch. Wait a few seconds to allow the system to stabilize. Check the light fixtures to see if they receive power. Always stand clear of the switch panel during this step.
Test Each Switch
Flip the first switch and observe the connected light. It should turn on or off without flickering. Repeat the process with the second switch. Both switches must operate independently and smoothly. Confirm that no unusual sounds or smells come from the switch.
Troubleshooting Tips
If a switch does not work, turn off the power again immediately. Check all wire connections for tightness and correct placement. Look for any loose or damaged wires. Use a voltage tester to confirm power flow at the switch terminals. Replace the switch if it feels warm or damaged. Repeat testing after adjustments for safe operation.

Credit: www.youtube.com

Credit: www.electricaltechnology.org
Frequently Asked Questions
How Do I Safely Install A Double Light Switch?
Turn off the power at the circuit breaker first. Use a voltage tester to confirm no electricity. Follow wiring diagrams carefully. Connect wires to the correct terminals. Secure the switch and cover plate before restoring power.
What Tools Are Needed To Install A Double Light Switch?
You need a screwdriver, wire stripper, voltage tester, electrical tape, and pliers. A drill may be useful for mounting. Ensure all tools are insulated for electrical work. Having a wiring diagram handy helps prevent mistakes.
Can I Replace A Single Switch With A Double Switch?
Yes, if the electrical box has enough space and wiring. Turn off power before starting. You may need to add wiring for the second switch. Follow local electrical codes and use proper wiring connections.
How Do I Connect Wires To A Double Light Switch?
Identify the line (power), load (light), and ground wires. Connect the line wire to the common terminal. Attach the load wires to the other switch terminals. Secure the ground wire to the green screw or box. Double-check connections before closing.
Conclusion
Installing a double light switch is simpler than it seems. Follow each step carefully and take safety first. Use the right tools and double-check your connections. Turn off the power before you start working. Testing the switch after installation ensures it works well.
A new double switch adds convenience to any room. Keep this guide handy for future electrical projects. Enjoy better control over your lighting with ease.