Hanging a picture above a light switch might seem simple, but getting the height just right can make a big difference in how your space looks and feels. If you hang it too high, it can look awkward.
Too low, and it might interfere with using the switch. You want your walls to look balanced and stylish without causing any hassle. You’ll discover the perfect height to hang your picture above a light switch—easy tips that anyone can follow.
Keep reading, and you’ll learn how to make your walls look great while keeping things practical.

Credit: www.instructables.com
Ideal Height For Hanging Pictures
Finding the right height to hang pictures above a light switch can be tricky. The ideal height makes the space look balanced and neat. It also keeps the picture easy to see without blocking the switch. Choosing the right height adds charm to your wall and keeps your room functional.
Let’s explore some simple ways to decide the perfect height for hanging pictures above your light switch.
Standard Measurements To Follow
The common rule is to hang pictures so their center is about 57 to 60 inches from the floor. This height fits most rooms and people. For hanging above a light switch, add a little space between the switch and the picture bottom. Usually, 6 to 8 inches above the switch works well. This gap stops the picture from crowding the switch.
Keep the picture at least 48 inches from the floor if the switch is low. This avoids awkward placements and keeps the wall tidy.
Considering Average Eye Level
Eye level helps decide picture height. Most adults see well at 57 to 60 inches high. Hanging pictures at this level feels natural and easy to view. It also prevents bending or stretching to see the art.
For families with children, consider slightly higher placements. This keeps pictures safe from little hands. Adjusting to average eye height creates a pleasant visual flow on your wall.
Factors Affecting Picture Placement
Choosing the right height for hanging a picture above a light switch depends on several factors. These elements help create a balanced and visually pleasing look. Understanding these factors makes your wall art fit perfectly in the space.
Switch Size And Position
The size of the light switch affects where the picture should go. Larger switches need more space above to avoid crowding. Small switches allow the picture to hang closer without looking cramped. The exact position of the switch on the wall also matters. A switch near a corner or edge requires adjusting the picture placement for balance.
Room Function And Layout
The room’s purpose influences picture height. In living rooms, eye level placement works best for easy viewing. Bedrooms may allow lower or higher placement for comfort. The layout, like seating and walking paths, shapes the picture’s spot. Make sure the picture does not block movement or sightlines.
Wall Space And Furniture Arrangement
Available wall space guides how high to hang the picture. Large empty walls need higher or centered placement. Smaller wall sections require the picture to be closer to the switch. Furniture below the picture, like tables or sofas, affects height choice. Leave enough space to avoid a crowded look.
Balancing Aesthetics And Practicality
Balancing aesthetics and practicality is key when hanging a picture above a light switch. The goal is to make the space look nice without causing any trouble using the switch. This balance helps keep your room both beautiful and functional.
Avoiding Switch Obstruction
Place the picture high enough so it does not block the switch. People should reach the switch easily without moving the frame. Keeping a small gap between the switch and picture helps avoid accidents. Never cover the switch completely or it becomes hard to find.
Creating Visual Harmony
Align the picture with other wall elements for a balanced look. Use the switch as a reference point to center the artwork. Choose a height that matches other decorations in the room. This creates a smooth flow and makes the wall look neat and planned.
Measuring Tips For Perfect Placement
Hanging a picture above a light switch needs careful measuring. Proper placement makes the room look balanced and neat. Following simple steps helps you avoid mistakes and saves time.
Use the right tools and measure twice. This ensures the picture hangs at the perfect height and distance from the switch.
Tools Needed
- Measuring tape
- Pencil
- Level
- Step stool or ladder
Step-by-step Measuring Guide
- Measure the height of the light switch from the floor.
- Decide the space you want between the switch and the picture bottom.
- Mark the spot lightly with a pencil on the wall.
- Measure the picture height and find its center point.
- Use the level to mark a straight line for the top of the picture.
- Double-check all measurements before hanging.
Common Mistakes To Avoid
Hanging a picture above a light switch might seem simple. Yet, many people make mistakes that affect the look and function of the wall. Avoiding these common errors helps you create a neat and practical space.
Hanging Too High Or Too Low
Placing the picture too high makes it hard to see. It also looks disconnected from the switch below. Hanging it too low can block the switch or make the wall look crowded. Aim for a balanced height, usually 6 to 12 inches above the switch. This keeps the picture visible and the area tidy.
Ignoring Switch Accessibility
The light switch must stay easy to reach. Avoid placing the picture where it blocks or covers the switch. People need quick access to turn lights on or off. A picture that hinders this causes frustration. Leave enough space around the switch for comfortable use.
:max_bytes(150000):strip_icc()/height-to-install-switches-1152823-2a1e62d29a9a4d448b2b44f1731cd5d1.png)
Credit: www.thespruce.com
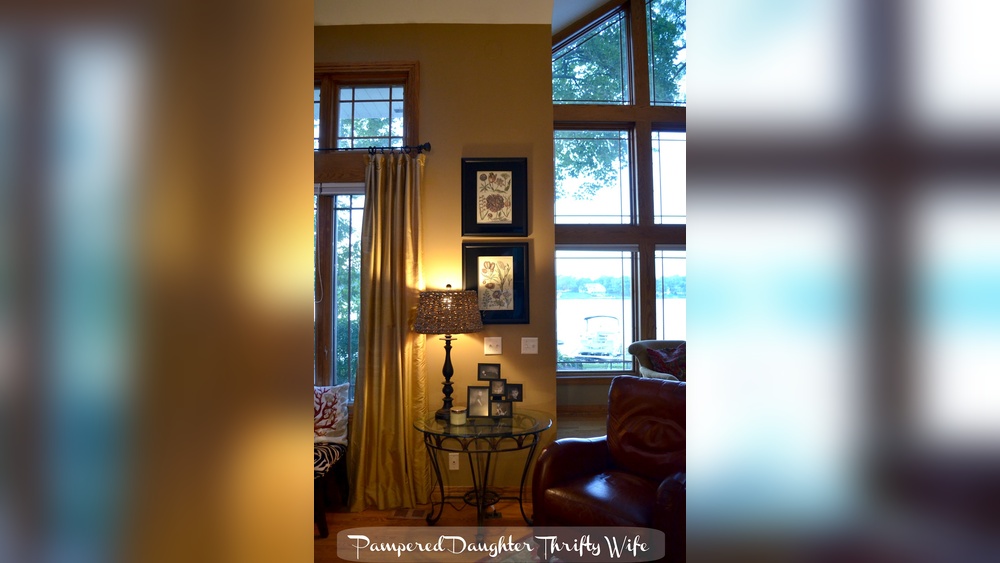
Creative Ideas For Picture Display Near Switches
Placing pictures above light switches can be tricky. The area is small and often overlooked. But with the right ideas, you can turn this space into a stylish feature.
Choosing creative ways to display pictures near switches makes your walls more interesting. It adds personality and charm without cluttering the room.
Using Frames With Built-in Lighting
Frames with built-in lighting highlight your pictures beautifully. These frames add a soft glow around the image. It draws attention and brightens the switch area.
LED lights inside the frame use little energy. They create a warm, welcoming feel in any room. This idea works well in hallways and living rooms.
Grouping Pictures For Impact
Group small pictures above or around the switch for a bold look. Arrange them in a neat grid or a playful cluster. This fills the space and creates visual interest.
Mix different frame styles and sizes for a unique display. Keep the colors and themes similar to stay balanced. This makes the switch area a focal point.

Credit: www.reddit.com
Frequently Asked Questions
How High Should A Picture Hang Above A Light Switch?
Hang the picture 6 to 12 inches above the light switch. This spacing ensures the picture is visible and avoids interference with the switch.
Why Is The Height Important For Hanging Pictures Above Switches?
Proper height creates visual balance and prevents accidental damage. It also ensures easy access to the switch while maintaining wall aesthetics.
Can I Hang Pictures Too Close To A Light Switch?
Yes, hanging too close can block the switch or cause damage. Maintain at least 6 inches of clearance to avoid these issues.
Does Picture Size Affect Hanging Height Above A Switch?
Larger pictures may require more space above the switch for balance. Adjust the height accordingly to keep the wall visually pleasing.
Conclusion
Hanging a picture above a light switch needs care and thought. Keep the art at eye level for best view. Leave enough space so the switch stays easy to use. Measure twice before you hang to avoid mistakes. A well-placed picture adds style and keeps things practical.
Small changes can make your room look neat and balanced. Follow these simple tips for a perfect wall display. Your space will feel more welcoming and organized.
