Have you ever wished you could control your lights from two different spots in a room? Adding a 2 way light switch lets you do just that.
It’s a simple upgrade that makes your daily life more convenient and your space feel smarter. In this guide, you’ll learn exactly how to add a 2 way light switch yourself—step by step, without confusion. By the end, you’ll save money, boost your home’s functionality, and gain the confidence to handle similar projects on your own.
Ready to brighten up your home in a whole new way? Let’s get started!

Credit: www.youtube.com
Tools And Materials Needed
Before starting your 2 way light switch installation, gather all necessary tools and materials. Having everything ready saves time and helps the job go smoothly.
Essential Tools
- Screwdriver set (flathead and Phillips)
- Wire stripper and cutter
- Voltage tester
- Needle-nose pliers
- Electrical tape
- Drill with appropriate bits
- Flashlight or headlamp for visibility
Required Materials
- Two 2-way light switches
- Electrical wires (live, neutral, and earth)
- Wire connectors or terminal blocks
- Switch boxes
- Mounting screws
- Wall plates
Safety Precautions
Working with electricity can be risky. Safety must be the top priority when adding a 2 way light switch. Following the right steps helps avoid accidents and injuries. Always prepare before starting your electrical project.
Turning Off Power
Always turn off power at the main circuit breaker. This stops electricity from flowing to the switch. Use a voltage tester to confirm power is off. Never assume the power is off without checking. This simple step protects you from electric shocks.
Using Protective Gear
Wear rubber gloves to protect your hands from electric shock. Safety glasses shield your eyes from sparks or debris. Use insulated tools designed for electrical work. These reduce the risk of accidental shocks. Taking these precautions keeps you safe during the installation.
Understanding 2 Way Switch Wiring
Understanding 2 way switch wiring is key to controlling lights from two locations. It is common in hallways, stairs, and large rooms. The wiring looks complex but is simple after breaking down. Knowing the parts helps avoid mistakes and keeps you safe.
Basic Circuit Layout
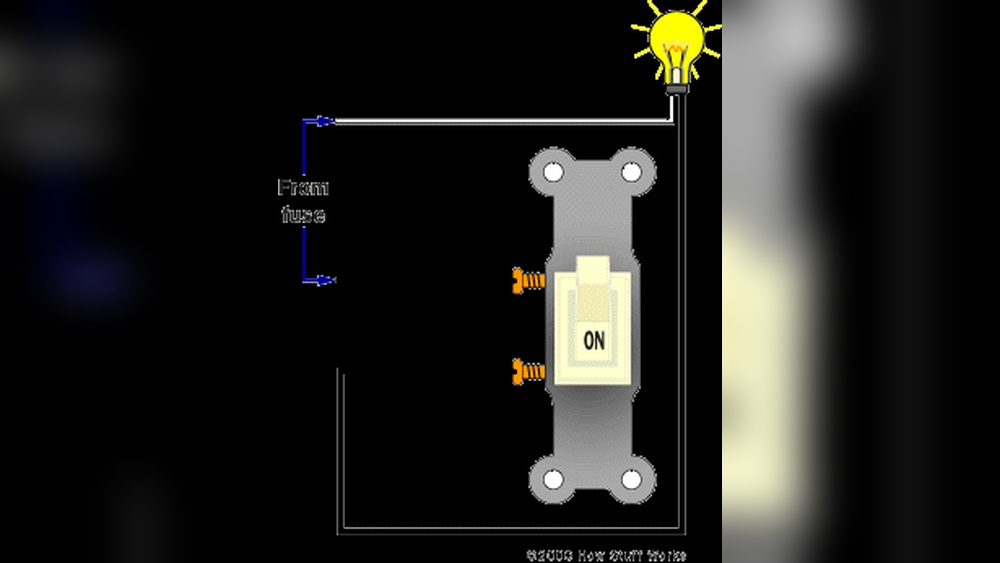
A 2 way switch circuit uses two switches to control one light. Each switch has three terminals: common, L1, and L2. Wires connect the switches and the light in a loop. The power wire goes to the common terminal on the first switch. Two traveler wires link L1 and L2 terminals between switches. The light connects to the common terminal on the second switch. This setup lets you turn the light on or off from either switch.
Identifying Wires
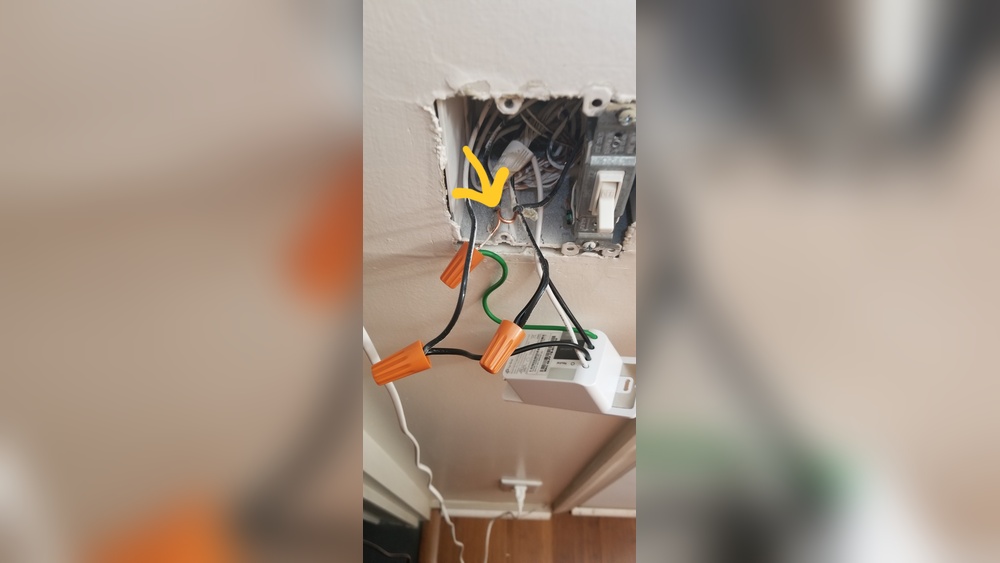
Wires in a 2 way switch have different roles. The live wire carries power from the source. Traveler wires connect the two switches and carry current back and forth. The load wire goes to the light fixture. Ground wires provide safety by connecting to the earth. Usually, live wires are brown or red. Travelers are often black or blue. The load wire matches the fixture’s color. Always confirm with a tester before touching wires.

Credit: www.reddit.com
Preparing The Switch Locations
Preparing the switch locations is the first step to install a 2 way light switch. This step is important to ensure safety and ease of use. Proper planning will make your work smooth and efficient.
Choosing the right spots for the switches affects convenience and functionality. The switches should be easy to reach and use. Placement depends on room layout and door positions.
Choosing Switch Spots
Pick locations near the entrances of the room. This allows you to turn lights on or off when entering or leaving. Avoid placing switches too high or too low. The ideal height is about 48 inches from the floor.
Also, consider the furniture and walkways. The switches should not be blocked or hard to reach. Think about the wiring path too. Shorter wiring routes save time and materials.
Cutting And Mounting Boxes
Mark the exact spots on the wall for the switch boxes. Use a pencil to draw clear outlines. Make sure the marks are level and aligned.
Use a drywall saw or a similar tool to cut the holes carefully. The holes must fit the switch boxes snugly. Avoid making holes too big or uneven.
Insert the electrical boxes into the holes. Secure them tightly to the wall studs or drywall. Proper mounting prevents movement and keeps wires safe.
Wiring The First Switch
Wiring the first switch is the key step to install a 2 way light switch. It controls the power flow from the main source. Proper wiring ensures both switches work smoothly. This part focuses on connecting wires and securing the switch safely.
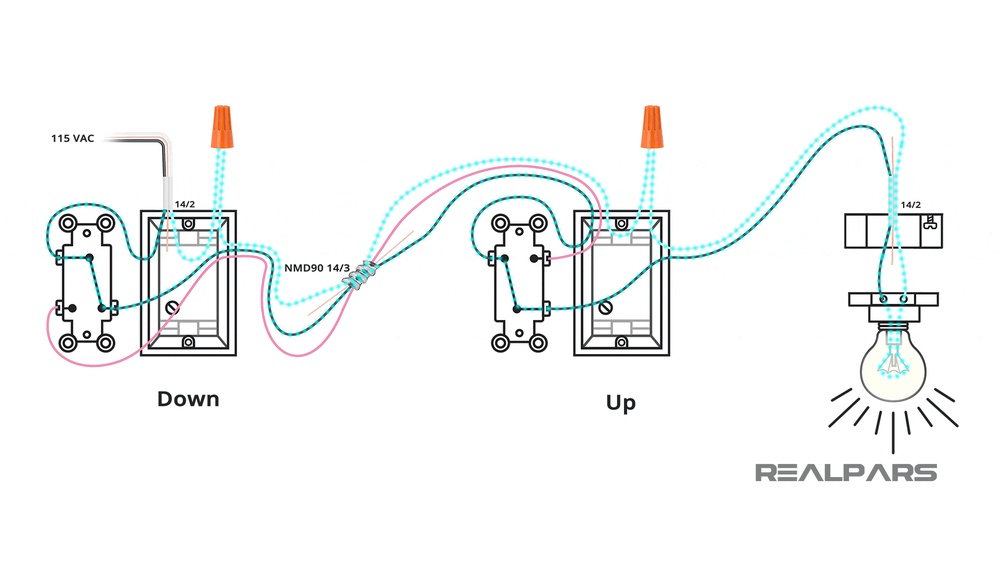
Connecting Live And Travelers
Start by turning off the power at the breaker. Identify the live wire, usually black or red. Connect this live wire to the common terminal on the switch. Next, find the two traveler wires. These are often red or black. Attach each traveler wire to the traveler terminals on the switch. Make sure the connections are tight to avoid loose wires. Use a voltage tester to confirm no power flows before handling wires.
Securing The Switch
After wiring, gently push the switch into the wall box. Avoid pinching any wires inside. Use screws to secure the switch firmly. Check that the switch does not move or tilt. Attach the wall plate to cover the switch and wires. Restore power and test the switch for proper operation. A secure switch ensures safety and good function.

Credit: www.reddit.com
Wiring The Second Switch
Wiring the second switch in a 2-way light switch setup is a key step. It controls the same light from another location. This part requires careful connection of wires to ensure safety and proper function. Follow each step closely to wire the second switch correctly.
Connecting Traveler Wires
The traveler wires carry current between the two switches. Usually, these wires are red and black. Connect these traveler wires to the terminals marked “Traveler” or “L1” and “L2” on the second switch. Make sure the wires are tight and secure under the screws. Loose connections can cause flickering or failure.
Check the wire color and position before tightening. This step ensures the switches communicate properly and the light works from both locations.
Completing The Circuit
Next, connect the common terminal on the second switch. This terminal often has a different color screw, usually black or dark bronze. Attach the wire coming from the light fixture or the power source to this common terminal. This connection completes the circuit, allowing current to flow correctly.
After all wires are connected, carefully place the switch into the box. Secure it with screws and attach the cover plate. Test the switches to confirm the light turns on and off from both points.
Testing The Installation
Testing the installation is a crucial step after wiring a 2-way light switch. It ensures the switches work correctly and safely. This step helps catch any wiring errors before restoring full power.
Restoring Power
Turn the main circuit breaker back on to restore power. Check that the switch box has power using a voltage tester. Be cautious and avoid touching any wires directly. Safety first.
Checking Switch Functionality
Flip one switch to turn the light on. Then, use the other switch to turn the light off. Both switches should control the light from different locations. If the light does not respond, double-check your wiring. Test multiple times to confirm consistent operation.
Troubleshooting Tips
Troubleshooting a 2 way light switch can seem tricky at first. Small problems often cause big frustrations. Knowing common issues and quick fixes helps save time and effort. This section guides you through simple steps to find and fix problems fast.
Common Issues
One common issue is the light not turning on or off. This may mean a loose wire or bad connection. Another problem is flickering lights. This often happens due to poor wiring or a faulty switch. Sometimes, the switch feels loose or does not click properly. This usually means the switch mechanism is worn out. Identifying these common problems is the first step to fixing them.
Quick Fixes
Start by turning off the power to the switch at the breaker. Check all wire connections to make sure they are tight and secure. Tighten any loose screws or wires. Replace the switch if the mechanism is broken or worn out. Use a voltage tester to check for power at the switch terminals. Clean any dust or dirt around the switch to prevent poor contact. Test the switch after each fix to see if the problem is solved. Simple checks like these often solve the issue quickly.
Frequently Asked Questions
What Tools Are Needed To Add A 2 Way Light Switch?
You need a screwdriver, wire stripper, voltage tester, and electrical tape. A drill may help for mounting. Safety gear like gloves is recommended. These tools ensure safe and efficient installation of a 2 way light switch.
How Does A 2 Way Light Switch Wiring Work?
A 2 way switch wiring connects two switches to control one light. It uses three wires: live, traveler, and neutral. This setup allows turning the light on or off from two locations, ideal for hallways or large rooms.
Can I Install A 2 Way Switch Myself Safely?
Yes, if you understand basic electrical safety and wiring. Always turn off power at the breaker before starting. Use a voltage tester to confirm no power is present. Follow instructions carefully or consult a professional if unsure.
What Is The Difference Between 2 Way And 3 Way Switches?
A 2 way switch controls a light from two locations. A 3 way switch allows control from three or more locations. The wiring complexity increases with more switches, so a 2 way is simpler and common for basic setups.
Conclusion
Adding a 2 way light switch is a simple task anyone can do. Follow the steps carefully and take safety first. Double-check your wiring and test the switch before finishing. This setup helps control lights from two places easily. It saves time and makes your home more convenient.
Keep tools and instructions nearby while working. With patience and care, you can complete this project yourself. Enjoy the comfort of controlling your lights with ease.