Are you looking to upgrade your home’s lighting control and want to learn how to install a double pole light switch? This guide is made just for you.
Installing a double pole switch might sound tricky, but with the right steps, you can do it safely and confidently. Imagine having full control over your lighting or appliances with just one switch – it’s easier than you think. Keep reading, and by the end, you’ll have the knowledge to handle this project like a pro, saving time and money along the way.
Let’s get started!
Tools And Materials Needed
Installing a double pole light switch requires specific tools and materials. Having everything ready makes the job safer and easier. Prepare your workspace and gather all items before starting.
Essential Tools
You will need a screwdriver set, including flathead and Phillips types. A voltage tester is crucial to ensure power is off. Wire strippers help remove insulation cleanly. Pliers assist in bending and twisting wires. A drill may be necessary to mount the switch box.
Required Materials
Get the double pole light switch suited to your system’s voltage. Use electrical wire rated for your circuit’s load. Wire nuts or connectors secure wire connections safely. Electrical tape provides extra insulation. A suitable switch box holds the switch in place.
Safety Equipment
Wear insulated gloves to protect against shocks. Safety glasses shield your eyes from debris. Have a flashlight or portable light source in dark areas. Always double-check power is off before working on wires.
Safety Precautions
Always turn off the power before starting the installation to avoid electric shock. Use a voltage tester to confirm no current flows through the wires. Wear insulated gloves and follow the wiring instructions carefully for safe setup.
Turn Off Power At The Circuit Breaker
Always start by switching off the power from the main circuit breaker. This stops electricity from flowing to the wires. Double-check with a voltage tester to confirm no current is present. Skipping this step risks serious electric shock or injury.
Use Proper Tools And Equipment
Choose tools designed for electrical work. Insulated screwdrivers and pliers reduce the risk of electric shock. Wear safety gloves and goggles to protect your hands and eyes. Using the right gear keeps you safe throughout the installation.
Understand Wiring And Local Codes
Learn about your home’s wiring system before starting. Check local electrical codes and rules to ensure compliance. Incorrect wiring can cause fires or damage to your electrical system. Following rules ensures a safe and legal installation.
Work In A Dry Environment
Keep your work area dry and free from moisture. Water and electricity do not mix and increase shock risks. Avoid working in rainy or damp conditions. A dry environment helps maintain safety during installation.
Double-check Connections Before Power On
Inspect all wire connections carefully before turning the power back on. Loose or wrong connections can cause sparks or short circuits. Tighten screws and secure wires properly. A final check helps prevent accidents and equipment damage.
Identify The Double Pole Switch
Identifying a double pole switch is the first step in a safe installation. This type of switch controls two circuits at once. It is different from a single pole switch, which controls only one circuit. Knowing how to spot a double pole switch helps avoid wiring mistakes and ensures proper function.
Double pole switches are commonly used for appliances that need 240 volts, like water heaters or dryers. They have two sets of terminals and a wider body than regular switches. Recognizing these features makes the installation process smoother and safer.
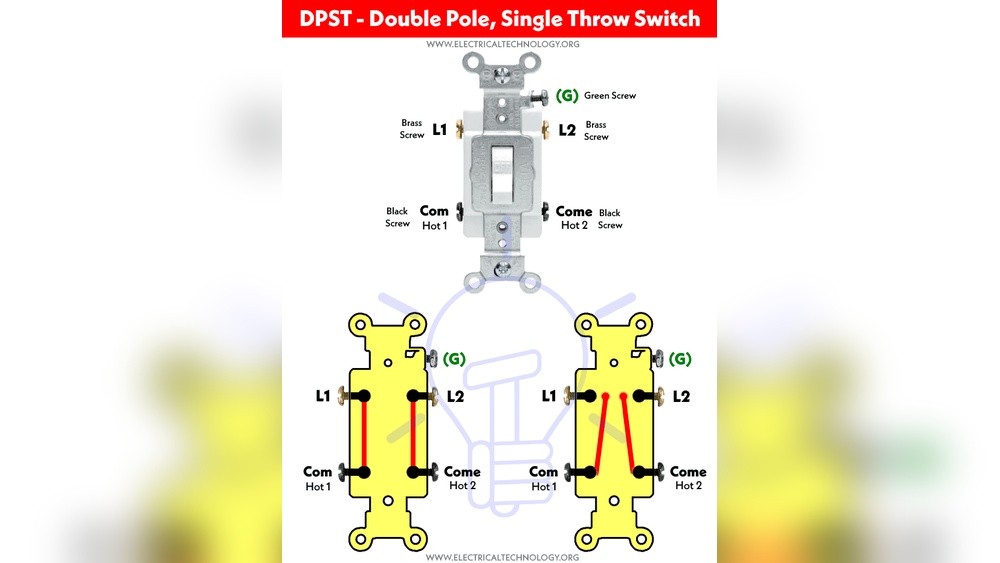
Physical Appearance Of A Double Pole Switch
A double pole switch is larger than a single pole switch. It usually has four terminal screws. Two terminals connect to the power source, and two go to the device. The switch handle is wider to control both circuits together.
Number Of Terminals On The Switch
Count the terminals to identify a double pole switch. Four terminals mean it is double pole. Single pole switches only have two terminals. This count confirms the switch type before installation.
Labeling And Markings On The Switch
Look for labels on the switch body. Common labels are “DP” or “Double Pole.” Some switches also show voltage and amperage ratings. These markings help verify the switch’s purpose.
Purpose And Use Of A Double Pole Switch
Double pole switches control two separate circuits. They turn off both live wires in a 240-volt system. This function is necessary for safety with high-power devices. Understanding its use guides correct installation.
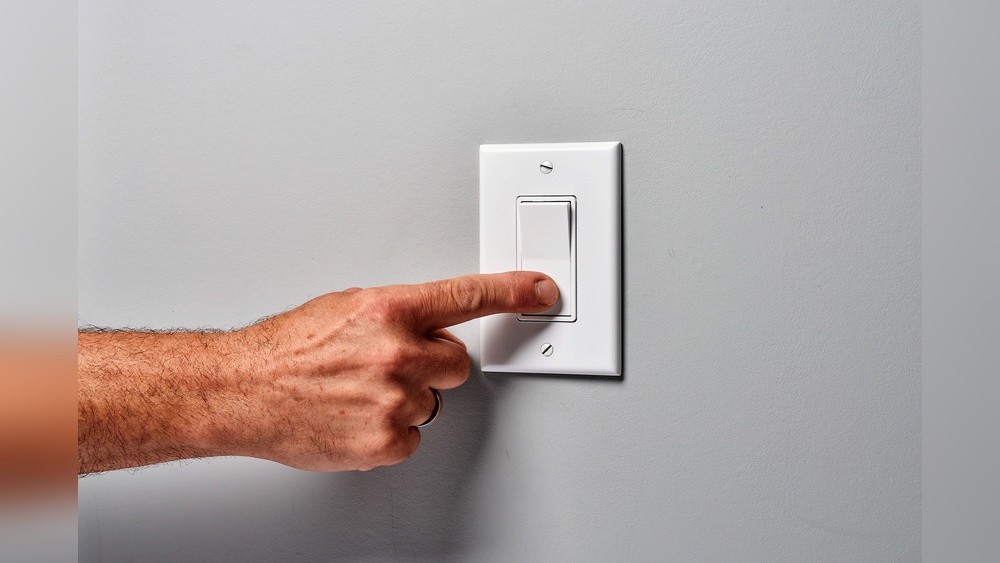
Credit: www.reviewed.com
Turn Off Power Supply
Turning off the power supply is the most important step before installing a double pole light switch. It keeps you safe from electric shocks and prevents damage to your electrical system. Always handle electrical work with care and caution.
Never start any wiring or switch replacement without cutting off the power. This simple action stops electricity from flowing to the switch and wires. It creates a safe environment to work on your light switch.
Locate The Main Circuit Breaker
Find your home’s main circuit breaker panel. It is usually in the basement, garage, or utility room. The main breaker controls all the power in your house. Turning it off stops electricity from reaching the switch.
Switch Off The Correct Breaker
Identify the breaker that controls the light switch you want to replace. The breakers are labeled for each room or area. Flip the correct breaker to the off position. This cuts power to the switch only.
Test The Power Is Off
Use a voltage tester or a multimeter to check the switch wires. Touch the tester to the wires to see if electricity is present. If the tester shows no power, it is safe to proceed. Always double-check before touching any wires.
Remove Existing Switch
Removing the existing switch is the first step in installing a double pole light switch. It prepares the space for the new switch and helps you work safely. Take your time and follow the steps carefully to avoid any mistakes.
Turn Off Power
Start by turning off the power to the switch at the circuit breaker. This step prevents electric shocks. Test the switch to make sure the power is off before touching any wires.
Remove Switch Cover Plate
Use a screwdriver to remove the screws holding the switch cover plate. Take the plate off gently to expose the switch and wires underneath.
Unscrew The Old Switch
Unscrew the old switch from the electrical box. Hold the switch carefully as you remove the screws. It may be tight, so use steady force.
Disconnect Wires
Note the position of each wire on the switch. Then, use a screwdriver to loosen the terminal screws. Gently pull the wires free from the switch.
Inspect Wires And Box
Check the wires for damage or corrosion. Look inside the electrical box for any loose connections. Fix any issues before installing the new switch.
Connect The New Double Pole Switch
Connecting the new double pole switch is a crucial step in your installation process. This part ensures the switch controls power safely and correctly. Careful connection of wires keeps your home safe and the switch working well.
Follow each step slowly. Double-check your work to avoid mistakes. Use the right tools and materials for best results.
Wiring Basics
Understand the wires before connecting. A double pole switch controls two separate circuits. It usually has two hot wires and a ground wire. Identify the wires by color: black or red for hot, green or bare for ground. Turn off power at the breaker to stay safe. Use a tester to confirm no electricity flows.
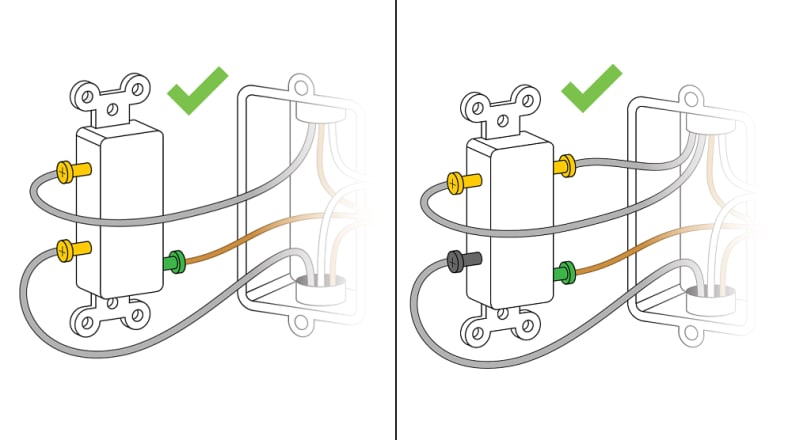
Attach Wires To Terminals
Loosen the screws on the switch terminals. Connect each wire to the right screw. Hot wires go to the brass or black screws. The ground wire attaches to the green screw. Wrap the wire clockwise around the screw for a tight fit. Tighten screws securely, but do not overtighten. Push wires gently into the box. Ensure no bare wire is exposed outside terminals.
Secure The Switch In Place
Securing the double pole light switch in place is a key step. It keeps the switch stable and safe. A loose switch can cause sparks or stop working well. Take time to fix it firmly inside the wall box. This ensures long-lasting use and safety.
Align The Switch With The Wall Box
First, hold the switch inside the wall box. Make sure the switch fits well. The screw holes on the switch should line up with the box holes. This helps in easy and secure fixing.
Tighten The Mounting Screws
Use a screwdriver to tighten the screws. Turn the screws slowly and evenly. Tighten until the switch feels firm. Avoid over-tightening to prevent damage.
Check The Switch Position
After tightening, check the switch position. The switch toggle should move freely. It must not be crooked or stuck. A well-placed switch works smoothly and looks neat.
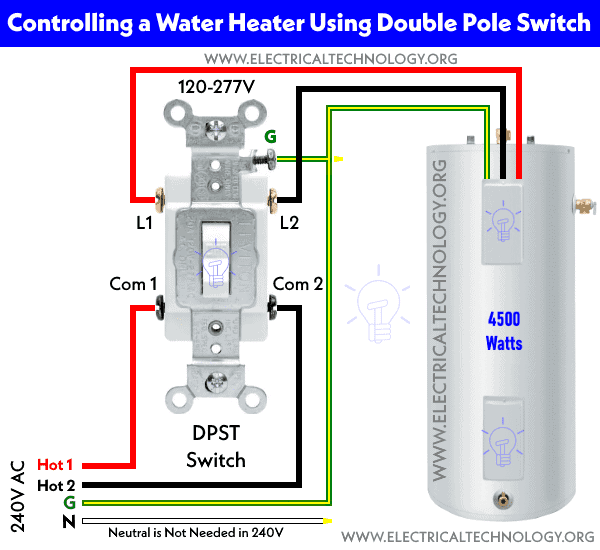
Credit: www.electricaltechnology.org
Restore Power And Test
Restoring power and testing your double pole light switch completes the installation process. This step ensures the switch works safely and correctly. You must be careful and follow simple actions.
Always verify power is off before doing any wiring. After the switch is connected, you can restore power to check its function. Testing confirms the switch controls both live wires properly.
Turn On The Circuit Breaker
Locate your home’s circuit breaker panel. Find the breaker that controls the light switch. Flip the breaker to the ON position. This restores power to the switch and connected lights.
Check The Switch Operation
Flip the double pole switch ON and OFF several times. Notice if the lights turn on and off without flicker. Both poles should control the power without any issue.
Look For Signs Of Trouble
Watch for sparks, smoke, or unusual sounds. These signs indicate wiring problems or switch defects. If you see any, turn off power immediately and check connections.
Test All Controlled Devices
Make sure all lights or appliances connected to the switch respond. Each should turn off and on with the switch. Testing confirms correct wiring and safe operation.
Troubleshooting Common Issues
Troubleshooting common issues with a double pole light switch can save time and avoid frustration. Problems often arise during or after installation. Understanding typical errors helps you fix them quickly. This section highlights simple solutions for usual problems.
Check For Loose Wiring Connections
Loose wires cause the switch to fail or flicker. Turn off power before checking. Tighten all terminal screws firmly. Inspect wire ends for damage. Replace frayed wires to ensure a solid connection.
Verify Proper Wire Placement
Incorrect wire placement stops the switch from working. Match each wire to its correct terminal. Double pole switches have two sets of terminals. Follow the wiring diagram carefully to avoid mistakes.
Test The Switch With A Voltage Tester
Use a voltage tester to check if power reaches the switch. No voltage means a wiring problem or a tripped breaker. Confirm the breaker is on and reset if needed. Test wires for current before proceeding.
Inspect For Short Circuits Or Overloads
Short circuits cause breakers to trip repeatedly. Look for bare wires touching metal or each other. Remove any exposed wiring and insulate properly. Make sure the switch rating matches the circuit load.
Replace Faulty Switch Components
Sometimes the switch itself is defective. Signs include no response or a burning smell. Swap the old switch with a new one of the same type. Always cut power before replacing electrical parts.
Credit: www.doityourself.com
Frequently Asked Questions
What Is A Double Pole Light Switch Used For?
A double pole light switch controls two separate circuits simultaneously. It is commonly used for 240V appliances or lights. This switch safely manages higher voltages and ensures both live wires disconnect when turned off, enhancing electrical safety.
How Do I Safely Install A Double Pole Switch?
Turn off the main power before installation. Use a voltage tester to confirm no current. Connect the live and neutral wires to the switch terminals. Follow wiring diagrams carefully. Secure the switch in the box and restore power to test.
Can I Replace A Single Pole With A Double Pole Switch?
No, you should not replace a single pole with a double pole switch. They serve different purposes. Single pole switches control one circuit, while double pole switches control two. Use the correct switch type for your wiring and load requirements.
What Tools Are Needed For Double Pole Switch Installation?
You need a screwdriver, wire stripper, voltage tester, and electrical tape. Additionally, wire connectors and pliers help manage wiring. Using the right tools ensures a safe, efficient installation process.
Conclusion
Installing a double pole light switch is simple with clear steps. Always turn off the power before you start. Connect wires carefully and tighten all screws well. Test the switch to make sure it works correctly. Taking your time helps avoid mistakes and keeps you safe.
This guide makes the process easy and safe to follow. Now, you can control your lights with confidence and ease.