Your brake light switch plays a crucial role in keeping you and others safe on the road. If it’s not working properly, your brake lights might not turn on, putting you at risk of accidents.
But how can you be sure your brake light switch is doing its job? In this guide, you’ll learn simple and effective ways to test your brake light switch yourself. By the end, you’ll have the confidence to spot any issues early and keep your vehicle running safely.
Ready to take control of your car’s safety? Let’s dive in.
Brake Light Switch Basics
The brake light switch is a small but vital part of your vehicle. It controls the brake lights that warn drivers behind you when you slow down or stop. Understanding this switch helps keep you and others safe on the road.
Knowing how it works and the types available can make testing and replacement easier. This section covers the basics of the brake light switch for better vehicle safety awareness.
Role In Vehicle Safety
The brake light switch signals your brake lights to turn on. This tells drivers behind you to slow down or stop. It helps prevent accidents by giving clear warnings.
The switch also plays a part in some car systems. It can affect cruise control and automatic transmission shifts. A faulty switch can cause safety risks or vehicle issues.
Common Types
Two main types of brake light switches exist: plunger type and magnetic type. The plunger type works by pressing a button when the brake pedal moves.
The magnetic type uses sensors to detect pedal movement without physical contact. Both types serve the same purpose but work differently. Knowing which type your car has helps with testing and repair.
Signs Of A Faulty Switch
Signs of a faulty brake light switch often show up in everyday driving. This small part controls your brake lights and affects other car functions. Knowing the symptoms helps you catch problems early. It can save you from accidents and costly repairs.
Brake Lights Not Working
One clear sign is brake lights that do not turn on. You press the brake pedal, but the lights stay off. This makes driving dangerous, especially at night or in traffic. Other drivers may not see you stopping. It could mean the brake light switch is broken or stuck.
Cruise Control Issues
Cruise control may stop working properly if the switch fails. The system uses the brake light switch to know when to turn off. A bad switch can cause cruise control to stay on or shut off unexpectedly. This problem affects your car’s ability to keep a steady speed safely.
Shift Lock Problems
The shift lock system can also act up due to a faulty brake light switch. The car might not let you move the gear out of park. This happens because the switch signals if the brake pedal is pressed. A failing switch can trap your car in park, causing frustration and delays.
Tools Needed For Testing
Testing a brake light switch needs a few simple tools. These tools help check if the switch works correctly and safely. Using the right tools makes the job easier and faster. Here are the main tools needed for testing a brake light switch.
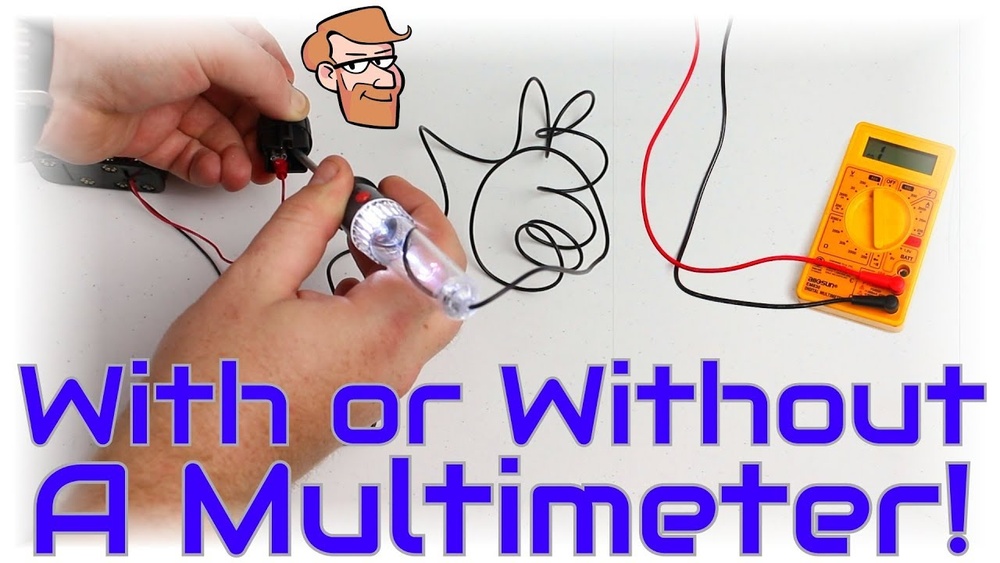
Multimeter
A multimeter measures electrical signals. It checks voltage, current, and resistance in the brake light switch. This tool shows if the switch sends power to the brake lights. A digital multimeter is easy to read and use. It helps find faults in the switch quickly.
Basic Hand Tools
Basic hand tools include screwdrivers and pliers. These tools help access the brake light switch. You may need a wrench or socket set to remove parts blocking the switch. A flashlight can help see in dark areas near the brake pedal. These simple tools make testing safe and efficient.
Credit: premierautotrade.com.au
Step-by-step Testing Process
Testing the brake light switch is a simple task that anyone can do. It helps ensure your brake lights work correctly and keep you safe on the road. Follow these clear steps to check the switch’s condition and function.
Locate The Brake Light Switch
Find the brake light switch under the dashboard. It sits near the brake pedal arm. The switch is small and usually attached to a bracket. Use a flashlight if needed to see it clearly. Identifying the switch is the first step in testing it.
Perform A Visual Inspection
Look closely at the brake light switch for damage. Check for cracks, corrosion, or loose wires. Make sure the switch is securely mounted. Damaged or loose parts can cause brake light problems. Clean any dirt or debris around the switch.
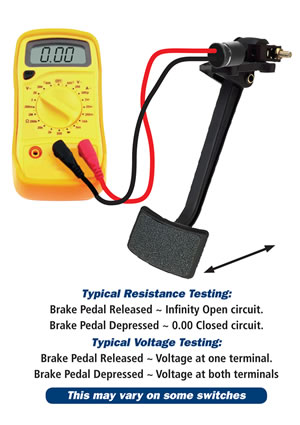
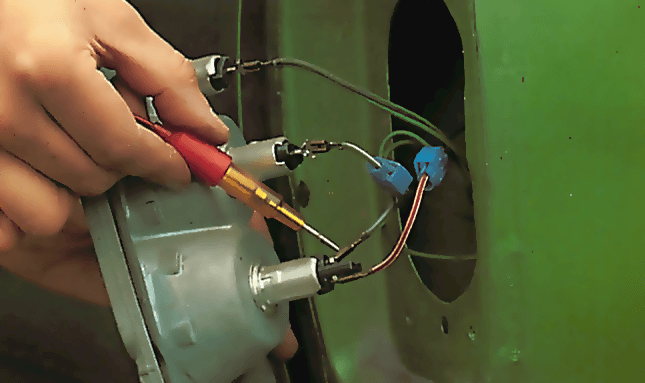
Test Electrical Continuity
Use a multimeter set to continuity mode. Disconnect the switch wiring connector. Place the multimeter probes on the switch terminals. Press the brake pedal to activate the switch. The multimeter should beep or show zero resistance. No beep means the switch may be faulty.
Check Switch Activation
Press and release the brake pedal slowly. Watch the brake lights at the back of your car. The lights should turn on when the pedal is pressed. They should turn off when the pedal is released. If the lights do not respond, the switch may need replacement.
Interpreting Test Results
Interpreting the test results of a brake light switch is key to knowing if it works properly. After testing, you must understand what the results mean. This helps decide if the switch needs repair or replacement. Clear signs tell whether the switch is good or failing.
Signs Of A Good Switch
A good brake light switch shows consistent electrical signals. It activates the brake lights immediately when pressed. There is no delay or flickering in the lights. The switch returns to its original position smoothly after release. Resistance readings are within the manufacturer’s range. No unusual noises or physical damage appears on the switch.
Indicators Of Failure
A failing brake light switch may cause brake lights to stay on constantly. Lights might not turn on at all when pressing the brake. Flickering or delayed light response is common. The switch may feel loose or stuck. Testing shows inconsistent or no electrical continuity. Physical damage or corrosion often appears on the switch parts.
Replacing The Brake Light Switch
Replacing the brake light switch is a common repair for many vehicles. This small part plays a big role in vehicle safety. A faulty switch means brake lights may not work. This can cause accidents or traffic tickets. Knowing how to replace it saves time and money.
The process is simple with the right tools. The switch is near the brake pedal. It detects when you press the pedal and turns on the brake lights. A new switch restores proper function quickly.
Choosing The Right Replacement
Pick a switch that fits your vehicle model. Check the owner’s manual or online parts stores. Choose switches from trusted brands. Quality parts last longer and work better. Avoid cheap or generic switches. They may fail sooner and cause problems.
Removal Procedure
Start by disconnecting the car battery. This prevents electrical shocks or shorts. Find the brake light switch near the pedal. It usually clips or screws in place. Remove the electrical connector carefully. Do not pull the wires. Unscrew or unclip the switch gently. Keep all screws safe for reinstallation.
Installation Tips
Attach the new switch where the old one was. Secure it firmly but do not overtighten. Reconnect the electrical plug properly. Test the switch by pressing the brake pedal. Check if the brake lights turn on. Adjust the switch position if needed. Reconnect the car battery after installation.
Maintaining Brake Light Switch Health
Maintaining the health of your brake light switch is key to safe driving. This small part controls the brake lights that alert drivers behind you. A faulty switch can cause brake lights to fail, increasing accident risk. Regular care helps spot problems early and keeps the switch working well.
Regular Inspections
Check the brake light switch every few months. Look for loose wires or damaged parts. Press the brake pedal and watch if the brake lights turn on. If the lights flicker or stay off, the switch might need attention. Clean the switch and surrounding area to remove dirt and dust. This prevents buildup that can block proper function.
Avoiding Common Issues
Do not slam the brake pedal too hard. This can wear out the switch faster. Avoid spilling liquids near the switch, as moisture can cause corrosion. Replace worn brake pedals pads to keep the switch from getting stuck. Use only the correct switch type for your vehicle model. Incorrect parts may not fit or work properly.

Credit: www.youtube.com
Credit: www.howacarworks.com
Frequently Asked Questions
How Do You Check A Brake Light Switch?
To check a brake light switch, press the brake pedal and observe the brake lights. If they don’t illuminate, test the switch with a multimeter for continuity.
What Tools Are Needed To Test Brake Light Switches?
You need a multimeter, screwdriver, and sometimes a vehicle manual to locate and test the brake light switch accurately.
Why Is My Brake Light Switch Not Working?
A faulty brake light switch can result from electrical issues, mechanical wear, or improper alignment, causing brake lights to fail.
How Often Should Brake Light Switches Be Tested?
Test your brake light switch during regular vehicle maintenance or if you notice brake lights malfunctioning to ensure safety.
Conclusion
Testing your brake light switch helps keep you safe on the road. It is a simple process anyone can do with basic tools. Regular checks prevent accidents and save money on repairs. Remember, a working brake light switch means your signals are clear to others.
Take a few minutes to test it today. A small effort makes a big difference in driving safety. Stay alert, stay safe.