If you want your deck to look sleek and seamless, learning how to install Trex hidden deck fasteners is a game changer. These fasteners keep screws out of sight, giving your deck a clean, professional finish that stands out.
But you might wonder, is the installation tricky? Don’t worry—you’re about to discover simple, step-by-step instructions that anyone can follow. By the end of this guide, you’ll have the confidence to install your Trex hidden fasteners like a pro, ensuring your deck is not only beautiful but also sturdy and long-lasting.
Ready to transform your deck and impress your guests? Let’s dive in!
Trex Hidden Fasteners Basics
Understanding the basics of Trex hidden deck fasteners is key for a smooth installation. These fasteners keep the deck surface clean and smooth. They fit into the grooves of Trex decking boards, hiding screws from view. This creates a neat, professional look without visible fasteners on top.
Knowing how these fasteners work and their benefits helps you install them correctly. It also ensures your deck stays strong and looks great for years. Let’s explore the basics of Trex hidden fasteners.
How Trex Fasteners Work
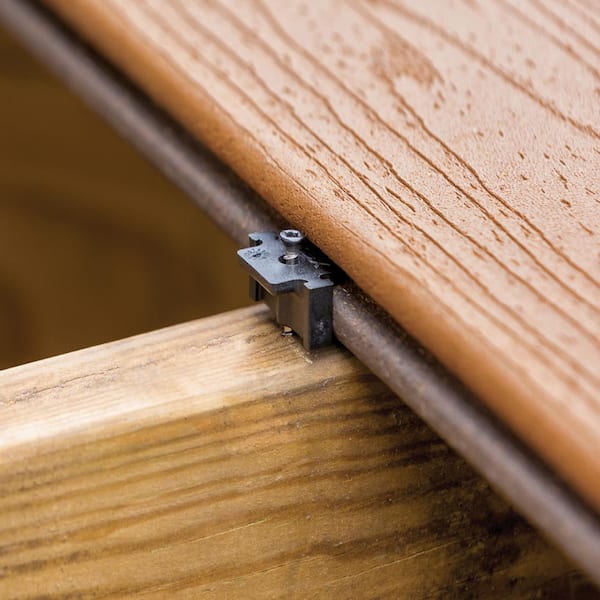
Trex hidden fasteners slide into the grooves on the sides of the decking boards. Then, they screw directly into the joists below. This holds each board firmly in place without surface screws. The fasteners keep consistent spacing between boards, allowing for expansion and contraction. They create a secure, flush deck surface free of nails or screws on top.
Benefits Of Hidden Fasteners
Hidden fasteners give your deck a sleek, clean appearance. No visible screws mean no chance of catching or snagging. They help boards stay evenly spaced for better drainage and airflow. This reduces warping and extends the deck’s life. Fasteners also speed up installation by locking boards in place quickly. Overall, hidden fasteners improve both the look and durability of your deck.

Credit: www.trex.com
Tools And Materials Needed
Preparing to install Trex hidden deck fasteners starts with gathering the right tools and materials. Having everything ready makes the installation smooth and efficient. It also helps prevent mistakes and delays during the project.
This section covers the essential tools needed for the job and how to choose the correct fasteners. Both are key to a secure and long-lasting deck.
Essential Installation Tools
A power drill is a must for driving screws quickly and tightly. Use a drill with a clutch to avoid overdriving fasteners. A Trex hidden fastener tool or a compatible bit holder helps guide screws into the grooves properly. A tape measure ensures accurate spacing of boards and joists. A pencil or chalk marks where fasteners should be placed. Safety gear like gloves and eye protection keeps you safe during work. A level helps keep the decking boards straight and even. Clamps can hold boards steady while fastening. Having these tools ready speeds up the installation and improves results.
Choosing The Right Fasteners
Trex hidden deck fasteners come in different styles and sizes. Select fasteners that match your decking board profile and thickness. Use stainless steel or coated fasteners to resist rust and corrosion. Check the product instructions to confirm compatibility with your deck type. Using the right fasteners ensures the deck stays secure and looks neat without visible screws. Avoid generic fasteners that may not fit correctly or cause damage. Choosing quality fasteners designed for Trex decks protects your investment and extends deck life.
Preparing The Deck Surface
Preparing the deck surface is a crucial step before installing Trex hidden deck fasteners. A smooth and clean surface ensures the fasteners fit properly and the decking looks flawless. Proper preparation helps avoid issues like uneven boards or loose fasteners later on. Follow these steps carefully for the best results.
Inspecting Joist Spacing
Check the spacing between the joists first. Trex decking requires joists spaced no more than 16 inches apart. Measure each gap to confirm they meet this standard. Uneven or wide gaps can cause problems during installation. Fix any spacing issues before moving forward. Proper joist spacing provides strong support for the hidden fasteners.
Cleaning And Aligning Boards
Remove dirt, dust, and debris from the deck surface. Clean boards allow fasteners to hold securely. Use a broom or blower for the best results. Align the boards evenly along the joists. Ensure there are no warped or damaged boards. Straight boards create a smooth surface and help fasteners fit perfectly. Take your time to make sure everything is clean and aligned well.
Installing The First Board
Installing the first board is the most important step in setting up Trex hidden deck fasteners. This step sets the foundation for the entire deck. A straight and secure starter board ensures your deck looks great and lasts long. Follow the right method to position and fix the first board precisely.
Positioning The Starter Board
Place the starter board along the edge of the deck frame. Keep a small gap between the board and the house wall for expansion. Use a level to check if the board is straight and even. Adjust the board until it sits perfectly. Mark the joist locations on the board’s edge for fastener placement.
Securing With Hidden Fasteners
Slide the Trex hidden fasteners into the groove on the edge of the starter board. Align each fastener with the marked joists below. Screw the fasteners into the joists using a drill and the recommended bit. Tighten the screws firmly but avoid over-tightening. This holds the board securely without visible screws on top.
Fastener Placement And Spacing
Proper fastener placement and spacing is key to a strong Trex deck. It ensures boards stay secure and look great. Correct spacing prevents warping and allows for natural expansion of the decking material. Follow spacing guidelines for a clean, lasting finish.
Spacing Between Fasteners
Place fasteners at every joist along the board length. This means one fastener per joist. Usually, joists are 16 inches apart. Keep fasteners about 1 inch from each board end. This prevents splitting and holds boards firmly.
Use Trex hidden fasteners designed to fit the board groove. Slide each fastener fully into the groove before screwing it down. This keeps fasteners hidden and secure. Avoid spacing fasteners too far apart. Wide gaps can cause boards to flex or move.
Maintaining Consistent Gaps
Maintain even gaps between deck boards for proper drainage and airflow. Trex boards expand and contract with temperature changes. Consistent gaps help prevent buckling or warping. Use spacers or the fastener tool’s built-in gap guide to keep spaces equal.
Check gap size frequently as you install. Adjust fastener placement if gaps vary. Proper spacing improves deck appearance and longevity. Avoid tight or uneven gaps that trap moisture or cause noise underfoot.

Credit: www.trex.com
Using The Trex Installation Tool
The Trex Installation Tool makes installing hidden deck fasteners easier and faster. It holds the screws securely and guides them perfectly into the grooves of your decking boards. This tool helps create a clean, fastener-free surface on your deck. Using it properly ensures the fasteners sit flush and tight, which improves the deck’s look and strength.
Follow these steps to use the Trex Installation Tool effectively and get the best results for your deck project.
Attaching The Bit Holder
Start by attaching the bit holder to the bottom of the installation tool. The bit holder keeps the screw bit steady during use. Push it in firmly until it clicks into place. Make sure it fits snugly to avoid wobbling. A secure bit holder helps drive screws straight and prevents damage to the deck boards.
Driving Screws Correctly
Place the fastener into the groove of the deck board. Align the tool with the fastener and joist below. Hold the tool steady and start driving the screw slowly. Use consistent pressure to avoid stripping the screw head. Stop driving when the fastener is flush with the board edge. This ensures a smooth, hidden fastening that blends with the deck surface.
Installing Subsequent Boards
Installing subsequent boards with Trex hidden deck fasteners requires care for a smooth, secure deck surface. Each board must fit tightly into the fasteners. Proper alignment ensures the deck looks clean and professional. Follow the steps carefully to avoid gaps or loose boards.
Sliding Boards Into Fasteners
Start by positioning the board near the installed fasteners. Align the grooved edge of the new board with the fasteners. Gently slide the board into the fasteners. Push it firmly to engage the clips inside the groove. This locks the board in place without visible screws. Take care not to damage the groove edges during sliding. Adjust the board to maintain consistent spacing with the previous board. This keeps the deck surface even.
Ensuring Secure Attachment
After sliding the board, secure the fasteners to the joists. Use a drill with the correct bit for Trex fasteners. Drive the screws through the fastener holes into the joists. Do not overtighten screws to avoid damage. Check each fastener along the board for firm attachment. Confirm the board does not move or lift. This step keeps the deck stable and safe. Repeat the process for every joist along the board’s length. Proper fastening prevents future squeaks and board warping.
Dealing With Expansion And Contraction
Installing Trex hidden deck fasteners requires careful attention to the natural expansion and contraction of composite decking. Changes in temperature cause the boards to expand or shrink slightly. Without proper handling, this movement can cause warping or buckling. Follow key steps to manage these shifts and keep your deck looking smooth and strong.
Allowing Proper End Gaps
Always leave space between the ends of the decking boards. Trex recommends a small gap to let the boards expand freely. This gap prevents the boards from pushing against each other and causing damage. Use a spacer during installation to keep the gap consistent. Check the weather forecast and install gaps slightly larger in hot weather. Proper end gaps help maintain the deck’s durability over time.
Adjusting For Temperature Changes
Composite decking expands more in hot weather and contracts in cold weather. Plan your installation based on the current temperature. Install the fasteners so boards can move slightly without stress. Avoid tightening screws too much. This adjustment allows the deck boards to shift naturally. Consider revisiting your deck in different seasons to ensure fasteners remain secure but flexible.
Border And Edge Finishing
Border and edge finishing is a key step in installing Trex hidden deck fasteners. It creates a neat, polished look for your deck. Proper finishing protects the deck edges and hides fasteners from view. This section shows how to install border boards and hide fasteners along the edges. Follow these steps for a clean, professional finish.
Installing Border Boards
Start by measuring the deck’s perimeter for border boards. Cut the boards to fit the edges precisely. Place border boards over the joists around the deck’s outer edge. Use Trex hidden fasteners to attach them securely. Align the boards carefully to keep even spacing. Border boards give the deck a strong, finished frame. They also cover the ends of the main deck boards.
Hiding Fasteners At Edges
Edges require special attention to hide fasteners well. Use the Trex fastener tool to insert clips into board grooves. Fasten these clips to the joists just inside the border boards. Make sure the clips are flush with the board edges. This hides screws and nails from sight. Check that all fasteners are tight but not overdriven. Clean edges without visible screws improve the deck’s look and durability.
Common Installation Mistakes
Installing Trex hidden deck fasteners requires care to avoid common mistakes. These errors can weaken the deck’s structure and affect its appearance. Understanding these pitfalls helps ensure a strong, neat finish. Focus on proper alignment and correct tightening during installation. These details make a big difference in the deck’s durability and look.
Avoiding Misaligned Fasteners
Misaligned fasteners cause uneven decking boards. This leads to gaps or raised edges that catch dirt and water. Always place fasteners squarely into the board grooves. Use a guide or installation tool to keep fasteners straight. Check alignment often as you work along the joists. Correct placement prevents warping and maintains a smooth surface.
Preventing Over-tightening
Over-tightening fasteners can damage the decking material. It may cause boards to crack or strip the screw holes. Tighten screws just enough to hold boards firmly. Use a drill with adjustable torque settings for control. Stop tightening when the fastener is snug but not forced. This preserves the board’s strength and allows for natural expansion.
Maintenance Tips For Longevity
Proper care of Trex hidden deck fasteners helps keep your deck safe and looking good. Regular maintenance prevents damage and extends the life of your deck. Simple steps like inspection and cleaning make a big difference over time.
Regular Inspections
Check your deck fasteners at least twice a year. Look for loose screws or any signs of rust. Tighten any fasteners that feel loose to keep boards secure. Watch for cracks or damage near the fasteners. Early spotting of problems avoids costly repairs later.
Cleaning And Repairs
Keep the deck surface clean from dirt and debris. Use a soft brush and mild soap to wash the deck. Avoid harsh chemicals that can damage the fasteners or decking material. If you find damaged fasteners, replace them immediately. Use the correct tools for installation to avoid stripping screws.
Credit: www.homedepot.com
Frequently Asked Questions
Do Trex Hidden Fasteners Go On Every Joist?
Trex hidden fasteners must be installed on every joist to secure the deck boards properly. This ensures stability and a clean surface.
How To Use Trex Hidden Fastener Tool?
Place the bit in the tool’s holder. Slide the fastener into the deck board groove. Screw it into the joist securely. Repeat for each joist along the board.
How Far Apart Should Trex Hidden Fasteners Be?
Trex hidden fasteners should be spaced at every joist, typically 16 inches apart. This ensures secure and even deck board attachment.
How Do Trex Hidden Fasteners Work?
Trex hidden fasteners slide into deck board grooves, securing boards to joists with screws. They create a clean, fastener-free surface while allowing board expansion.
Conclusion
Installing Trex hidden deck fasteners is simple with clear steps. Secure each fastener tightly to every joist for stability. Keep proper spacing for board expansion and contraction. Use the recommended tool to slide fasteners into grooves easily. This method creates a clean, screw-free deck surface.
Following these tips ensures a strong, lasting deck. Enjoy your smooth, professional-looking Trex deck for years.