Have you ever hung something on your wall and later needed to remove the anchors without leaving a mess? Removing anchors can be tricky, especially if you want your walls to look clean and smooth afterward.
Whether you’re redecorating, fixing a mistake, or just updating your space, knowing how to remove anchors properly saves you time and frustration. In this guide, you’ll discover simple, effective steps to get those anchors out quickly—without damaging your walls. Keep reading, and you’ll master this easy skill in no time.
:max_bytes(150000):strip_icc()/how-to-remove-drywall-anchors-7562285-02-c01abbfe63374ad3a7bc1e52d0c15bb2.JPG)
Credit: www.thespruce.com
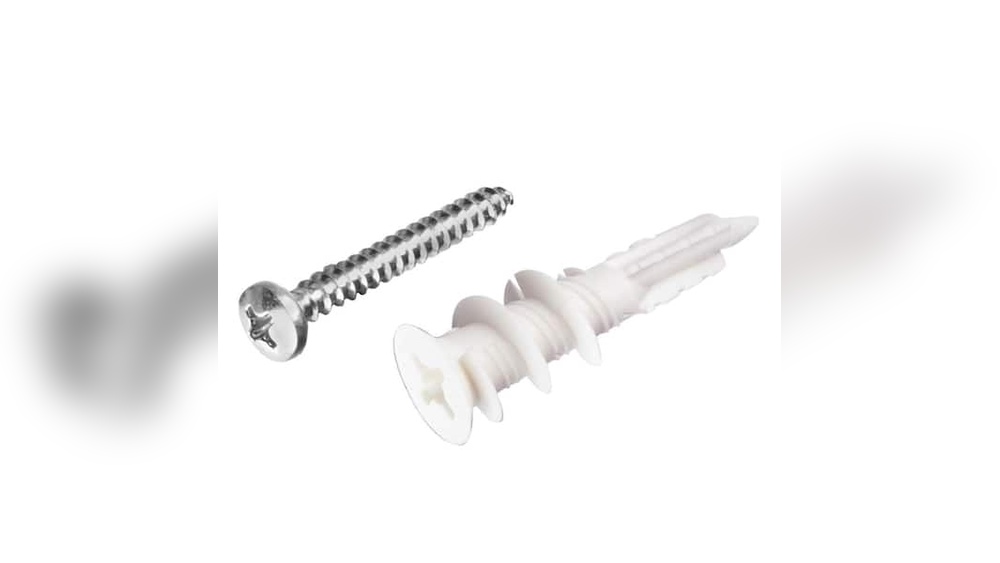
Types Of Wall Anchors
Wall anchors come in different types. Each type works best for certain walls and weights. Knowing the kind of anchor helps you remove it safely and easily. This section explains the main types of wall anchors.
Plastic Expansion Anchors
Plastic expansion anchors are common and easy to use. They expand inside the wall when you insert a screw. These anchors work well for light items on drywall or plaster. Removing them requires pulling out the screw first. Sometimes, you can push the anchor back into the wall.
Molly Bolts
Molly bolts are metal anchors for heavier loads. They expand behind the wall when you tighten the screw. These bolts hold strong in drywall and hollow walls. To remove, unscrew the bolt fully. Then, the anchor may come out or stay in place.
Toggle Bolts
Toggle bolts have wings that open behind the wall. They support heavy items on drywall or hollow walls. Removing toggle bolts means unscrewing the bolt. The wings usually drop inside the wall and stay there.
Self-drilling Anchors
Self-drilling anchors have sharp tips to drill into the wall. They do not need a pre-drilled hole. These anchors suit drywall and light materials. To remove, unscrew the screw and try to pull out the anchor. Sometimes, you need to push it inside the wall.
Tools Needed For Removal
Removing anchors from a wall requires the right tools. Using proper tools makes the job easier and prevents damage. Below are the essential tools you will need for anchor removal.
Screwdriver And Pliers
A screwdriver helps to unscrew anchors that have screws in them. Choose a screwdriver that fits the screw head well. Pliers are useful to grip and pull out anchors stuck inside the wall. Use pliers gently to avoid wall damage.
Drill And Drill Bits
A drill can remove stubborn anchors by drilling them out carefully. Use a drill bit slightly smaller than the anchor size. Drilling creates space around the anchor for easier removal. Always drill slowly to control the process.
Putty Knife And Spackle
After removing the anchor, a hole will remain in the wall. A putty knife helps apply spackle smoothly to fill the hole. Spackle dries fast and can be sanded for a clean finish. This step restores the wall’s surface perfectly.
Safety Equipment
Wear safety glasses to protect your eyes from dust and debris. Use gloves to avoid cuts or scrapes on your hands. A dust mask helps prevent inhaling fine particles during drilling or scraping. Safety is important for every task.
Preparing The Wall
Preparing the wall is a key step before removing anchors. It helps protect your wall and makes the process easier. Taking time to prepare keeps the space safe and clean. Follow simple steps to get the wall ready.
Clearing The Area
Remove any furniture or objects near the wall. This stops damage to your belongings. It also gives you enough space to work comfortably. Clear the floor area to avoid tripping or falling. A clean area helps you focus on the task.
Protecting The Surface
Cover the floor and nearby surfaces with a drop cloth or old sheet. This catches dust and debris from the anchor removal. Use painter’s tape to secure the cloth and keep it in place. Protecting surfaces saves time on cleaning later. It also prevents scratches and paint chips on your wall.
Removing Plastic Expansion Anchors
Plastic expansion anchors hold screws tightly in walls. Removing them needs care to avoid wall damage. Two simple ways work well for most plastic anchors. Both methods use basic tools and little effort.
Choose the right method based on the anchor’s size and wall type. Small anchors are easier to pull out. Larger ones may need pushing through the wall.
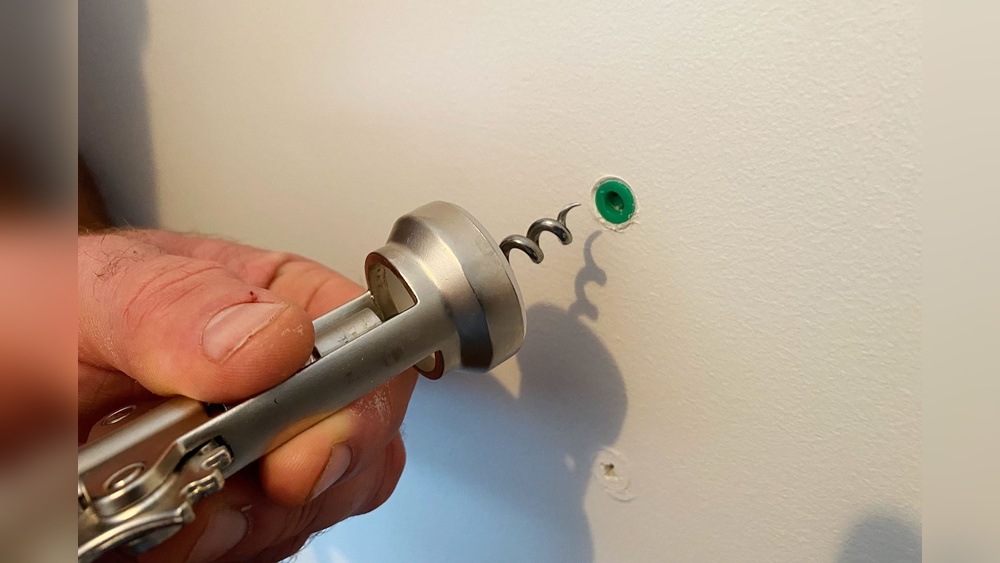
Prying Out With Pliers
Grip the anchor’s edge firmly with needle-nose pliers. Pull straight out slowly to avoid breaking the wall. Wiggle the anchor gently to loosen it if stuck. Keep pulling until the whole anchor comes free.
This method works best on anchors sticking out slightly. Avoid pulling too hard to protect drywall from damage. If the anchor breaks, try the pushing method next.
Pushing Through The Wall
Use a screwdriver to push the anchor inside the wall cavity. Place the screwdriver tip in the anchor’s center hole. Tap gently with a hammer to push the anchor through the drywall. The anchor will fall inside the wall.
This method leaves a small hole but no anchor in sight. Fill the hole with spackling or wall filler. Smooth it out and let dry before painting or decorating.
Extracting Molly Bolts
Molly bolts are strong wall anchors used for heavy items. Removing them needs care to avoid damage. The process has two main steps. First, unscrew the bolt. Next, collapse the sleeve to pull it out. This guide explains these steps clearly.
Unscrewing The Bolt
Start by turning the bolt counterclockwise. Use a screwdriver that fits the bolt head well. Turn slowly to avoid stripping the screw. Keep turning until the bolt is loose or comes out. Sometimes, the bolt may not come out fully. This means the sleeve is still gripping the wall.
Collapsing The Sleeve
Push the sleeve inward to collapse it. You can tap it lightly with a hammer if needed. The goal is to fold the sleeve’s legs inside the wall. This releases the anchor’s grip. After collapsing, pull the sleeve out with pliers. If it resists, wiggle gently to free it. Now, the wall is ready for patching or new anchors.
Taking Out Toggle Bolts
Toggle bolts are strong anchors often used to hang heavy objects on walls. Removing them can be tricky without damaging the wall. Knowing the right steps makes the process easier and cleaner. Here’s how to take out toggle bolts safely.
Unscrewing The Bolt
Start by turning the bolt counterclockwise. Use a screwdriver that fits the bolt head. Keep turning until the bolt loosens completely. Pull the bolt out slowly. If the bolt does not move, try wiggling it gently. Avoid forcing it to stop wall damage.
Retrieving The Toggle
The toggle part stays inside the wall after removing the bolt. Push it gently into the wall cavity. Use a wire or hook tool to pull it out. Sometimes, the toggle falls inside the wall and stays hidden. In this case, patch the hole with filler or spackle. Let it dry before sanding smooth.
Handling Self-drilling Anchors
Handling self-drilling anchors requires care and the right steps. These anchors are designed to dig into walls without needing a pilot hole. Removing them can be tricky but is doable with simple methods. Follow these techniques to remove self-drilling anchors safely and cleanly.
Unscrewing Method
Start by trying to unscrew the anchor with a screwdriver. Use a screwdriver that fits the anchor head well. Turn the screwdriver counterclockwise slowly. If the anchor moves, keep turning until it comes out. If it does not budge, do not force it. Forcing can damage the wall.
Drilling Out The Anchor
Use a drill with a bit slightly smaller than the anchor. Drill carefully into the center of the anchor. This breaks the anchor into pieces inside the wall. Be gentle to avoid damaging the wall surface. After drilling, push out the broken pieces with a small tool. Clean the hole and prepare it for patching.

Credit: www.hgtv.com
Repairing The Wall After Removal
Removing anchors from your wall often leaves small holes or damage. Repairing these spots is important to keep the wall looking neat and smooth. This process includes filling the holes, sanding the surface, and painting over the repaired areas. Each step helps restore the wall to its original state.
Filling Holes With Spackle
Start by cleaning the holes to remove dust and debris. Use a putty knife to apply spackle into each hole. Press the spackle firmly to fill the space completely. Smooth the surface by spreading the spackle evenly. Let the spackle dry as per the instructions on the package.
Sanding And Smoothing
After the spackle dries, use fine-grit sandpaper to smooth the area. Sand gently to avoid damaging the surrounding wall. The goal is to make the surface flush with the rest of the wall. Wipe away dust with a dry cloth before moving to the next step.
Painting Touch-ups
Choose paint that matches your wall color. Use a small brush or roller to cover the repaired spots. Apply thin layers to blend the paint seamlessly. Allow each layer to dry before adding another. This ensures the repair is not visible after painting.
Preventing Wall Damage
Removing anchors from walls can cause damage if not done carefully. Preventing wall damage starts before you put anchors in. Choosing the right anchor and installing it properly helps protect your walls. This saves time and money on repairs later.
Choosing The Right Anchor
Select anchors made for your wall type. Drywall needs different anchors than brick or plaster. Use plastic anchors for light items and metal anchors for heavy objects. The right anchor holds firmly without extra force. This lowers the chance of cracks or holes.
Proper Installation Techniques
Drill holes carefully at the right size. Too big or too small holes weaken the wall. Insert anchors gently without pushing hard. Tighten screws slowly to avoid cracking the wall. Follow product instructions to keep the wall intact. Good installation means easier anchor removal later.

Credit: theturquoisehome.com
Frequently Asked Questions
How Do You Safely Remove Wall Anchors?
To safely remove wall anchors, first unscrew any screws. Use pliers to gently pull out the anchor. If stuck, push the anchor into the wall and patch the hole afterward.
What Tools Are Needed To Remove Wall Anchors?
You need a screwdriver, pliers, and a putty knife. Sometimes a drill or hammer may help. These tools help loosen and extract the anchor cleanly.
Can Wall Anchors Be Reused After Removal?
Wall anchors are generally not reusable. Removing them damages their gripping ability. For secure fixing, always use new anchors after removal.
How To Fix Holes After Removing Anchors?
Fill holes with spackle or wall filler. Let it dry, then sand smooth. Finally, paint over to match the wall color.
Conclusion
Removing anchors from walls is easier than it seems. Use the right tools and take your time. Gently pull or twist the anchor to avoid wall damage. Fill any holes with spackle for a smooth finish. Clean the area and let it dry well.
This simple process keeps your walls neat and ready for new decor. With care, you can remove anchors without any trouble. Try these steps next time you update your space.