Have you ever wondered how Mount Scope drilled tapped holes can make your projects stronger and more reliable? Whether you’re working on a DIY task or a professional build, knowing the right way to create these threads can save you time and frustration.
You’ll discover simple steps and expert tips that will help you master the drilling and tapping process. By the end, you’ll feel confident handling your tools and getting perfect results every time. Keep reading to unlock the secrets behind Mount Scope drilled tapped techniques that can transform your work.

Credit: www.badacetactical.com
Mount Scope Basics
Mount scopes are essential tools for attaching scopes securely. They ensure stability and accuracy. Understanding their basics helps in choosing the right one. Each mount scope has specific features designed for different needs. This section breaks down the types, materials, and uses of mount scopes.
Types Of Mount Scopes
Mount scopes come in several types. Ring mounts hold the scope firmly around the tube. Rail mounts slide onto a base rail for quick attachment. One-piece mounts combine the rings and base for extra strength. Each type fits different firearms and scopes.
Materials Used
Most mount scopes use aluminum for light weight and strength. Steel mounts offer extra durability but add weight. Some mounts use polymer for low cost and corrosion resistance. The choice of material affects the mount’s lifespan and performance.
Applications In Various Fields
Mount scopes are used in hunting for precise aiming. Law enforcement uses them for tactical advantage. Shooting sports rely on mounts for consistent accuracy. Even airsoft and paintball players use mount scopes to improve aim.
Credit: www.badacetactical.com
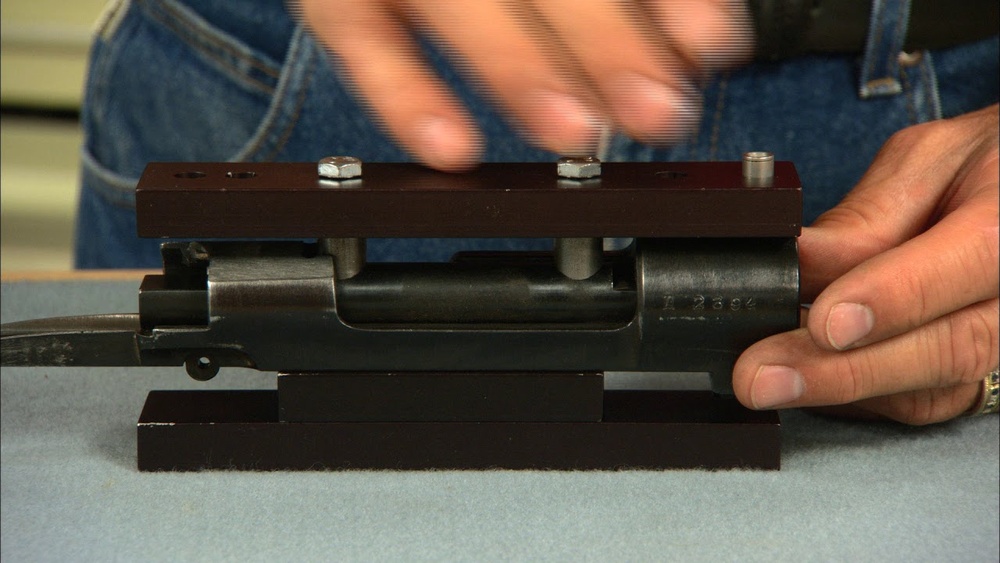
Drilling Techniques
Drilling techniques play a key role in creating precise mount scopes. Good drilling ensures strong, clean holes. This helps the scope hold firm and stay stable. Using the right methods can prevent damage to the material and tools. Below are important steps and tips for effective drilling.
Selecting The Right Drill Bit
Choose a drill bit that fits the material type. For metal, use high-speed steel or cobalt bits. Wood requires a sharp twist bit or spade bit. For plastic, a slower speed and sharp bit work best. Pick the correct size to match the screw or bolt diameter. Using the wrong bit may cause rough holes or breakage.
Step-by-step Drilling Process
Start by marking the exact spot to drill with a pencil or center punch. Secure the mount and workpiece firmly to avoid slipping. Use a slow speed to begin the hole and increase speed gradually. Apply steady pressure, but do not force the drill. Withdraw the bit occasionally to clear debris. Finish with a clean hole free of burrs or rough edges.
Common Drilling Mistakes To Avoid
Do not rush drilling or apply too much force. This can cause the bit to break or the hole to widen. Avoid using dull or damaged drill bits. They create uneven holes and wear out tools faster. Ensure the workpiece is stable before drilling. Moving parts cause inaccurate holes and risk injury. Always wear safety goggles to protect your eyes from debris.
Tapping Procedures
Tapping procedures are key in creating strong, reliable threads in drilled holes. Accurate tapping ensures parts fit well and hold firmly. It requires the right tools and careful technique. Each step matters to avoid damage and maintain thread quality.
Choosing Tap Sizes And Types
Select taps that match the hole size and thread needed. Use standard sizes for common bolts and screws. Different taps fit different materials, like metal or plastic. Spiral taps clear chips better in deep holes. Hand taps work well for small or delicate jobs.
Proper Tapping Methods
Start tapping slowly to avoid cross-threading. Use cutting oil to reduce friction and heat. Turn the tap forward a few turns, then back it off slightly. This clears metal chips and prevents jamming. Keep the tap straight to avoid crooked threads.
Ensuring Thread Accuracy
Check thread depth and fit with a gauge or bolt. Measure threads often during tapping to maintain precision. Use sharp taps to create clean, consistent threads. Replace worn taps to prevent rough or loose threads. Accurate threads ensure strong connections and long-lasting parts.
Precision Factors
Precision is key in mount scope drilled tapped processes. It ensures parts fit perfectly and work reliably. Small errors can cause big problems in assembly and function. Focus on precision factors helps maintain high quality and performance.
Tools For Measuring Accuracy
Accurate tools check the size and depth of drilled holes. Calipers, micrometers, and thread gauges measure exact dimensions. Coordinate measuring machines (CMM) provide detailed 3D data. These tools catch mistakes early and keep parts within specs.
Impact Of Material Properties
Material hardness affects drilling and tapping quality. Softer materials may deform, causing loose threads. Hard materials can wear down tools faster. Knowing material traits helps select the right drill speed and tap type. This reduces errors and improves precision.
Maintaining Consistency In Production
Consistent drilling and tapping avoid part variation. Using jigs or fixtures holds parts steady during machining. Standardized processes and regular tool checks keep results uniform. Training workers on best practices minimizes human error. Consistency leads to reliable, high-quality mounts.
Safety Tips
Safety is the top priority when drilling and tapping mounts on scopes. Proper precautions help avoid accidents and injuries. Following safety tips ensures a smooth and secure process.
Protective Gear Recommendations
Wear safety glasses to protect your eyes from metal shavings. Use gloves to keep your hands safe from sharp edges. Consider ear protection if noise levels are high. Choose clothing that fits well and covers your skin fully.
Safe Handling Of Tools
Check tools before use to ensure they work properly. Keep drill bits sharp and clean for better control. Hold tools firmly but avoid gripping too tight. Always keep your hands away from moving parts.
Preventing Common Injuries
Keep your workspace clean to avoid slips and falls. Work slowly and carefully to reduce mistakes. Avoid distractions while operating tools. Stop immediately if you feel tired or uneasy.
Troubleshooting Guide
Troubleshooting is key when working with mount scope drilled tapped holes. Issues can arise that affect the fit and function. This guide helps you identify and fix common problems fast. Clear steps make repairs easier, saving time and effort.
Fixing Misaligned Holes
Misaligned holes cause mounting problems. Start by checking the hole positions. Use a center punch to mark the exact spot. Drill slowly to correct the alignment. Avoid making holes larger than needed. Re-check fit before tapping new threads.
Repairing Damaged Threads
Damaged threads reduce holding strength. Use a thread file or tap to clean minor damage. For larger issues, use a thread repair kit. Insert a helicoil or threaded insert to restore threads. Always match the insert size to the original thread.
Addressing Tool Wear And Tear
Worn tools cause poor holes and threads. Inspect drills and taps regularly for wear signs. Replace dull or chipped tools immediately. Use sharp tools to maintain clean cuts. Proper tool care extends tool life and improves results.
Advanced Techniques
Advanced techniques improve the quality and speed of mount scope drilling and tapping. These methods ensure precise holes and strong threads. They also reduce errors and material waste.
Below are some key advanced techniques used in the industry today.
Using Cnc Machines For Drilling And Tapping
CNC machines offer precise control over drilling and tapping. They follow exact measurements and patterns. This reduces mistakes and improves repeatability. CNC machines handle tough materials with ease. They speed up the entire process and produce clean threads every time.
Incorporating Lubricants And Coolants
Lubricants and coolants keep tools and materials cool during drilling. This prevents overheating and tool damage. They also reduce friction and wear on taps and drills. Using proper fluids extends tool life and improves thread quality. The result is smoother cuts and less chance of thread failure.
Automation In Mount Scope Fabrication
Automation uses robots and machines to handle drilling and tapping. It increases production speed and reduces human error. Automated systems can work continuously without fatigue. They ensure consistent quality on every mount scope. Automation also lowers labor costs and improves safety in workshops.

Credit: www.youtube.com
Frequently Asked Questions
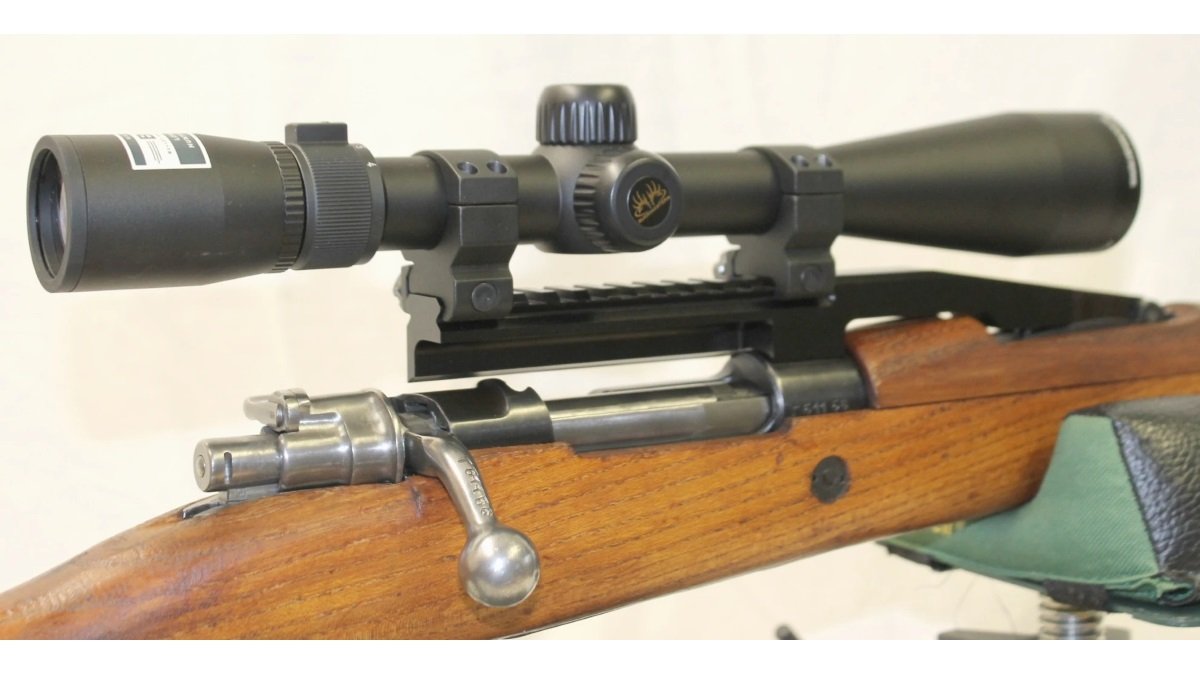
What Does “mount Scope Drilled Tapped” Mean?
Mount scope drilled tapped means the scope mount has pre-drilled holes. These holes are threaded for screws. This allows secure attachment to rifles or other equipment. It ensures stability and precise alignment of the scope for accurate shooting.
Why Choose A Drilled And Tapped Scope Mount?
Drilled and tapped mounts provide stronger, more reliable attachment. They reduce scope movement under recoil. This improves shooting accuracy over time. The design also allows easy installation and removal without damage. It’s ideal for hunters and competitive shooters.
How To Install A Drilled And Tapped Mount?
First, align the mount holes with the firearm’s mounting points. Use compatible screws to secure the mount firmly. Avoid overtightening to prevent damage. Double-check alignment before final tightening. Proper installation ensures stable and accurate scope performance.
Can Any Rifle Use A Drilled And Tapped Mount?
Not all rifles are compatible. The rifle must have pre-drilled and tapped holes. Some firearms require gunsmithing to add these holes. Always verify your rifle’s specifications before purchasing a drilled and tapped mount. Compatibility ensures a secure fit.
Conclusion
Mount Scope drilled tapped with care and precision. This process ensures a strong, secure hold. It helps improve the mount’s stability and performance. Proper drilling and tapping prevent damage and wear. Always follow the correct steps for best results. This simple method saves time and effort.
A well-done mount lasts longer and works better. Understanding this technique can help in many projects. Practice makes perfect—keep trying and learning.