Have you noticed your brake lights acting up or not working at all? Your brake light switch might be the culprit.
This small but important part controls your brake lights, keeping you safe and visible on the road. Fixing it yourself can save you time and money, and it’s easier than you think. In this guide, you’ll learn simple steps to identify, test, and replace your brake light switch.
Keep reading to get your brake lights working perfectly again—your safety depends on it.
Signs Of A Faulty Brake Light Switch
The brake light switch plays a key role in car safety. It signals drivers behind you when you slow down. Signs of a faulty brake light switch can affect your driving and safety. Spotting these signs early helps avoid accidents and costly repairs.
Brake Lights Not Illuminating
One clear sign of a bad brake light switch is when the brake lights do not turn on. Pressing the brake pedal should light up the brake lights instantly. If the lights stay off, the switch might be broken or stuck. This problem can cause accidents because other drivers don’t see when you stop.
Cruise Control Issues
The brake light switch also controls the cruise control system. If cruise control stops working or turns off suddenly, the switch may be faulty. The system relies on the switch to know when you press the brake. A broken switch can confuse the cruise control and make driving harder.
Brake Pedal Problems
Sometimes, the brake pedal may feel different or not respond well. A faulty brake light switch can cause the pedal to stick or feel loose. This issue makes braking unsafe and can lead to delayed stops. Checking the switch can help fix brake pedal problems quickly.
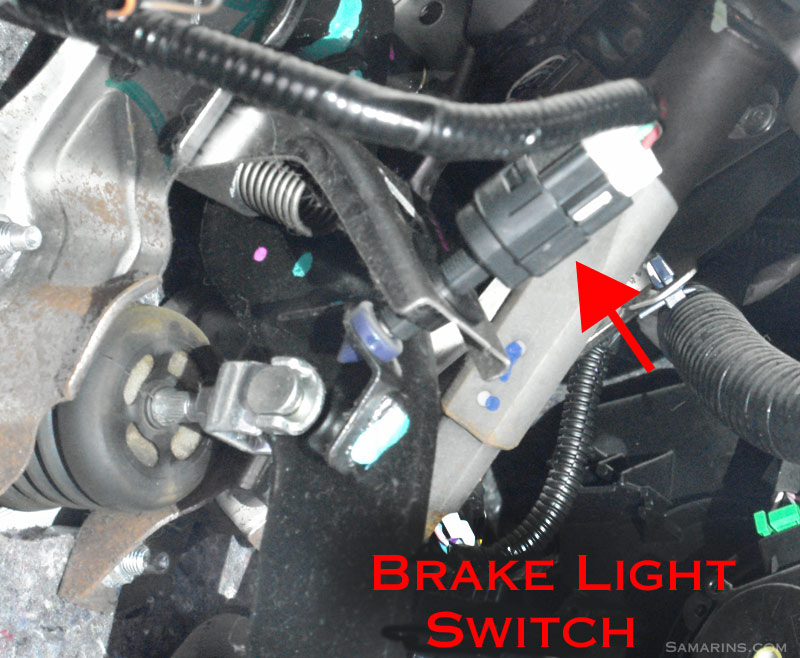
Credit: www.samarins.com
Tools And Materials Needed
Fixing a brake light switch requires the right tools and materials. This ensures the job is done safely and correctly. Having everything ready saves time and prevents frustration. Below is a list of what you will need to complete the task smoothly.
Basic Hand Tools
You will need a set of screwdrivers, both flathead and Phillips. A socket wrench with various socket sizes is important. Needle-nose pliers help to reach tight spots. A small flashlight can make it easier to see under the dashboard. Keep a clean rag nearby to wipe your hands and parts.
Replacement Brake Light Switch
The brake light switch must match your vehicle’s make and model. Check your car manual or ask at the auto parts store. Avoid using a switch that does not fit. A proper replacement ensures the brake lights work properly and last long.
Safety Equipment
Wear gloves to protect your hands from sharp edges. Safety glasses shield your eyes from dust and debris. Use a sturdy car jack and stands if you need to lift the vehicle. Always work in a well-lit and ventilated area to stay safe.
Locating The Brake Light Switch
Finding the brake light switch is the first step to fixing it. This small part controls the brake lights. It tells the car when you press the brake pedal. Knowing where it is helps you check or replace it quickly. Most switches are easy to spot once you know where to look.
Position Near The Brake Pedal
The brake light switch is usually near the top of the brake pedal. It is mounted on the brake pedal bracket or close to the pedal arm. Pressing the brake pedal activates the switch. This sends a signal to turn on the brake lights. Look under the dashboard on the driver’s side. The switch often has a small plunger or button that moves when you press the pedal.
Identifying The Switch Type
Brake light switches come in two main types: plunger and non-contact. The plunger type has a small rod that presses in and out. The non-contact type uses magnets or sensors and has no moving parts. Check the shape and size to identify it. Some switches have wires connected to them. These wires send power to the brake lights. Knowing the type helps you buy the right replacement.
Removing The Old Brake Light Switch
Removing the old brake light switch is the first step in fixing brake light issues. This part connects to the brake pedal and controls the brake lights. Taking it out carefully helps avoid damage to other parts. Follow these steps to remove the old switch safely and correctly.
Disconnecting The Battery
Start by disconnecting the car battery. This stops any electrical flow and keeps you safe. Use a wrench to loosen the negative terminal clamp. Remove the clamp and keep it away from the battery. This prevents shocks and short circuits during the repair.
Unplugging The Electrical Connector
Find the electrical connector attached to the brake light switch. Press the release tab and gently pull the connector out. Avoid pulling the wires to prevent damage. This step disconnects the switch from the car’s electrical system.
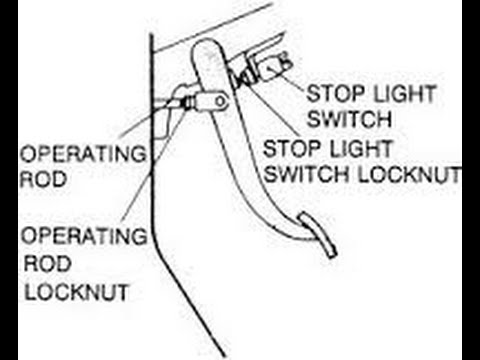
Detaching The Switch From The Pedal Assembly
Locate the brake light switch mounted near the brake pedal. Check how it is fixed—usually with clips or screws. Use a screwdriver or your hands to remove the switch. Pull it out carefully to avoid breaking the pedal assembly.
Installing The New Brake Light Switch
Installing the new brake light switch is a key step to restore your vehicle’s safety. The process needs care and attention to detail. A properly installed switch ensures your brake lights work correctly. Follow these simple steps to fit the new switch with ease.
Positioning The New Switch
Start by locating the mounting spot of the old switch. Place the new switch in the same position. Make sure it fits snugly without forcing it. The switch should align with the brake pedal arm. Proper positioning prevents future problems with brake light activation.
Reconnecting The Electrical Connector
Next, connect the electrical plug to the new switch. Check the connector for dirt or damage before attaching. Push the connector until it clicks into place. A solid connection ensures the brake lights receive power. Loose connections can cause lights to flicker or fail.
Adjusting The Switch For Proper Function
Adjust the switch so it activates when the brake pedal is pressed. Move the switch closer or farther from the pedal arm as needed. Test the brake lights by pressing the pedal lightly. The lights should turn on immediately and turn off when released. Correct adjustment keeps you and others safe on the road.
Testing The Repair
Testing the repair is a key step after fixing the brake light switch. It confirms the switch works properly. This step helps avoid safety issues and legal problems. Two main checks ensure the repair is successful. These checks involve the brake lights and the cruise control system.
Checking Brake Light Operation
Start by sitting in the driver’s seat. Press the brake pedal slowly. Watch the brake lights at the rear of the vehicle. The lights should turn on immediately when the pedal is pressed. Release the pedal and see if the lights turn off. If the lights respond correctly, the switch works well. If not, double-check the switch connection or alignment.
Verifying Cruise Control Functionality
Next, test the cruise control system. Turn on the cruise control while driving at a safe speed. Press the brake pedal gently. The cruise control should turn off immediately. This action shows the brake light switch sends the right signal. If cruise control stays on, the switch might still be faulty. Repair or replace it again to ensure safety.
Common Mistakes To Avoid
Fixing a brake light switch can be simple if done right. Many people make mistakes that cause the repair to fail. Avoiding these errors saves time and keeps your brake lights working well. Here are common mistakes to watch out for.
Incorrect Switch Adjustment
Setting the brake light switch too tight or too loose causes issues. A tight switch may keep the brake lights on all the time. A loose switch might not activate the lights when you press the brake. Adjust the switch carefully to match the brake pedal movement. Test the lights after adjustment to confirm proper function.
Ignoring Electrical Connections
Loose or dirty wires can stop the brake light switch from working. Check all wiring for corrosion, damage, or poor contact. Clean the connectors and ensure they fit tightly. Ignoring these connections often leads to brake lights not turning on. Secure and clean connections improve switch performance and safety.

Credit: www.youtube.com
When To Seek Professional Help
Knowing when to seek professional help is important for brake light switch issues. Some problems need expert skills and tools. Trying to fix these alone can cause more damage or safety risks. Trusting a professional ensures the problem is handled correctly and safely.
Complex Electrical Issues
Brake light switches connect to the car’s electrical system. If wiring or circuits are damaged, fixing them requires special knowledge. Professionals use tools to test and diagnose electrical faults. Complex problems like shorts or blown fuses need expert repair. Avoid guessing or using trial and error with electrical parts.
Persistent Brake Light Problems
If the brake lights keep failing after replacement or repair, seek help. Persistent issues may indicate deeper problems in the switch or wiring. Professionals can find hidden faults quickly and fix them properly. Repeated problems waste time and put driving safety at risk.
Credit: www.youtube.com
Frequently Asked Questions
What Causes A Brake Light Switch To Fail?
A brake light switch can fail due to wear, electrical issues, or dirt buildup. Frequent use and moisture also contribute. Regular inspection helps catch problems early, ensuring your brake lights work safely and reliably.
How Do I Test A Faulty Brake Light Switch?
To test, press the brake pedal and check if the brake lights illuminate. Use a multimeter to measure continuity. If lights don’t respond or continuity is absent, the switch likely needs replacement.
Can I Replace A Brake Light Switch Myself?
Yes, replacing a brake light switch is often a simple DIY task. Locate the switch near the brake pedal, disconnect the wiring, remove the old switch, and install the new one. Always consult your vehicle’s manual for specific instructions.
How Long Does A Brake Light Switch Last?
A brake light switch typically lasts 50,000 to 100,000 miles. Its lifespan depends on usage and vehicle conditions. Regular maintenance and prompt replacement when faulty ensure optimal brake light function and safety.
Conclusion
Fixing a brake light switch is simple with the right steps. Checking the switch and connections helps find the problem fast. Replacing a faulty switch can keep you safe on the road. Regular car care prevents brake light issues. Take your time and follow the guide carefully.
Stay alert and drive safely every day.