Are you tired of forgetting to turn off your lights and wasting electricity? Installing a timer switch for your lights can save you money and add convenience to your daily routine.
Imagine coming home to a well-lit room without lifting a finger or ensuring your lights turn off automatically every night. In this guide, you’ll learn exactly how to install a timer switch step-by-step, even if you have little to no experience with electrical work.
Keep reading—you’re just minutes away from making your home smarter and more energy-efficient.
Credit: www.homedepot.com
Tools And Materials Needed
Installing a timer switch for your lights needs the right tools and materials. This step ensures your work is safe and effective. Knowing what to prepare helps the job go smoothly. Below are the key items you will need.
Timer Switch Types
Choose the correct timer switch for your setup. Mechanical timers are simple and easy to use. Digital timers offer more control and features. Some timers fit standard wall boxes, while others need special wiring. Pick a type that matches your needs and skills.
Essential Tools
Gather basic tools before starting. A screwdriver set is necessary for removing and attaching covers. Wire strippers help prepare wires without damage. A voltage tester ensures power is off before working. Pliers assist in bending and holding wires. Electrical tape secures wire connections.
Safety Gear
Protect yourself with safety gear. Wear insulated gloves to avoid electric shock. Safety glasses shield your eyes from debris. Use a sturdy ladder if needed to reach switches. Ensure your work area has good lighting. These steps keep you safe during installation.
Preparing For Installation
Preparing for installation is a key step before setting up your timer switch. It keeps you safe and helps the process go smoothly. Taking time to get ready ensures you avoid mistakes and damage.
Start by understanding the electrical setup in your home. Knowing where wires are and how power flows will make the installation easier. Gather all tools and materials before you begin.
Turn Off Power
Switch off power at the circuit breaker or fuse box. Confirm no electricity runs to the light switch. Use a voltage tester for extra safety. This step prevents shocks and accidents.
Locate Wiring
Remove the existing switch cover carefully. Look behind to find the wires connected to the switch. Identify the live, neutral, and ground wires. Take note of their positions before disconnecting.
Read Instructions
Go through the timer switch manual thoroughly. Understand each step and the wiring diagram. Follow the guide closely to avoid errors. Keep the instructions handy during installation.
Removing Existing Switch
Removing the existing switch is the first step in installing a timer switch for lights. This process needs care and safety. Turn off the power at the breaker box to avoid electric shock.
Work slowly and follow each step. This ensures a smooth and safe removal of the old switch. Keep track of the wires for the next steps.
Unscrew Switch Plate
Use a screwdriver to remove the screws holding the switch plate. Place the screws somewhere safe. Pull the switch plate away from the wall gently. This reveals the switch and wires behind it.
Disconnect Wires
Look at the wires connected to the switch. Note their positions or take a photo for reference. Use a screwdriver to loosen the screws holding the wires. Carefully disconnect each wire from the switch. Make sure the wires do not touch each other. This step prepares the space for the new timer switch.

Credit: mydome.co.uk
Wiring The Timer Switch
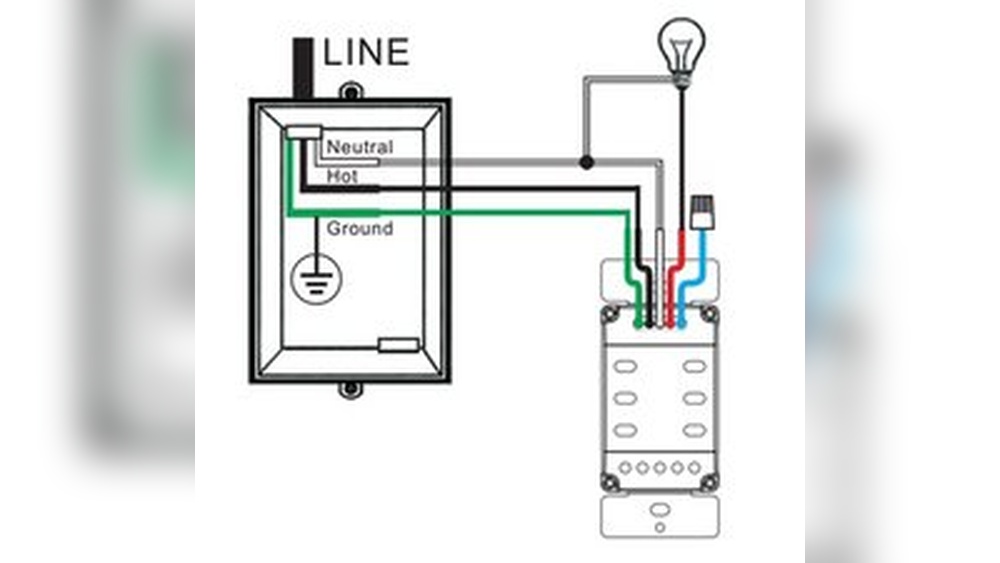
Wiring the timer switch is a key step in installing it correctly. Proper wiring ensures the timer works safely and efficiently. Understanding the wires and how to connect them is essential. This section guides you through each step clearly.
Identify Wire Types
First, turn off the power at the breaker box. Check the wires in your switch box. You will see black, white, and green or bare copper wires. Black wires carry power. White wires are neutral. Green or bare wires are ground. Identifying these wires helps avoid mistakes.
Connect Wires Correctly
Match the timer switch wires with the house wires. Connect black to black (power). Connect white to white (neutral). Attach green or bare wire to the ground screw or wire. Use wire nuts to twist wires together securely. Follow your timer’s instructions for any specific connections.
Secure Connections
Make sure all wire nuts are tight and no copper is exposed. Tug each wire slightly to check the connection. Wrap electrical tape around wire nuts for extra safety. Push wires neatly back into the switch box. Secure the timer switch to the wall with screws. Turn power back on and test the timer switch.
Mounting The Timer Switch
Mounting the timer switch is a key step in the installation process. It involves securing the device to the wall and making sure it fits well. Proper mounting ensures the switch works safely and looks neat.
Follow these steps carefully for a smooth installation. Take your time to avoid damage and ensure the timer switch stays in place.
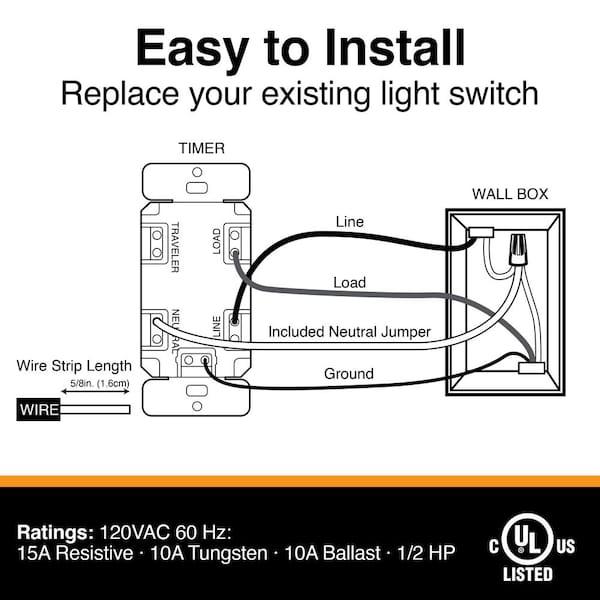
Attach To Wall Box
Start by pushing the timer switch wires back into the wall box. Align the switch with the screw holes on the box. Use a screwdriver to fasten the screws tightly. Do not over-tighten to avoid cracking the switch. The switch should sit flush against the wall without gaps. Check that it feels secure and does not wiggle.
Replace Switch Plate
Place the switch plate over the timer switch. Align the screw holes of the plate with those on the switch. Insert the screws and tighten them carefully. Ensure the plate is even and snug against the wall. The timer switch should be fully covered except the buttons and display. This step completes the neat look and protects the switch.
Credit: www.youtube.com
Testing The Timer Switch
Testing the timer switch is a key step after installation. It ensures the device works correctly. This step helps avoid future problems and saves energy.
Restore Power
Turn the main power back on at the circuit breaker. This supplies electricity to the timer switch. Wait a few seconds for the timer to activate. Make sure the switch shows signs of power, like a light or display.
Set Timer Settings
Adjust the timer to your preferred schedule. Follow the instructions to set the current time. Program on and off times for your lights. Double-check each setting to avoid errors. Use simple, clear steps to make changes.
Verify Operation
Observe the timer switch during the set times. Confirm the lights turn on and off as programmed. Test manual override if available to check control. Watch for any flickering or delays. Fix any issues before finishing the installation.
Troubleshooting Common Issues
Installing a timer switch for lights can save energy and add convenience. Sometimes, issues may arise after installation. Troubleshooting common problems helps fix these quickly. This section covers typical problems and easy solutions.
Switch Not Powering On
Check if the circuit breaker is on. A tripped breaker stops power flow. Confirm the timer switch is wired correctly. Loose wires can cause no power. Use a voltage tester to see if power reaches the switch. Replace the timer switch if it is faulty.
Timer Not Functioning
Ensure the timer is set correctly. Incorrect settings prevent operation. Reset the timer to factory defaults and try again. Check the power source; no power means no timer function. Inspect batteries if your timer uses them. Replace old or dead batteries promptly.
Flickering Lights
Flickering lights may mean a loose connection. Turn off power and tighten all wires. Use bulbs recommended for the timer switch. Some timers do not support LED or CFL bulbs. Replace incompatible bulbs with suitable types. If flickering continues, try another timer switch.
Maintenance Tips
Keeping your timer switch in good condition helps it work well for a long time. Simple care and checks prevent problems. This section shows easy ways to maintain your timer switch for lights.
Regular Checks
Check your timer switch every few months. Look for any signs of wear or damage. Make sure the switch moves smoothly and the settings work right. Test the timer by turning your lights on and off. Fix small issues early to avoid bigger repairs.
Cleaning Tips
Turn off the power before cleaning the timer switch. Use a dry cloth to wipe dust and dirt from the surface. Avoid using water or cleaning sprays. Clean the switch gently to keep the buttons and dials free of grime. Regular cleaning keeps the timer switch looking and working well.
When To Replace
Replace your timer switch if it stops working correctly. Signs include flickering lights or the timer not keeping time. Also, replace it if you see cracks or broken parts. A damaged timer switch can be unsafe. Installing a new one keeps your home safe and your lights on schedule.
Frequently Asked Questions
What Tools Are Needed To Install A Timer Switch?
You need a screwdriver, wire stripper, voltage tester, and electrical tape. These tools help ensure safe and accurate installation of your timer switch.
How Do I Safely Turn Off Power Before Installation?
Turn off the circuit breaker controlling the light fixture. Use a voltage tester to confirm no electricity flows before starting work.
Can I Install A Timer Switch Without Professional Help?
Yes, if you follow instructions carefully and understand basic wiring. However, consult an electrician if unsure or uncomfortable with electrical work.
How Do I Connect Wires To A Timer Switch?
Match wires by color: black to black, white to white, and ground wire to green or bare copper. Secure connections with wire nuts.
Conclusion
Installing a timer switch for your lights saves energy and adds convenience. It helps control when lights turn on and off automatically. The process is simple and does not need special skills. Always remember to turn off the power before starting.
Use the steps carefully to avoid mistakes. A timer switch can make your home safer and more efficient. Try it yourself and enjoy the benefits of smart lighting control. Small effort, big difference.