Are you looking to control an outlet with your light switch but don’t know where to start? Connecting an outlet to a light switch can make your space more convenient and efficient.
Imagine turning on a lamp or a fan with just one flick of a switch—no more reaching for plugs or fumbling in the dark. In this guide, you’ll find simple, step-by-step instructions that anyone can follow, even if you’re not an expert.
Ready to make your home smarter and safer? Keep reading, and you’ll learn exactly how to do it right.

Credit: www.youtube.com
Tools And Materials Needed
Before starting to connect an outlet to a light switch, gather all the tools and materials. Having the right items makes the job easier and safer. This section lists what you need for a smooth process.
Essential Tools
- Screwdriver set (flathead and Phillips)
- Wire stripper
- Voltage tester
- Needle-nose pliers
- Electrical tape
- Drill (optional, for mounting)
Required Materials
- Electrical outlet
- Light switch
- Electrical wires (14 or 12 gauge depending on circuit)
- Wire connectors (wire nuts)
- Outlet and switch wall plates
Safety Gear
- Insulated gloves
- Safety goggles
- Rubber-soled shoes
- Flashlight or headlamp
Credit: www.youtube.com
Basic Electrical Concepts
Basic electrical concepts help you connect an outlet to a light switch safely. Knowing these ideas makes your work easier and prevents accidents. This section explains circuits, wires, and how switches and outlets work.
Understanding Circuits
A circuit is a path that electricity follows. It starts at the power source, moves through wires, and ends at a device. Circuits can be simple or complex. A light switch controls the flow of electricity in a circuit. It turns the power on or off for the outlet or light.
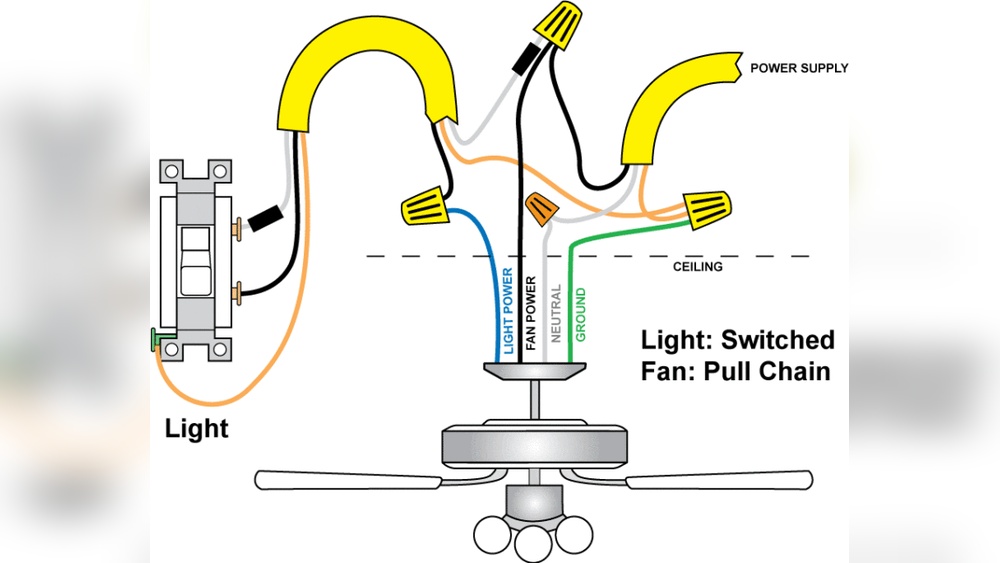
Types Of Wires
Wires carry electricity through a circuit. There are three main types: hot, neutral, and ground. Hot wires carry electricity to devices. Neutral wires return electricity to the source. Ground wires protect you by sending electricity to the earth if there is a fault. Each wire has a color to help you identify it.
Switch And Outlet Functions
A switch controls the flow of electricity. It opens or closes the circuit. An outlet provides a place to plug in electrical devices. When you connect an outlet to a switch, the switch controls power to that outlet. This lets you turn devices on or off from the switch.
Preparing The Work Area
Preparing the work area is the first step in connecting an outlet to a light switch. Safety is very important. A clean and organized space helps you work better and avoid accidents.
Follow simple steps to get ready. Check tools, clear the area, and make sure the power is off. These actions protect you and make the job easier.
Turning Off Power
Find the circuit breaker that controls the power to the outlet and switch. Turn it off completely. This step stops electricity flow and keeps you safe.
Use a label or tape to mark the breaker as off. This prevents others from turning it back on by mistake.
Clearing The Workspace
Remove any objects near the outlet and switch. Clear furniture, tools, and clutter. A tidy space helps you focus and move freely.
Lay down a cloth or mat to catch small parts and dust. This makes cleanup easier after the job is done.
Testing For Live Wires
Use a voltage tester or multimeter to check wires. Touch each wire carefully to see if it carries electricity. This step confirms the power is off.
Test all wires in the outlet box and switch box. Never assume the wires are safe without testing.

Credit: www.do-it-yourself-help.com
Wiring The Outlet To The Switch
Wiring the outlet to the switch is a key step in your electrical project. It controls the power flow and helps operate devices safely. This process involves careful connection of wires to ensure proper function and safety.
Understanding each wire’s role and how to connect them is important. Follow the steps below to wire the outlet to the switch correctly.
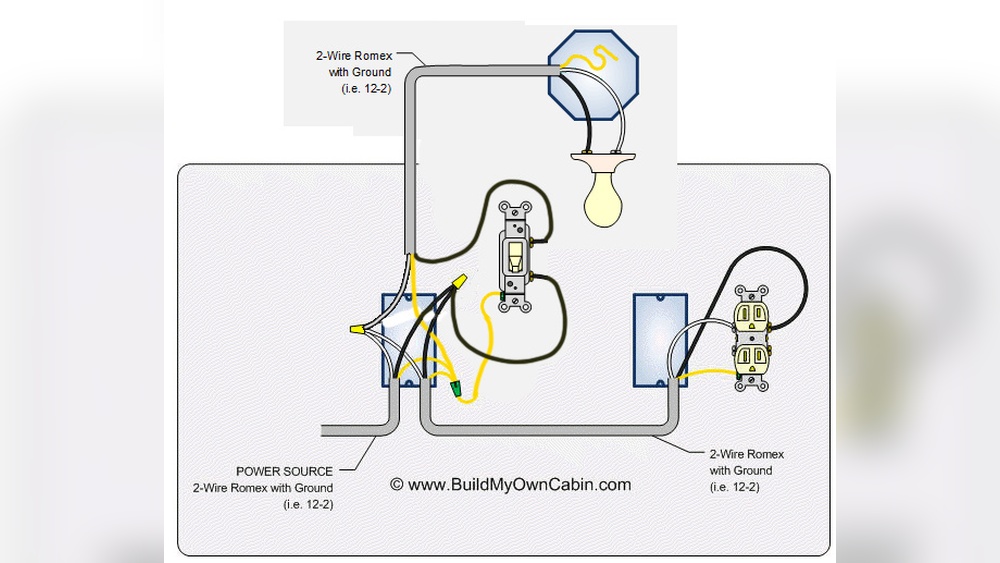
Identifying Wire Connections
First, find the power source wire. Usually, it is black or red and carries current.
Next, locate the neutral wire. It is often white and completes the circuit.
Also, find the ground wire. This is green or bare copper for safety.
Check that wires are not damaged or loose before starting.
Connecting The Switch
Connect the power wire to one terminal on the switch.
Attach the wire that leads to the outlet to the other terminal.
Ensure connections are tight and secure to avoid sparks.
Do not connect the neutral wire to the switch.
Wiring The Outlet
Connect the wire from the switch to the outlet’s brass screw.
Attach the neutral wire to the silver screw on the outlet.
Connect the ground wire to the green screw for safety.
Double-check all connections before restoring power.
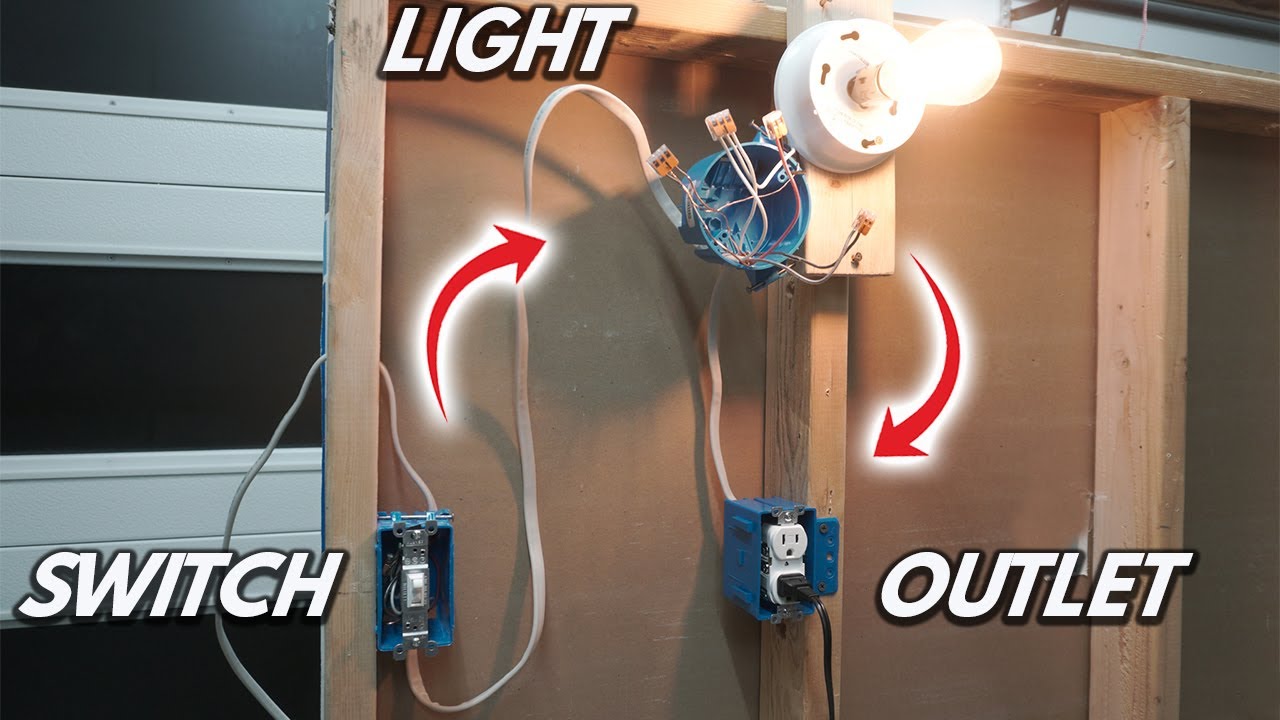
Securing And Testing
After connecting the outlet to the light switch, securing and testing are key steps. These steps make sure your wiring is safe and works well. Take time to fasten everything tightly and check the power carefully. Testing confirms your setup is correct and ready to use.
Fastening Devices
Use screws to secure the outlet and switch in their boxes. Tighten screws firmly but do not strip them. Make sure wires are neatly placed inside the box. Avoid loose wires that can cause shorts or sparks. Secure the cover plates to keep everything safe and clean.
Restoring Power
Turn on the main power at the circuit breaker. Do this slowly to avoid sudden surges. Watch for any unusual sounds or smells near the outlet and switch. If you notice anything odd, turn off the power immediately. Safety first before moving to testing.
Testing The Setup
Use a tester or plug in a small device to check the outlet. Flip the switch on and off to see if the outlet power changes. Confirm the light switch controls the outlet as planned. If everything works, your connection is successful. If not, turn off power and recheck your wiring.
Common Troubleshooting Tips
Troubles can happen when connecting an outlet to a light switch. Knowing common fixes helps save time and effort. This guide covers frequent problems and simple ways to solve them. Understanding these issues makes your work safer and easier.
No Power Issues
Check the main power switch first. Sometimes the circuit breaker trips. Flip it off and on to reset. Test the outlet with a voltage tester. No power could mean a wiring problem or a faulty breaker. Always turn off power before inspecting wires.
Switch Not Working
Make sure the switch is connected to the right wires. The switch controls the flow of electricity. If it does not work, wires may be swapped or loose. Test the switch with a multimeter. Replace the switch if it shows no continuity when on.
Loose Connections
Loose wires cause flickering or no power at all. Check all wire nuts and terminal screws. Tighten any loose connections carefully. Use electrical tape for added safety if needed. Loose connections can cause sparks or damage, so fix them quickly.
Safety Precautions And Best Practices
Working with electricity needs careful attention. Safety should be the top priority. Following best practices keeps you safe and prevents damage. Simple rules can avoid serious accidents and ensure proper installation.
Before connecting an outlet to a light switch, understand the risks. Proper steps reduce electrical hazards and meet legal standards. Knowing when to get expert help can save time and trouble.
Avoiding Electrical Hazards
Always turn off power at the breaker box. Use a voltage tester to confirm no electricity flows. Wear insulated gloves to protect your hands. Avoid working in wet or damp areas. Keep tools dry and insulated. Never touch wires with bare hands. Double-check connections before restoring power.
Code Compliance
Follow local electrical codes strictly. Use approved materials and tools for the job. Install grounding wires properly for safety. Check wire gauge matches the circuit requirements. Label breakers correctly for easy identification. Obtain permits if required by law. Inspections help confirm safe and legal work.
When To Call A Professional
Complex wiring or unclear instructions need expert help. If unsure about wiring colors or connections, stop. Persistent problems after installation require a licensed electrician. Unsafe conditions like sparks or burning smells must be checked. Professionals ensure safe, code-compliant results. Don’t risk injury or damage by guessing.
Frequently Asked Questions
How Do I Connect An Outlet To A Light Switch Safely?
Turn off the power at the breaker first. Use a three-wire cable to connect the outlet and switch. Connect the hot wire through the switch and the neutral wire directly to the outlet. Always follow local electrical codes for safety.
Can I Control An Outlet With A Light Switch?
Yes, you can control an outlet with a light switch by wiring the hot wire through the switch. This setup allows the outlet to turn on or off with the switch, ideal for lamps or devices you want to control easily.
What Tools Are Needed To Connect Outlet To Switch?
You need a screwdriver, wire stripper, voltage tester, electrical tape, and wire nuts. A drill may help for mounting. Using the right tools ensures safe, secure connections and helps you work efficiently.
Is It Legal To Wire An Outlet To A Light Switch?
Wiring an outlet to a switch is legal if done according to local electrical codes. Ensure you use proper materials and methods. When unsure, consult a licensed electrician to meet safety standards and avoid code violations.
Conclusion
Connecting an outlet to a light switch is a useful skill for home projects. Always turn off power before starting any work. Follow wiring steps carefully to ensure safety and function. Double-check connections to avoid mistakes or hazards. With patience and attention, you can complete this task.
It saves time and adds convenience to your space. Keep tools ready and instructions close while working. Practice caution and enjoy your improved electrical setup at home.