Changing a light switch cover might seem like a small task, but it can make a big difference in the look of your room. Maybe your old cover is cracked, dirty, or just doesn’t match your style anymore.
You might think it’s tricky or that you need special tools, but you don’t. In this guide, you’ll learn exactly how to change your light switch cover quickly and safely. By the end, you’ll have the confidence to update your space in minutes.
Ready to give your room a fresh, easy makeover? Let’s get started!
Tools And Materials Needed
Changing a light switch cover is a simple task. Having the right tools and materials makes the job easier and safer. Prepare everything before you start to save time and avoid frustration.
Basic Tools Checklist
Gather these basic tools for the project:
- Flathead screwdriver
- Phillips screwdriver
- Voltage tester
- New light switch cover
- Cleaning cloth
A flathead or Phillips screwdriver helps remove and attach the cover screws. A voltage tester ensures the power is off before you touch wires. A clean cloth helps wipe the switch area before installing the new cover.
Choosing The Right Cover
Choose a cover that fits your switch type. Standard switches use single or double-gang covers. Check the size and shape before buying. Pick a color that matches your room’s style. Plastic covers are common and easy to clean. Metal covers offer more durability and a modern look.
Safety First
Safety is the top priority when changing a light switch cover. Electrical work can be risky without the right precautions. Taking simple safety steps protects you from shocks and injuries. Always prepare before starting the task. Never rush or skip safety checks.
Turning Off Power
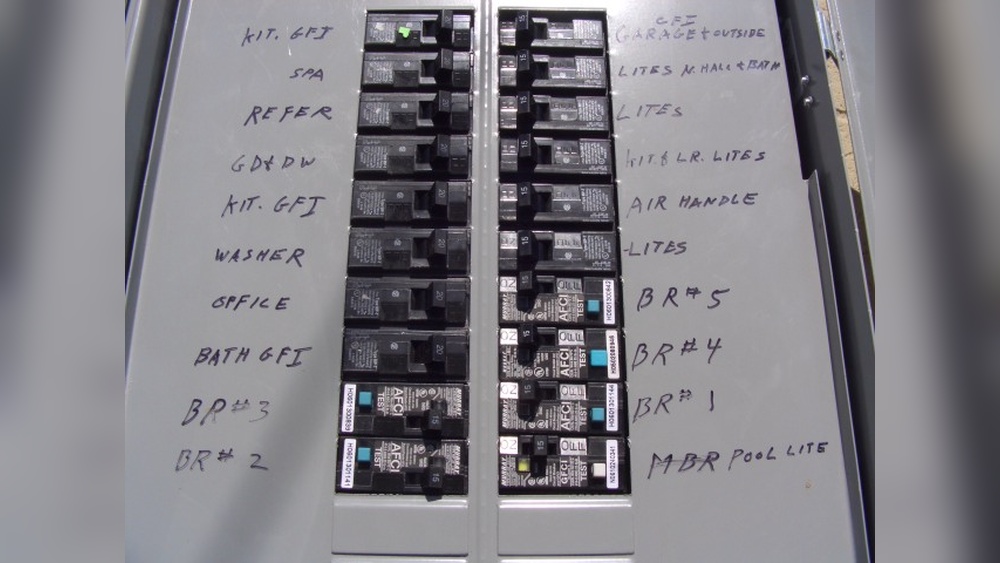
Start by turning off the power to the switch. Find the correct circuit breaker in your home’s electrical panel. Flip the switch to the off position. This stops electricity from flowing to the light switch. Double-check by trying to turn the light on. If it does not light up, the power is off.
Using A Voltage Tester
Use a voltage tester to confirm no electricity is present. Touch the tester’s probe to the switch wires or terminals. The tester will show if power is still active. If the tester indicates power, do not proceed. Turn off the breaker again and test once more. This simple tool ensures your safety before you touch anything.
Removing The Old Cover
Removing the old light switch cover is the first step in updating your switch. It is a simple process that anyone can do with basic tools. Taking your time ensures a smooth and safe removal. This section explains how to take off the old cover carefully and prepare the area for the new one.
Unscrewing The Plate
Start by turning off the power to the switch for safety. Use a screwdriver to remove the screws holding the cover plate. Keep the screws in a safe place for reuse or disposal. Gently pull the cover away from the wall once the screws are out. Avoid forcing it to prevent damage to the wall or switch.
Cleaning The Area
After removing the cover, clean the wall around the switch. Use a damp cloth to wipe away dust and dirt. This step helps the new cover fit properly and look neat. Make sure the area is dry before installing the new cover plate.
Selecting A New Cover
Selecting a new light switch cover is the first step in updating your room’s look. The right cover blends with your decor and fits your switch perfectly. It protects the switch and adds a touch of style. Think about the room’s style and the switch type before choosing. Consider durability and ease of cleaning as well.
Material Options
Light switch covers come in many materials. Plastic covers are common, affordable, and easy to clean. They resist moisture and stains, making them good for kitchens and bathrooms. Metal covers offer a sleek, modern look and strong durability. They are ideal for industrial or minimalist styles. Wood covers add warmth and texture but need care to avoid damage. Ceramic covers can be decorative but fragile. Choose a material that matches your room’s use and style.
Style And Color Choices
Switch covers come in many colors and styles. Neutral colors like white, beige, or gray blend with most walls. Bright colors add a fun pop to a dull space. Matte finishes hide fingerprints, while glossy finishes shine and stand out. Some covers have patterns or textures for extra design. Consider your room’s theme. Classic, modern, rustic, or artistic styles all have matching covers. Pick a style that feels right and fits your switch type.
Installing The New Cover
Installing the new light switch cover is the last step to finish the job. It protects the wiring and gives a neat look to the wall. This part is simple but needs care to avoid damage or loose fitting. Follow the steps below to place the new cover properly.
Aligning The Plate
Hold the new cover over the switch. Make sure the screw holes on the cover match the holes on the wall box. The cover should sit flat against the wall without gaps. Check that the switch fits well inside the opening. Adjust the plate until it is straight and centered.
Securing Screws Properly
Insert screws into the holes on the cover. Turn each screw gently by hand at first. Use a screwdriver to tighten the screws evenly. Avoid over-tightening to stop cracking the cover. Screws should be snug enough to hold the cover firmly in place. Check the cover does not move or tilt after securing.

Credit: www.youtube.com
Final Checks
After installing the new light switch cover, take time for final checks. These steps ensure everything works safely and correctly. Do not skip this part. It helps avoid problems and keeps your home safe.
Restoring Power
Turn the power back on at the circuit breaker. Make sure the switch is in the off position before doing this. After restoring power, watch for any sparks or unusual smells. These signs mean a problem. If you notice any, turn off the power again immediately.
Testing The Switch
Flip the switch on and off a few times. Check if the light turns on and off smoothly. Listen for any strange sounds like buzzing or clicking. The switch should feel firm, not loose or stiff. If the light does not work, double-check your wiring. Fix any issues before using the switch normally.
Tips For A Professional Finish
Changing a light switch cover is a simple task. Doing it right makes your room look neat and polished. Follow these tips for a professional finish. These small steps help avoid mistakes and keep the cover lasting longer.
Avoiding Common Mistakes
Always turn off the power before you start. Use a screwdriver that fits the screws well. Tighten screws gently to avoid cracking the cover. Do not force the cover if it does not fit. Check that the switch is straight before fixing the cover. Clean the wall around the switch before installation.
Maintaining The Cover
Wipe the cover regularly with a soft cloth. Avoid using harsh cleaners that can damage the surface. Check the screws now and then to keep them tight. Replace covers that are cracked or yellowed for safety. Keep the area dry to prevent damage over time.
Credit: www.reddit.com

Credit: home.howstuffworks.com
Frequently Asked Questions
How Do I Safely Remove A Light Switch Cover?
Turn off the power at the circuit breaker first. Use a screwdriver to unscrew the cover plate gently. Avoid touching wires or terminals to ensure safety.
What Tools Are Needed To Change A Light Switch Cover?
You need a flathead or Phillips screwdriver depending on your cover screws. A voltage tester is helpful for safety. Having a new cover plate ready is essential.
Can I Change A Light Switch Cover Without Electrician Help?
Yes, changing a cover is a simple DIY task if power is off. Ensure safety by turning off the breaker and using proper tools. No wiring changes are needed.
How Do I Choose The Right Size For A Light Switch Cover?
Measure the existing cover plate’s height and width. Check the number of switch toggles or buttons. Match these dimensions and style when buying a new cover.
Conclusion
Changing a light switch cover is simple and quick. Just turn off the power first for safety. Use a screwdriver to remove the old cover. Place the new cover carefully and screw it tight. No special skills needed, anyone can do it.
Fresh covers make rooms look clean and neat. Try changing covers to update your space easily. Small changes bring a big difference in your home. Keep tools ready and follow steps one by one. Enjoy a safer and nicer looking room today.