Have you ever noticed your brake lights staying on or not working at all? The problem might be your brake light switch.
Knowing how to remove a brake light switch can save you time and money on repairs. In this guide, you’ll learn simple steps to take the switch out safely and easily. Whether you’re a beginner or just want to understand your car better, this article will give you clear instructions that anyone can follow.
Keep reading to find out how you can fix this common issue yourself!
Credit: www.yourmechanic.com
Tools Needed
Removing a brake light switch requires some basic tools. Having the right tools makes the job easier and safer. The tools you need are common in most home toolkits or auto repair kits. Using the correct tools prevents damage to the switch and surrounding parts.
Socket Wrench Set
A socket wrench set helps remove bolts and nuts holding the switch. Choose the right size socket for a snug fit. This tool provides the leverage needed for tight bolts.
Flathead Screwdriver
A flathead screwdriver assists in prying and releasing clips or connectors. It helps to gently loosen parts without breaking them. This tool is essential for handling small components.
Needle Nose Pliers
Needle nose pliers grab and pull small connectors and wires. They allow precise control in tight spaces. Use them to disconnect electrical plugs safely.
Multimeter (optional)
A multimeter checks the switch’s electrical function before removal. It helps confirm if the brake light switch is faulty. This tool is useful but not mandatory for removal.
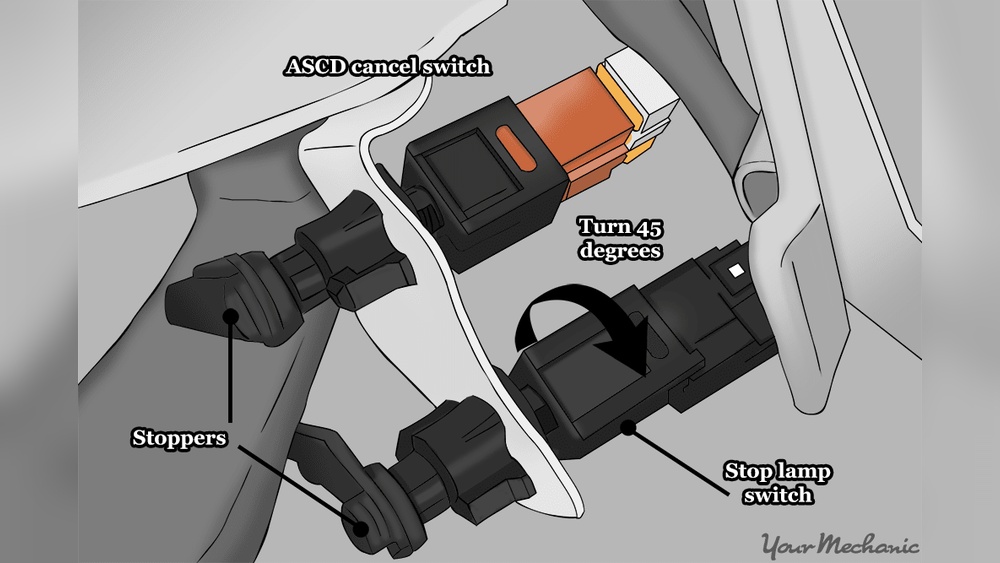
Locate The Brake Light Switch
Finding the brake light switch is the first step to removing it. This small part controls the brake lights and sits near the brake pedal. Knowing its exact spot helps you work faster and avoid mistakes.
The brake light switch is usually attached to the brake pedal arm. It can be hidden under the dashboard or near the steering column. Spotting it needs some care because it looks similar to other small parts.
Check Under The Dashboard
Look under the dashboard on the driver’s side. The switch is often mounted there. Use a flashlight for better visibility. It should be close to the brake pedal arm or the pedal itself.
Identify The Brake Pedal Arm
The brake pedal arm moves when you press the pedal. The switch will be near the top or side of this arm. It usually has a small plunger or button that the pedal presses.
Look For A Small Electrical Connector
The brake light switch has a wire connected to it. This wire sends a signal to the brake lights. Find the connector to confirm you have the right part.
Use The Vehicle Manual
The owner’s manual shows the exact location of the brake light switch. It often includes pictures or diagrams. This guide makes finding the switch easier and faster.
Disconnect The Battery
Disconnecting the battery is the first step to safely remove a brake light switch. It stops electrical power from flowing in the car. This helps avoid shocks and short circuits. Safety is the main reason for this step. Always disconnect the battery before touching electrical parts.
Take your time to do this step right. It protects both you and the car’s electrical system. Without disconnecting the battery, you risk damaging parts or hurting yourself.
Locate The Battery
Open the car’s hood to find the battery. Usually, it sits on one side of the engine bay. Look for a rectangular box with two thick cables attached. One cable is positive, the other negative.
Use The Right Tools
Prepare a wrench or socket set to loosen battery terminals. Use the correct size to avoid stripping bolts. Having the right tools makes the job faster and safer.
Remove The Negative Terminal First
Always disconnect the negative terminal before the positive. Loosen the bolt on the negative terminal clamp. Carefully lift the cable off the battery post. This step prevents accidental sparks.
Disconnect The Positive Terminal
After the negative terminal is off, loosen the positive terminal. Remove the cable from the battery post. Keep terminals away from the battery to stop them from touching metal parts.
Secure The Cables
Move both battery cables to a safe place. Prevent them from falling back onto the battery. Use tape or a cloth to keep cables apart if needed.

Credit: service.tesla.com
Remove The Old Brake Light Switch
Removing the old brake light switch is a key step in fixing brake light issues. This part controls the lights that alert drivers behind you when you brake. Taking out the old switch carefully helps prevent damage to other components. Follow these steps to remove it safely and smoothly.
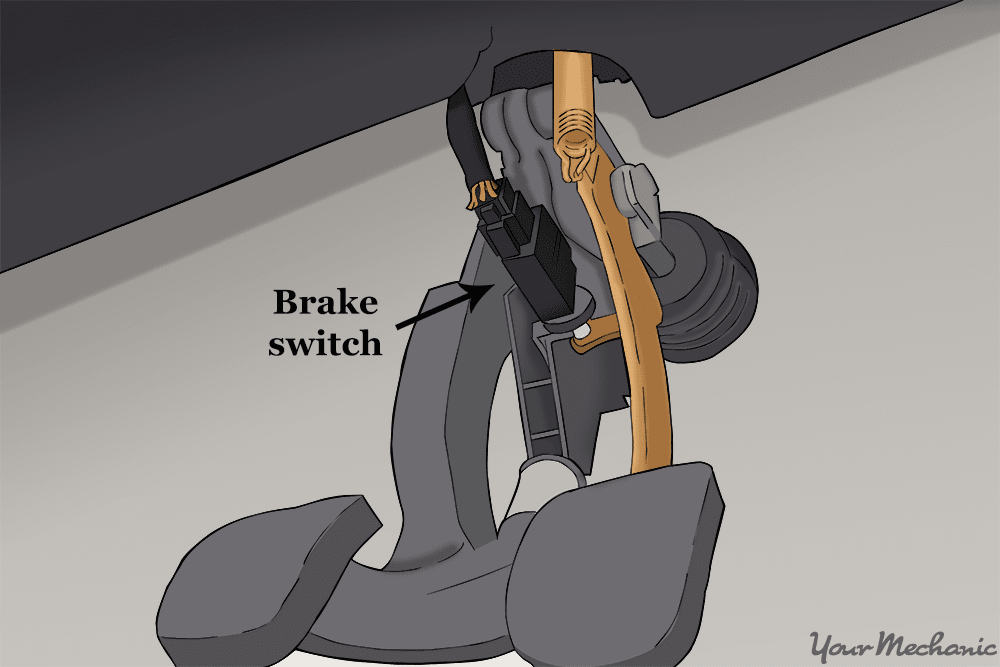
Access The Switch
Locate the brake light switch near the brake pedal arm. It is usually mounted on a bracket above the pedal. Move any panels or covers blocking your reach. Use a flashlight if the area is dark. Make sure you have clear access before continuing.
Unplug The Wiring Connector
Find the wiring connector attached to the switch. Press the tab or clip to release it gently. Avoid pulling on the wires directly. Carefully pull the connector away from the switch. This stops electrical power from the switch.
Unscrew Or Unclip The Switch
Check how the switch is held in place. Some switches screw in, others clip on. Use the correct tool, such as a screwdriver or pliers. Turn the screws counterclockwise or release the clips carefully. Remove the switch from the bracket without forcing it.
Inspect The Switch And Area
Begin by checking the brake light switch and its surroundings for dirt or damage. Clear any debris and ensure the area is dry before removal. This helps prevent issues during the switch replacement process.
Before removing the brake light switch, check the switch and its surroundings carefully. This step helps find any problems early. It also makes the removal process easier and safer.
Look for dirt, dust, or damage around the switch. These can affect how the brake light works. Clean any dirt you find to avoid issues later.
Check For Physical Damage
Look closely at the brake light switch for cracks or broken parts. Damaged switches may not work properly. Note any signs of wear or damage before removal.
Examine The Wiring And Connectors
Inspect the wires connected to the switch. Make sure there are no frayed or loose wires. Tight connectors ensure the brake light functions well.
Look For Corrosion Or Rust
Check metal parts around the switch for rust or corrosion. Corrosion can cause poor electrical contact. Clean or replace corroded parts if needed.
Test The Switch Movement
Press the switch gently to see if it moves smoothly. Stiff or stuck switches might need replacement. A smooth switch is easier to remove and reinstall.

Credit: service.tesla.com
Install The New Brake Light Switch
Installing the new brake light switch is a key step after removing the old one. This process ensures your brake lights work correctly and keep you safe on the road. Follow each step carefully to install the switch properly.
Position The New Switch
Find the spot where the old switch was mounted. Align the new brake light switch in the same position. Make sure it fits snugly and the plunger touches the brake pedal arm. Proper positioning helps the switch work smoothly.
Secure The Switch
Use the mounting bracket or clip to hold the switch in place. Tighten any screws or nuts firmly but avoid over-tightening. The switch should stay stable without moving. A secure switch prevents connection issues or false signals.
Reconnect The Wiring
Attach the wiring connector to the new brake light switch. Push the connector firmly until it clicks into place. Check the wires for any damage before connecting. Proper wiring ensures the brake lights turn on when you press the pedal.
Reconnect The Battery
Testing the brake lights is important after removing the brake light switch. It confirms the lights work properly. Without this check, you may not know if the switch installation is correct.
Properly working brake lights keep you safe on the road. They alert drivers behind you when you stop. Testing is a quick and simple step that saves trouble later.
Turn On The Car Ignition
Start by turning the car ignition to the “on” position. Do not start the engine. This powers the brake light system and lets you test the lights.
Press The Brake Pedal
Press the brake pedal firmly with your foot. Hold it down to activate the brake light switch. This action should turn on the brake lights.
Check The Brake Lights
Look at the rear of the vehicle to see if the brake lights are on. You can ask someone to help or use a reflective surface. The lights must glow brightly when you press the pedal.
Repeat The Test
Release the brake pedal and press it again a few times. This ensures the brake light switch responds consistently. Flickering or no lights mean the switch needs adjustment or replacement.
Test The Brake Lights
Troubleshooting a brake light switch can save time and avoid extra repairs. It helps identify issues before removing or replacing the switch. Simple checks often fix common problems quickly. Below are practical tips to diagnose brake light switch troubles effectively.
Check The Brake Lights First
Start by pressing the brake pedal. Watch if the brake lights turn on. No light means a possible switch or bulb problem. Test both bulbs to rule out a simple bulb failure.
Listen For Click Sounds
Press the brake pedal slowly. Listen for a clicking noise near the brake pedal. The sound shows the switch is working mechanically. No click could mean a stuck or broken switch.
Test The Electrical Connections
Inspect the wires connected to the brake light switch. Look for loose or damaged wires. Tighten or repair any poor connections. Use a multimeter to check for voltage at the switch.
Check The Switch Alignment
Make sure the switch lines up with the brake pedal arm. Misalignment can stop the switch from activating. Adjust the switch position carefully to match the pedal movement.
Reset The Switch
Sometimes the switch needs a reset. Disconnect the battery for a few minutes. Reconnect and test the brake lights again. This can clear minor electrical faults in the switch.
Frequently Asked Questions
How Do I Identify The Brake Light Switch Location?
The brake light switch is usually near the brake pedal arm. Look for a small, cylindrical sensor attached to the pedal mechanism. It may have wires connected to it. Consult your vehicle’s manual for exact placement and visual reference.
What Tools Are Needed To Remove The Brake Light Switch?
You typically need a wrench or socket set to remove bolts. A screwdriver might be necessary to disconnect electrical connectors. Always use tools that fit properly to avoid damage and ensure safety during the removal process.
How To Disconnect The Brake Light Switch Safely?
First, disconnect the vehicle’s battery to avoid electrical shocks. Then, carefully unplug the wiring harness from the switch. Avoid pulling on the wires directly; use the connector clip or tab to release it safely.
Can I Remove The Brake Light Switch Without Professional Help?
Yes, if you have basic mechanical skills and proper tools. Follow the vehicle’s service manual instructions carefully. Take safety precautions like disconnecting the battery and wearing gloves to prevent injury.
Conclusion
Removing a brake light switch is a simple task you can do yourself. Follow the steps carefully to avoid mistakes. Always disconnect the battery before starting work. Use basic tools and take your time. Check the new switch fits well before final installation.
Test the brake lights after replacing the switch. This helps keep your car safe and legal. Regular maintenance prevents bigger problems later. You save money and gain confidence by doing small repairs. Keep your car in good shape with easy fixes like this.