Have you ever wished you could control your lights from the same spot as your outlet? Adding a light switch to an outlet might sound tricky, but it’s easier than you think.
Imagine turning a lamp on and off without unplugging it or fumbling for a switch across the room. In this guide, you’ll learn simple, step-by-step instructions to make your space more convenient and functional. Keep reading—you’re just moments away from upgrading your home with a smart, easy fix.
Tools And Materials Needed
Adding a light switch to an outlet needs the right tools and materials. Having these ready makes the job easier and safer. This section lists the key items you will use.
Essential Tools
- Voltage tester – checks if wires carry electricity
- Wire stripper – removes insulation from wires cleanly
- Screwdrivers – both flathead and Phillips types
- Pliers – for bending and twisting wires
- Utility knife – cuts electrical tape or cable sheathing
- Drill with bits – for making holes if needed
- Flashlight – helps see inside dark spaces
Required Materials
- Light switch – single pole switch usually works
- Electrical box – to hold the new switch securely
- Romex cable – connects the switch to the outlet
- Wire nuts – join wires safely
- Electrical tape – insulates wire connections
- Outlet cover plate – fits over the outlet and switch
- Grounding wire – ensures safety by grounding the circuit
Safety Precautions
Working with electricity needs careful attention. Safety is the top priority when adding a light switch to an outlet. Taking the right steps helps prevent accidents and injuries. Follow these safety precautions before starting your project.
Power Shutoff
Always turn off the power at the breaker box. This stops electricity from flowing to the outlet. Use a voltage tester to check the wires. Make sure no current is present before you touch any wires. Never guess if the power is off.
Protective Gear
Wear insulated gloves to protect your hands. Use safety glasses to guard your eyes from sparks or debris. Avoid loose clothing and jewelry that can catch on wires. Proper gear keeps you safe during the installation process.
Assessing Your Outlet
Before adding a light switch to an outlet, assess the outlet carefully. This step ensures safety and proper function. Understanding your outlet helps avoid mistakes. It also saves time and effort during installation.
Start by examining the wiring type and outlet compatibility. These details guide the process and tools needed.
Identify Wiring Type
Turn off the power at the circuit breaker. Remove the outlet cover to see the wiring inside. Check if wires are copper or aluminum. Copper wires are common and easier to work with. Look for black, white, and green or bare wires. Black is hot, white is neutral, and green is ground. Some outlets may have multiple sets of wires. Note how wires connect to the outlet terminals. This information helps decide how to add the switch safely.
Check Outlet Compatibility
Not all outlets support adding a switch. Look for an outlet with separate hot and neutral terminals. Outlets with a tab between hot terminals may need modification. Confirm if the outlet box has enough space for extra wiring. Metal boxes require grounding and proper mounting. Plastic boxes might be easier for beginners. Check if the outlet is a GFCI or AFCI type. These may need special handling or replacement. Knowing the outlet type avoids electrical issues later.

Credit: www.do-it-yourself-help.com
Planning The Switch Location
Planning the switch location is a key step before adding a light switch to an outlet. The right spot makes the switch easy to reach and use. It also helps keep your walls neat and your wiring safe. Take time to pick the best place. This will save effort and trouble later.
Choosing A Convenient Spot
Pick a spot near the outlet but not too close. It should be easy to reach from the room’s main area. Think about where people stand or walk. Avoid places behind doors or furniture. A good spot feels natural and simple to use every day.
Consider the height too. Most switches sit about 48 inches from the floor. This height works well for adults and children. Keep the switch away from water sources like sinks. Safety first.
Marking The Wall
Once you find the spot, mark it clearly on the wall. Use a pencil to draw a small square or cross. This shows exactly where to cut or drill. Double-check the mark before starting work.
Use a level tool for straight lines. This helps the switch look neat after installation. Marking well reduces mistakes and speeds up the process. Take your time here.
Turning Off The Power
Before adding a light switch to an outlet, safety is the top priority. Turning off the power stops electricity from flowing. This prevents shocks and accidents during the work. Follow simple steps to ensure the power is fully off.
Locate Circuit Breaker
Find your home’s main circuit breaker panel. It is usually in the basement, garage, or utility room. Open the panel door carefully. Look for the breaker that controls the outlet you want to work on. The breaker might be labeled with room names or numbers.
Flip the correct breaker switch to the “off” position. This cuts the power to the outlet. If you are unsure which breaker it is, turn off the main breaker. This stops power to the whole house.
Verify Power Is Off
Use a non-contact voltage tester or a simple outlet tester. Place it near the outlet terminals. The tester should show no electricity flow. Double-check by plugging in a lamp or device. The device should not turn on.
Never skip this step. Always confirm the power is off before touching wires. This keeps you safe from electric shocks. Take your time. Safety first.
Removing The Outlet Cover
Removing the outlet cover is the first step in adding a light switch to an outlet. This step lets you see the wiring inside. It also makes the work safer and easier.
Take your time and be careful. This task requires simple tools but needs attention to detail. Follow the steps below to remove the outlet cover safely.
Turn Off The Power
Find the circuit breaker for the outlet. Switch it off to cut power. Use a tester to make sure the outlet is off. This prevents electric shock while working.
Gather Your Tools
You need a flathead or Phillips screwdriver. Have a voltage tester ready. A flashlight helps if the room is dark. Keep all tools close before starting.
Unscrew The Outlet Cover
Locate the screws on the outlet cover. Use the screwdriver to turn them counterclockwise. Keep the screws safe for later. Gently pull the cover away from the wall.
Inspect The Wiring
Look at the wires behind the outlet. Check for any damage or loose wires. This step helps you plan the wiring for the light switch. Do not touch wires before confirming the power is off.
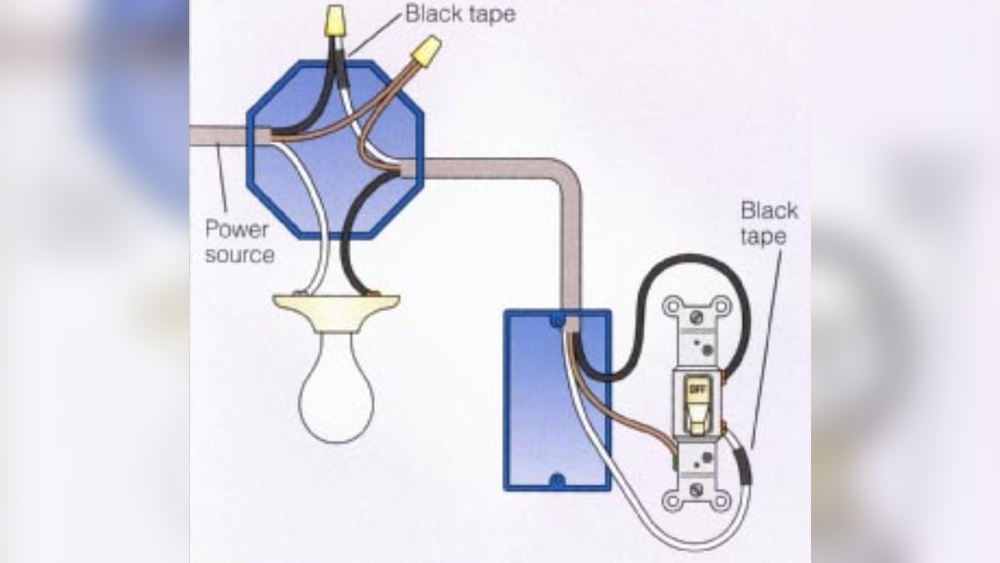
Wiring The Light Switch
Wiring the light switch is a key step to control your outlet safely. It requires careful handling of wires and connections. Follow each step closely to avoid mistakes and ensure safety. Always turn off power before working with electrical components.
Disconnecting The Outlet
First, remove the outlet cover with a screwdriver. Unscrew the outlet from the electrical box. Gently pull the outlet out to expose the wires. Use a voltage tester to confirm the power is off. Disconnect the wires attached to the outlet terminals. Keep track of each wire’s position for later.
Connecting Switch Wires
Identify the hot wire that supplies power to the outlet. Connect this wire to one terminal on the switch. Use a new wire to run from the switch’s other terminal back to the outlet. Attach this wire to the outlet’s hot terminal. Keep the neutral wires connected directly together. This setup lets the switch control the power flow.
Securing Connections
Twist wires together tightly using pliers. Cover each wire connection with a wire nut. Wrap electrical tape around the wire nuts for extra safety. Push the wires neatly back into the box. Screw the switch and outlet firmly in place. Replace the outlet cover and restore power to test the switch.
Installing The Switch Box
Installing the switch box is a key step in adding a light switch to an outlet. This process involves preparing the wall and securing the box. The switch box holds the switch safely and neatly. Follow these simple steps to install it correctly.
Cutting The Wall Opening
First, mark the spot on the wall where you want the switch. Use a pencil and a level to draw the outline of the box. Double-check the size to match the switch box.
Next, use a drywall saw to cut along the lines carefully. Take your time to avoid making the hole too big. A clean cut helps the box fit snugly.
Remove the cut piece of drywall and clear any dust or debris from the opening. This keeps the space ready for the switch box.
Mounting The Box
Slide the switch box into the wall opening. Make sure it fits flush with the wall surface. The box should not stick out or sit too deep.
Use screws to secure the box to the wall studs. This keeps the box stable and safe for wiring. Tighten the screws until the box does not move.
Check the box again to ensure it is level and properly aligned. Adjust if needed before moving to the next step.
Reattaching The Outlet
Reattaching the outlet is an important step after wiring the new light switch. It ensures everything stays safe and works properly. Take your time to place the outlet back correctly in the electrical box. Make sure no wires are pinched or loose. This prevents damage and electrical hazards.
Check that all wires are connected tightly to the outlet terminals. Loose wires can cause sparks or stop the outlet from working. Carefully push the outlet into the box, keeping the wires organized behind it. Align the screw holes with the box to secure the outlet firmly.
Secure The Outlet With Screws
Use a screwdriver to fasten the outlet to the box. Tighten the screws evenly to hold the outlet straight. Avoid over-tightening, which can crack the outlet or strip the screws. The outlet should be snug but not forced.
Attach The Outlet Cover Plate
Place the cover plate over the outlet. Align the screw hole in the plate with the outlet’s center screw. Use a screwdriver to tighten the cover plate screw. This protects the wiring and gives a finished look.
Test The Outlet And Switch
Turn the power back on at the circuit breaker. Use a tester or plug in a device to check the outlet. Flip the new switch to confirm it controls the outlet as expected. This final check confirms your work is safe and functional.

Credit: diy.stackexchange.com
Testing The Switch
Testing the switch is a key step after wiring it to an outlet. It ensures everything works safely and correctly. This step helps you avoid electrical problems later. Follow simple checks to confirm your switch functions as intended.
Restoring Power
First, turn the circuit breaker back on. This restores power to the outlet and switch. Make sure the switch and outlet area are dry and clear. Stand back and be ready to test the switch functions.
Checking Switch Function
Flip the switch up and down. Watch the connected light or device. It should turn on and off smoothly. If it doesn’t, check the wiring again. Make sure all connections are tight and secure. Test multiple times to confirm consistent operation.
Troubleshooting Common Issues
Troubleshooting common issues helps fix problems fast. Problems can occur after adding a light switch to an outlet. Knowing how to find and fix these issues saves time. Check each part step by step. This guide covers common problems with switches and outlets. Follow the tips below to solve basic faults.
Switch Not Working
The switch may not work due to loose wires. Make sure all wire connections are tight and secure. Check the switch itself for damage or defects. Test the switch with a voltage tester to see if it gets power. Replace the switch if it shows no voltage or feels faulty. Confirm the switch is compatible with the outlet setup. Incorrect switches can cause failure or damage.
Outlet Not Receiving Power
Power may not reach the outlet if wires are connected wrong. Double-check that the hot wire goes to the switch and outlet correctly. Inspect the circuit breaker to see if it tripped or turned off. Reset the breaker if needed and test the outlet again. Look for any blown fuses or damaged wires in the circuit. Use a voltage tester to confirm power at the outlet terminals. Fix any wiring errors or replace faulty parts.

Credit: www.youtube.com
Frequently Asked Questions
How Do I Add A Light Switch To An Existing Outlet?
To add a light switch to an outlet, turn off power first. Next, install a switch loop by running a cable from the outlet box to the new switch box. Connect wires properly, then mount the switch and restore power safely.
Can I Control An Outlet And Light With One Switch?
Yes, you can control both with one switch by wiring the outlet as a switched outlet. This allows the switch to turn power on or off to the outlet, controlling any device or light plugged into it.
What Tools Are Needed To Add A Light Switch To An Outlet?
You’ll need a voltage tester, wire stripper, screwdriver, electrical tape, and a drill. Also, use appropriate cables and a light switch rated for your circuit to ensure safety and proper installation.
Is It Safe To Add A Light Switch To An Outlet Myself?
It can be safe if you follow electrical codes and turn off power. However, if unsure, consult a licensed electrician to avoid risks like shocks or fire hazards.
Conclusion
Adding a light switch to an outlet can save energy and add convenience. You only need a few tools and basic wiring skills. Always turn off the power before starting any electrical work. Follow safety rules to avoid accidents. Taking your time helps you do the job right.
This simple upgrade can brighten your space and control your lights easily. Try it yourself and enjoy the benefits of a switched outlet.