Are you looking to add more convenience and control to your ceiling fan? Installing a light switch on your ceiling fan can make a big difference.
Imagine turning your fan’s light on or off without needing to get up or fumble with a remote. It’s easier than you think, and you don’t have to be an expert. In this guide, you’ll discover simple, step-by-step instructions that anyone can follow.
By the end, you’ll have a fully functional light switch, making your space more comfortable and user-friendly. Keep reading to learn how to make this smart upgrade happen quickly and safely.

Credit: www.homedepot.com
Tools And Materials Needed
Installing a light switch on a ceiling fan needs the right tools and materials. These help you work safely and finish the job properly. Prepare everything before starting to avoid delays or mistakes.
Gathering tools and materials ensures a smooth, easy installation. It also protects your electrical system and keeps you safe from shocks or injuries.
Tools Needed
- Screwdriver (flathead and Phillips) for removing and attaching screws
- Wire stripper to remove insulation from wires
- Voltage tester to check if wires have electricity
- Drill for making holes if needed
- Pliers to twist wires together
- Utility knife to cut electrical tape or wire sheathing
Materials Needed
- Single-pole light switch to control the fan light
- Electrical box to hold the switch securely
- Wire nuts for connecting wires safely
- Electrical tape for extra insulation
- Switch cover plate to finish the look
- Romex electrical wire if you need to extend wiring
Safety Precautions
Turn off the power at the breaker before starting any electrical work. Use a voltage tester to ensure no electricity flows to the wires. Always follow local electrical codes to stay safe during installation.
Turn Off Power At The Circuit Breaker
Always switch off the power before starting any electrical work. Do not rely on the wall switch alone. Find the correct circuit breaker and turn it off. Use a voltage tester to confirm no electricity flows to the fan. This step prevents electric shocks.
Use Insulated Tools
Choose tools with insulated handles. These tools protect you from accidental electric shocks. Avoid using metal tools without insulation. Keep your hands dry and clean during the installation.
Wear Safety Gear
Wear safety goggles to protect your eyes. Use gloves to avoid cuts or scrapes. Closed-toe shoes help protect your feet from falling objects. Safety gear keeps you safe during the project.
Work In A Well-lit Area
Good lighting helps you see wires and connections clearly. Use a portable lamp if needed. Poor lighting increases the chance of mistakes and accidents. Ensure the area is tidy and free from tripping hazards.
Follow Manufacturer Instructions
Read the ceiling fan and switch manuals carefully. Follow all steps and warnings provided. Using the right parts ensures safe and proper installation. Never skip instructions or make assumptions.
Preparing The Ceiling Fan
Preparing the ceiling fan is the first step before installing a light switch. This step ensures safety and makes the installation easier. Taking time to prepare helps avoid electrical problems later.
Follow these simple actions carefully. They will get your ceiling fan ready for the new switch.
Turn Off Power
Find the circuit breaker that controls the ceiling fan’s power. Switch it off to stop electricity flow. Use a tester to check if power is really off. Never touch wires with power on. Safety first.
Remove Existing Switch Or Cover
Unscrew the switch plate or cover on the wall. If there is an old switch, gently pull it out. Take note of the wires and how they connect. This makes it easier to install the new switch. Keep screws and parts safe for reuse.

Credit: diy.stackexchange.com
Wiring Basics
Wiring a light switch on a ceiling fan requires a clear understanding of the basics. Knowing the wires and how they connect ensures safety and proper function. This section breaks down the essential wiring steps.
Identify Wires
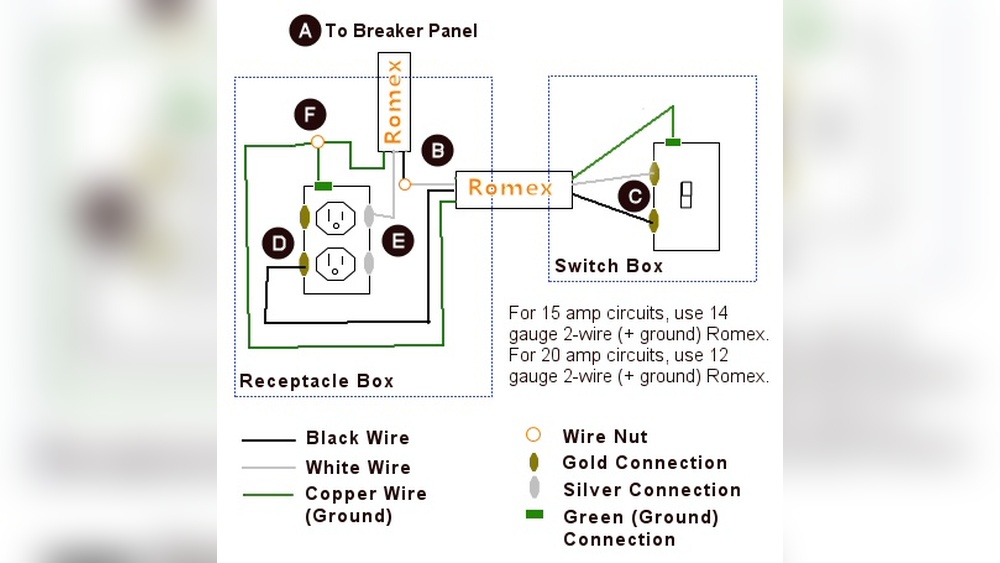
First, find the wires in the ceiling fan and the switch box. Usually, you will see three types of wires: black, white, and green or bare copper. The black wire is the hot wire, carrying electricity. The white wire is neutral and completes the circuit. The green or bare wire is for grounding and safety.
Use a voltage tester to check if the wires carry power. Turn off the circuit breaker before handling wires. Label each wire to avoid confusion during installation.
Understand Wiring Connections
Connect the black wire from the power source to the switch’s input terminal. Attach the black wire from the fan to the switch’s output terminal. This setup allows the switch to control the fan’s light. Connect the white wires from the power source and the fan together with a wire nut. Join all the green or bare copper wires to the grounding screw or wire.
Secure each connection tightly. Loose wires can cause shorts or fires. Test the wiring by turning on the power and flipping the switch. The light should respond correctly to the switch.
Installing The Light Switch
Installing the light switch on a ceiling fan is a simple task. It allows you to control the fan light separately from the fan itself. Follow the steps carefully to ensure safe and proper installation.
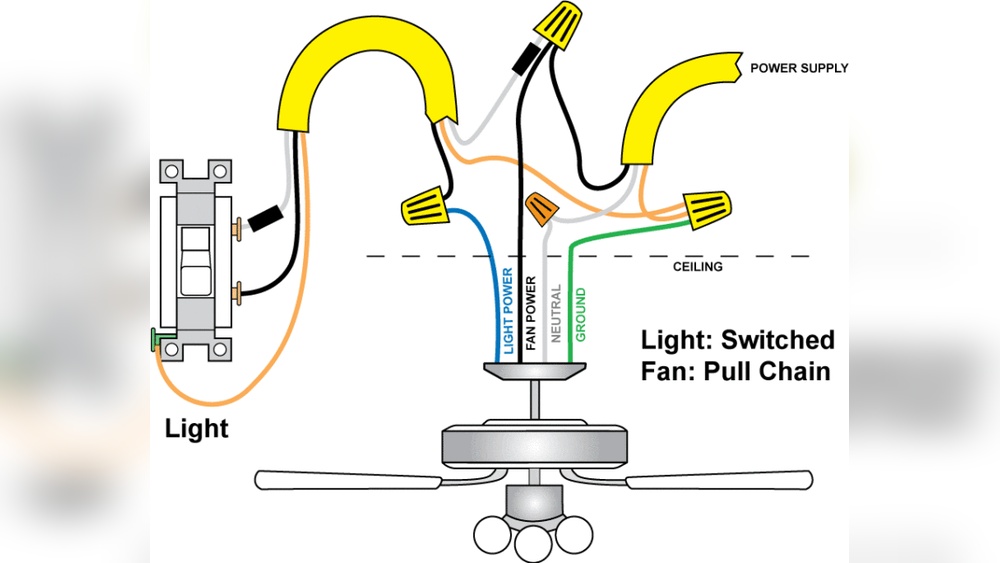
Connect Wires To Switch
Start by turning off the power to the ceiling fan at the circuit breaker. This step keeps you safe from electric shock. Next, identify the wires coming from the ceiling fan. Usually, the black wire controls the fan, and the blue or red wire controls the light.
Attach the light wire to one terminal on the switch. Connect the neutral wire, often white, to the other terminal. Use wire nuts to secure the connections. Make sure the wires are tight and no bare wire is exposed.
Secure The Switch In Place
After wiring, gently push the wires back into the switch box. Fit the switch into the box carefully. Use screws to fasten the switch to the box. Make sure it is firmly secured and does not move.
Attach the switch cover plate. This protects the wires and gives a finished look. Finally, turn the power back on and test the switch. The light should turn on and off smoothly with the switch.

Credit: www.youtube.com
Testing The Installation
Testing the installation is the last important step after wiring your light switch on a ceiling fan. This step makes sure everything works correctly and safely. It helps catch any wiring mistakes or loose connections before you finish.
Take your time to test the switch carefully. This protects your home and keeps the fan running smoothly.
Turn On The Power
First, restore power at the circuit breaker. Never test without power. Confirm the breaker is on before moving forward.
Check The Light Switch
Flip the new switch on and off. The ceiling fan light should respond each time. If it does not, there may be wiring errors to fix.
Test The Fan Function
Run the ceiling fan using its controls. The fan should operate without interference from the new switch. Both devices must work independently.
Look For Signs Of Trouble
Listen for buzzing sounds or flickering lights. Check if the switch feels hot or loose. These signs mean a problem exists and needs correction.
Final Safety Check
Ensure all screws and covers are tight. No wires should be exposed. Safety is key before closing the switch box.
Troubleshooting Common Issues
Troubleshooting common issues helps you fix problems fast. It saves time and keeps your ceiling fan working well. Problems can be simple, like a loose wire or a switch that does not work. Knowing what to check makes the process easier.
Checking For Loose Wiring Connections
Loose wires cause the fan or light to stop working. Turn off the power before checking wires. Look inside the switch box. Make sure all wires are tight and secure. Use a screwdriver to tighten loose connections. Loose wires can cause flickering or no power at all.
Testing The Light Switch Function
Sometimes the switch itself is faulty. Use a simple tester to check if the switch works. Flip the switch on and off. Listen for a click sound. No click might mean the switch is broken. Replace the switch if it does not respond.
Verifying Power Supply To The Switch
The switch needs power to work. Check the circuit breaker or fuse box. Make sure the circuit is not tripped. Use a voltage tester to check power at the switch. No power means a problem with the wiring or breaker.
Examining The Ceiling Fan’s Internal Wiring
Faulty fan wiring can cause issues. Turn off power before opening the fan cover. Look for loose or disconnected wires. Check for signs of burning or damage. Repair or replace wires as needed. Proper wiring keeps the fan and light working.
Resolving Grounding Problems
Ground wires protect against electrical shocks. Check if the ground wire is connected properly. It usually is green or bare copper. A missing ground connection can cause safety issues. Connect the ground wire securely to the fan and switch box.
Tips For Maintenance
Maintaining a light switch installed on a ceiling fan keeps it working well. Regular care helps avoid problems and extends the switch’s life. Simple steps prevent electrical issues and ensure safety.
Follow these easy tips to keep your switch clean and functional. Proper maintenance saves time and money on repairs later.
Cleaning The Switch Regularly
Dust and dirt can build up around the switch. Wipe it gently with a dry cloth once a month. Avoid using water or liquid cleaners to prevent damage. Keeping the switch clean stops it from sticking or failing.
Checking For Loose Connections
Loose wires cause flickering or no power at all. Turn off the power before checking. Tighten any loose screws or wire nuts carefully. This keeps the switch stable and safe to use.
Testing The Switch Function
Press the switch to see if it turns the fan light on and off smoothly. Listen for any unusual sounds like buzzing or clicking. If it feels hard to move, consider replacing the switch to avoid failure.
Replacing Old Or Damaged Switches
Switches wear out over time from frequent use. Replace any switch that shows cracks or burns. Use a switch that matches the fan’s voltage and power needs. This prevents electrical hazards and ensures proper operation.
Keeping The Area Dry
Moisture near the switch can cause rust and shorts. Avoid placing fans in damp areas without proper ventilation. If moisture appears, dry the area immediately. A dry environment helps the switch last longer.
Frequently Asked Questions
How Do I Safely Install A Light Switch On A Ceiling Fan?
Turn off power at the breaker before starting. Use a voltage tester to confirm no electricity flows. Follow wiring diagrams carefully. Connect wires securely and use wire nuts. Mount the switch firmly and restore power for testing.
What Tools Are Needed To Install A Ceiling Fan Light Switch?
You need a screwdriver, wire stripper, voltage tester, wire nuts, and electrical tape. A drill may be required for mounting. Always use insulated tools to ensure safety during installation.
Can I Install A Light Switch On Any Ceiling Fan Model?
Most ceiling fans support light switch installation if they have separate wiring for lights. Check your fan’s wiring configuration before starting. Some models may require additional adapters or modifications.
How Do I Troubleshoot A Light Switch Not Working On A Ceiling Fan?
Check if power is on and connections are tight. Test the switch with a multimeter. Inspect for damaged wires or faulty switch. Replace the switch if necessary and retest.
Conclusion
Installing a light switch on a ceiling fan is easier than it seems. Follow each step carefully and take your time. Always turn off the power before starting any work. Use the right tools and double-check your connections. Safety matters most.
With patience, you can control your fan’s light easily. Enjoy the comfort and convenience you create yourself. Keep this guide handy for future projects. Simple tasks like this improve your home and skills. Ready for your next DIY challenge?