Have you ever wanted to control your lights with a simple flick of a switch? Connecting a toggle switch to a light is easier than you might think.
Imagine turning your room’s lighting on or off without getting up or rewiring your entire home. In this guide, you’ll discover step-by-step instructions that make the process clear and manageable, even if you’re new to electrical work. Keep reading, and you’ll gain the confidence to upgrade your lighting setup safely and quickly.

Credit: www.youtube.com
Choosing The Right Toggle Switch
Choosing the right toggle switch is key to a safe and effective light connection. A proper switch ensures smooth operation and lasting performance. This section explains how to select the best toggle switch for your light setup.
Types Of Toggle Switches
Toggle switches come in several types. The most common are single-pole single-throw (SPST), single-pole double-throw (SPDT), and double-pole switches. SPST switches control one circuit and are simple on/off switches. SPDT switches can control two circuits, allowing more control options. Double-pole switches handle two separate circuits at once, useful for complex wiring. Choose the type based on how you want to control your light.
Switch Ratings And Compatibility
Every toggle switch has electrical ratings. These include voltage and current limits. Check the switch rating matches your light’s power needs. Using a switch with too low a rating can cause failure or hazards. Also, ensure the switch fits physically where you want to install it. Confirm the terminal type matches your wiring style. Proper ratings and compatibility keep your light safe and functional.

Credit: www.youtube.com
Gathering Required Tools And Materials
Before connecting a toggle switch to a light, gather all tools and materials. Having everything ready makes the job easier and safer. This step saves time and avoids interruptions. Use the right tools to ensure a clean and secure connection.
Essential Tools
Start with basic hand tools. A screwdriver set is vital for removing and fastening screws. Wire strippers help remove insulation without damaging wires. Pliers assist in bending and holding wires firmly. A voltage tester checks if wires carry current. Electrical tape secures wire connections. A drill might be needed for mounting the switch. Safety gear like gloves and goggles protects you during work.
Necessary Electrical Components
Choose the right toggle switch for your light type. Most home projects use a single-pole toggle switch. Use electrical wires rated for your circuit’s voltage and current. Wire nuts connect and protect wire ends safely. A light fixture or bulb must match your switch and wiring. A switch box houses the toggle switch neatly. Make sure all components meet local electrical codes.
Safety Precautions Before Starting
Before connecting a toggle switch to a light, safety comes first. Working with electricity is risky. Taking simple steps can prevent accidents. This section explains important safety precautions. Follow them carefully to protect yourself and your home.
Power Shutoff Procedures
Turn off the power at the main circuit breaker. Do not rely on the wall switch alone. Use a voltage tester to check wires. Confirm there is no electricity before touching anything. This step is critical to avoid electric shocks.
Personal Protective Equipment
Wear rubber-soled shoes to avoid grounding yourself. Use insulated gloves to protect your hands. Safety glasses protect your eyes from sparks or debris. Dress in non-conductive clothing to stay safe. These simple items reduce injury risks while working.
Preparing The Wiring Setup
Preparing the wiring setup is the first step to connect a toggle switch to a light. It ensures safety and a smooth installation process. Taking time to organize and identify wires helps avoid mistakes. Clear wiring setup makes the rest of the work easier and faster.
Identifying Wires
Start by checking the wires in your electrical box. Usually, you will find a live wire, a neutral wire, and a ground wire. The live wire carries power to the switch. The neutral wire completes the circuit by returning current. The ground wire protects against electrical shocks. Use a voltage tester to confirm which wire is live. Label each wire to keep track during installation.
Stripping And Arranging Cables
Use wire strippers to remove about half an inch of insulation from each wire end. Be careful not to nick the metal inside. Straighten the wire tips for easier connection. Arrange the wires neatly to prevent tangling. Keep the stripped ends close but not touching. This order avoids shorts and makes attaching terminals simple.
Connecting The Toggle Switch
Connecting the toggle switch to a light is a key step in controlling your lighting setup. This process involves attaching wires correctly and making sure all connections are safe and tight. Proper connection ensures the switch works smoothly and the light turns on and off as desired.
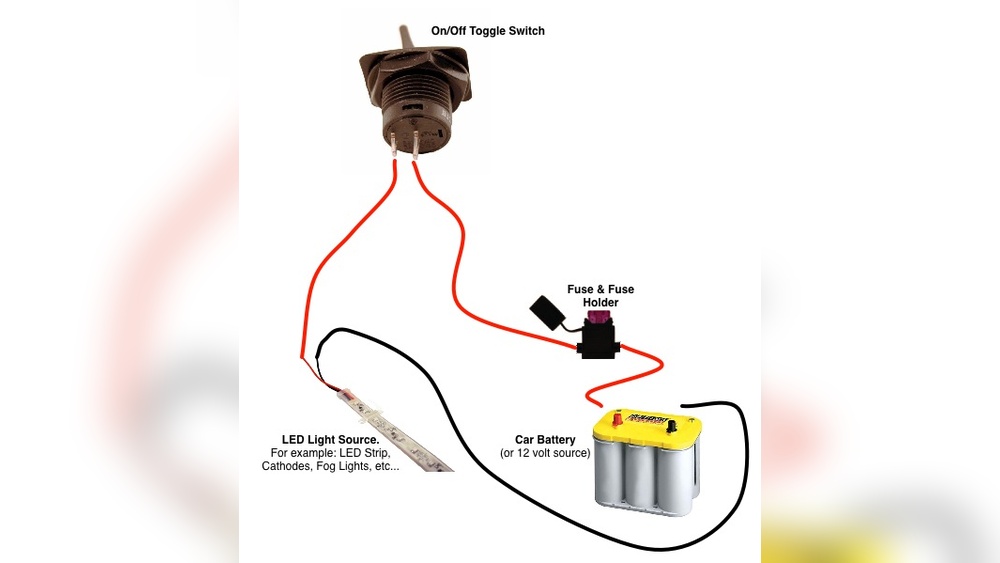
Wiring The Switch Terminals
Start by identifying the switch terminals. Most toggle switches have three terminals: common, normally open, and normally closed. Connect the power source wire to the common terminal. Next, attach the wire from the light to the normally open terminal. This setup allows the switch to control the light by opening and closing the circuit.
Use a wire stripper to remove about half an inch of insulation from each wire end. This exposes the metal wire for a good connection. Twist the wire strands tightly to avoid fraying. Attach each wire securely to its terminal using a screwdriver.
Securing Connections
Check each connection to ensure it is tight. Loose wires can cause flickering or failure. Use electrical tape or wire nuts to cover exposed wire ends. This prevents short circuits and protects from electric shocks.
Double-check the switch terminals and wires for any signs of damage. A firm, clean connection improves the switch’s lifespan. Once secure, mount the toggle switch in its box and restore power to test the light.
Installing The Switch And Light Fixture
Installing the switch and light fixture is a key step in controlling your room’s lighting. This part requires careful handling to ensure safety and proper function. Follow clear steps to mount the switch and set up the light fixture correctly.
Mounting The Switch
First, turn off the power at the circuit breaker. This prevents any electrical shock during installation. Remove the old switch by unscrewing the faceplate and the switch from the wall box. Note the wire positions before disconnecting.
Connect the wires to the new toggle switch. Usually, the black (hot) wire connects to the switch’s screw terminal. The white (neutral) wires often connect together in the box, not to the switch. Secure all wire connections with wire nuts.
Carefully push the wires back into the box. Screw the switch into place and attach the faceplate. Turn the power back on to test the switch operation before moving to the light fixture.
Setting Up The Light
Choose the right light fixture for your space and power rating. Turn off the power again at the circuit breaker before starting. Remove the old fixture by unscrewing it and disconnecting the wires.
Attach the mounting bracket from the new fixture to the electrical box. Connect the fixture wires to the house wires—black to black, white to white, and green or bare copper to ground. Use wire nuts to secure these connections.
Push the wires into the box carefully. Attach the fixture to the mounting bracket with screws. Insert the light bulb and restore power at the breaker. Test the light by flipping the toggle switch on and off.
Testing And Troubleshooting
Testing and troubleshooting are key steps after wiring a toggle switch to a light. These steps ensure safety and proper function. A careful check helps spot errors early and saves time.
Start by powering on the circuit and observing the light’s response. This reveals if the wiring is correct or if adjustments are needed. Troubleshooting guides help fix common problems quickly.
Power On And Function Check
First, turn on the main power supply. Use a voltage tester to confirm power reaches the switch. Flip the toggle switch and watch the light. It should turn on and off smoothly.
If the light does not work, check the switch position and wiring connections. Ensure all wires are tight and correctly placed. A loose wire can stop the circuit from working.
Common Issues And Fixes
The most common issue is a loose wire connection. Tighten all screw terminals on the switch and light fixture. Another issue is reversed wires. Check the wiring diagram and swap wires if needed.
A faulty switch can also cause problems. Replace the toggle switch if it feels loose or does not click properly. Burnt or damaged wires must be replaced immediately for safety.
Credit: www.oznium.com
Frequently Asked Questions
How Do I Wire A Toggle Switch To A Light?
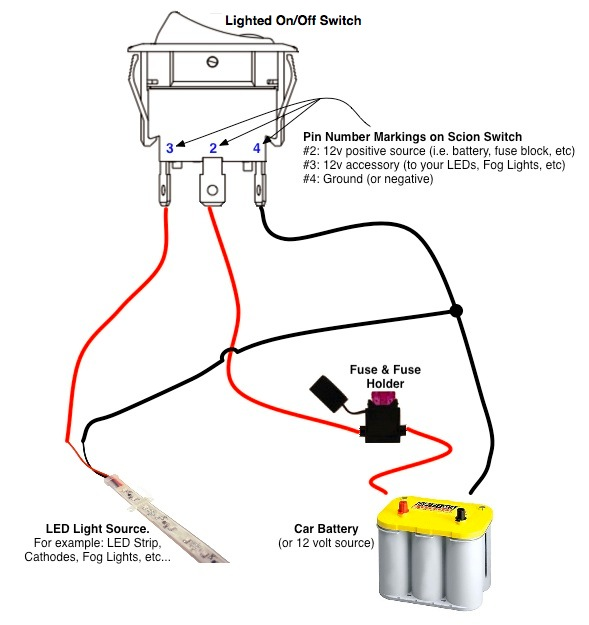
Connect the power source to the switch’s input terminal. Then, connect the output terminal to the light fixture. Finally, ensure the ground wires are properly connected for safety.
What Tools Are Needed To Connect A Toggle Switch?
You will need a screwdriver, wire strippers, electrical tape, and a voltage tester. These tools help ensure a safe and secure connection.
Can I Install A Toggle Switch Without Professional Help?
Yes, if you follow safety guidelines and instructions carefully. Turn off the power before starting and double-check all connections.
What Type Of Toggle Switch Works For Lights?
A single-pole toggle switch is commonly used for controlling lights. It allows you to turn the light on or off from one location.
Conclusion
Connecting a toggle switch to a light is simple with the right steps. Always turn off power before starting work. Follow safety rules to avoid accidents. Use basic tools and check your wiring carefully. Testing the switch after installation ensures it works well.
This small task can save you time and money. With practice, electrical projects become easier. Try it yourself and see the results. Stay safe and enjoy your new setup.