Have you ever wanted to set the perfect mood in your room with just a flick of a switch? Learning how to connect a dimmer light switch can give you full control over your lighting, helping you save energy and create the right atmosphere anytime you want.
If you think it’s complicated, don’t worry—you can do it yourself with a few simple steps. Keep reading, and by the end of this guide, you’ll have the confidence to install your dimmer switch quickly and safely. Let’s get started!
Tools And Materials Needed
Connecting a dimmer switch requires specific tools and materials. Having everything ready makes the job easier and faster. Safety is very important, so using the right tools helps avoid problems.
This section lists the basic tools and materials. Each item plays a key role in the installation process. Understanding their use helps you complete the task with confidence.
Essential Tools For Installing A Dimmer Switch
You need a screwdriver, usually flathead and Phillips. A voltage tester ensures no electricity flows while working. Wire strippers help remove insulation from wires safely. Pliers are useful for bending and twisting wires. A flashlight can improve visibility in dark spaces.
Materials Required For The Dimmer Switch Setup
Start with the dimmer switch itself, compatible with your light bulbs. Electrical tape secures wire connections and prevents shorts. Wire nuts join wires safely and keep them insulated. A plastic wall plate covers the switch and gives a clean finish. Ensure you have the correct size and type of dimmer switch for your needs.
Safety Gear To Protect Yourself
Use insulated gloves to prevent electric shocks. Safety goggles protect your eyes from dust and debris. Wear sturdy shoes to avoid injuries from dropped tools. Keep a fire extinguisher nearby as a precaution. Always work with the power turned off at the breaker box.

Credit: www.youtube.com
Safety Precautions
Safety is the top priority when connecting a dimmer light switch. Electrical work can be dangerous. Simple mistakes can cause shocks or fires. Follow safety steps carefully to protect yourself and your home.
Take time to prepare before starting. Knowing the right precautions reduces risks. Always treat electrical circuits as live until confirmed otherwise.
Turn Off Power At The Circuit Breaker
Cut power to the room by switching off the circuit breaker. Do not rely on the wall switch alone. Use a voltage tester to confirm no electricity flows to the wires.
Use Insulated Tools
Choose tools with insulated handles. They protect you from electric shocks. Avoid metal tools without insulation during wiring tasks.
Wear Safety Gear
Wear rubber-soled shoes to avoid grounding. Use safety goggles to protect eyes from sparks or debris. Gloves help prevent cuts and shocks.
Read Manufacturer Instructions
Check the dimmer switch manual for specific safety advice. Follow wiring diagrams closely. Different models may have unique requirements.
Work In A Well-lit Area
Good lighting helps you see wires clearly. Avoid working in dark or shadowy spaces. A flashlight or headlamp can help if needed.
Choosing The Right Dimmer Switch
Choosing the right dimmer switch is important for a smooth lighting experience. It affects how well your lights work and how easy it is to control them. Picking the right one helps save energy and extends bulb life. This guide covers key points to help you decide.
Types Of Dimmer Switches
There are several types of dimmer switches. The most common are rotary, slide, and toggle dimmers. Rotary dimmers turn a knob to adjust brightness. Slide dimmers move a lever up or down. Toggle dimmers flip like a regular switch but offer dimming with a press or hold.
Some dimmers include smart features. These connect to Wi-Fi and allow control from your phone. Choose a type that fits your room and personal style.
Compatibility With Bulbs
Not all dimmer switches work with every bulb. Check if your dimmer matches the bulb type. Incandescent and halogen bulbs usually work with standard dimmers. LED and CFL bulbs need special dimmers designed for them.
Using the wrong dimmer can cause flickering or buzzing. It may also shorten the bulb’s life. Always read the dimmer and bulb labels for compatibility. This ensures smooth dimming and better light quality.
Preparing The Work Area
Preparing the work area is a crucial step before installing a dimmer light switch. A safe and organized space helps avoid accidents and makes the job easier. Take time to clear the area around the switch and gather all necessary tools. Good lighting also helps you see wires and connections clearly.
Turning Off Power
Safety starts with turning off power to the switch. Locate your home’s circuit breaker panel. Switch off the breaker that controls the light switch you will replace. Use a voltage tester to confirm no electricity flows to the switch. Never skip this step to avoid electric shock.
Removing The Old Switch
After ensuring power is off, remove the old switch. Unscrew the switch cover plate carefully. Use a screwdriver to loosen the screws holding the switch in the wall box. Pull the switch out gently to expose the wires. Take note of how wires connect to the switch before disconnecting them. This helps when connecting the new dimmer switch.
Wiring The Dimmer Switch
Wiring the dimmer switch is a key step in installing your new lighting control. It involves working carefully with electrical wires to ensure safety and proper function. Understanding the wires and how to connect them helps avoid mistakes and damage.
Follow each step carefully. Double-check connections before turning power back on. Proper wiring makes your dimmer switch work smoothly and last longer.
Identifying Wires
First, turn off power at the breaker. Remove the old switch cover to see the wires. Most dimmer switches have three wires: a black (hot), a white (neutral), and a green or copper (ground).
Match these wires with the ones in your wall. The black wire usually carries electricity from the breaker. The white wire returns current to the panel. The green or copper wire connects to the ground for safety.
Use a voltage tester to confirm which wire is hot. Label wires if needed to keep track.
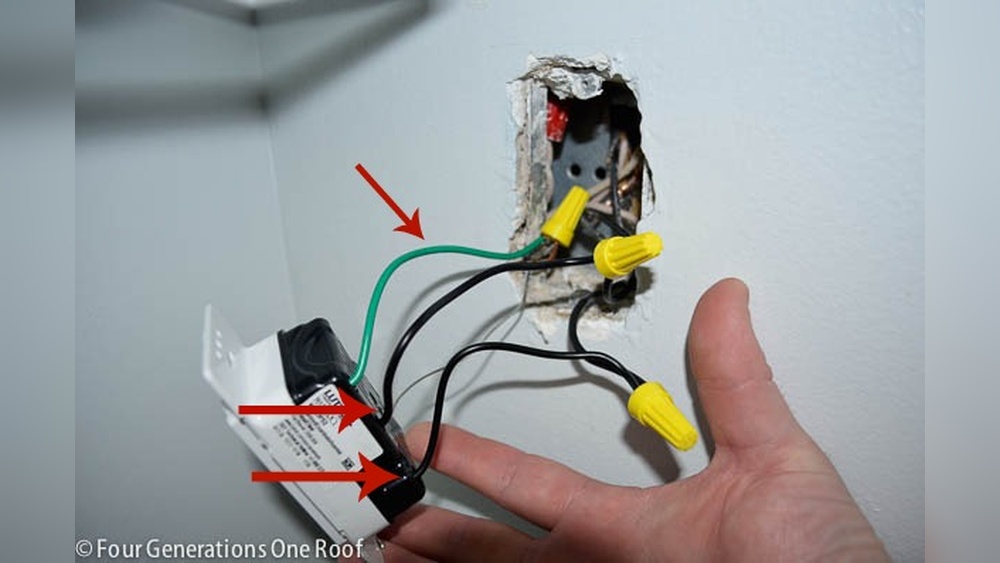
Connecting Wires To Dimmer
Connect the black wire from the wall to the black wire on the dimmer. Twist them together clockwise and secure with a wire nut. Next, join the white wires the same way if your dimmer requires a neutral connection.
Attach the green or bare copper wire from the dimmer to the ground wire in the wall. This connection is important for safety. Make sure each wire is tightly connected and no bare wire shows outside the nuts.
Securing Connections
Wrap electrical tape around each wire nut for extra security. Carefully tuck the wires into the electrical box. Avoid bending or forcing wires into tight spaces.
Attach the dimmer switch to the wall box using screws. Make sure it fits flush and does not move. Finally, replace the switch cover plate.
Testing The Dimmer Switch
Testing the dimmer switch is a key step after installation. It ensures the switch works correctly and safely. This process helps catch wiring mistakes or faulty parts early.
Always test the dimmer switch before finalizing the installation. This saves time and prevents damage to your lights.
Turn The Power Back On
Start by restoring power at the circuit breaker. This powers the dimmer switch and connected light. Never test without power, as the switch won’t respond.
Adjust The Dimmer Control
Slowly move the dimmer slider or knob. Watch the light’s brightness change smoothly. The light should dim down and brighten without flickering.
Check For Flickering Or Buzzing
Listen closely for buzzing sounds. Flickering or buzzing indicates problems. It may mean the bulb isn’t compatible or wiring is loose.
Test With Different Bulbs
Try different bulbs if flickering happens. Some dimmers work best with LED or incandescent bulbs. Match the bulb type to the dimmer’s rating.
Use A Voltage Tester
Use a voltage tester to check power flow. Test at the dimmer terminals to confirm voltage is present. This ensures correct wiring and safe operation.
Troubleshooting Common Issues
Troubleshooting common issues with dimmer light switches helps keep your lighting smooth and efficient. Many problems are easy to fix without calling an electrician. Understanding typical issues saves time and effort.
Check simple causes first. Safety matters. Always turn off power before inspecting the switch or wiring. Use a tester to ensure no electricity flows.
Dimmer Not Working
A dimmer switch may stop working for several reasons. A loose wire connection is a common cause. Turn off power and tighten all wire nuts carefully.
Another reason is an incompatible bulb. Dimmer switches work best with LED or incandescent bulbs marked as dimmable. Replace bulbs if needed.
The dimmer itself could be faulty. If wiring and bulbs are fine, try replacing the dimmer switch with a new one. This often solves the problem.
Flickering Lights
Flickering lights can be annoying and indicate a problem. Loose bulb connections cause flicker. Make sure bulbs are screwed in tightly.
Using non-dimmable bulbs with a dimmer switch also causes flickering. Swap them for dimmable bulbs suited for dimmers.
Wiring issues inside the switch box can cause flicker too. Inspect wires for damage or loose connections. Tighten or replace as needed.
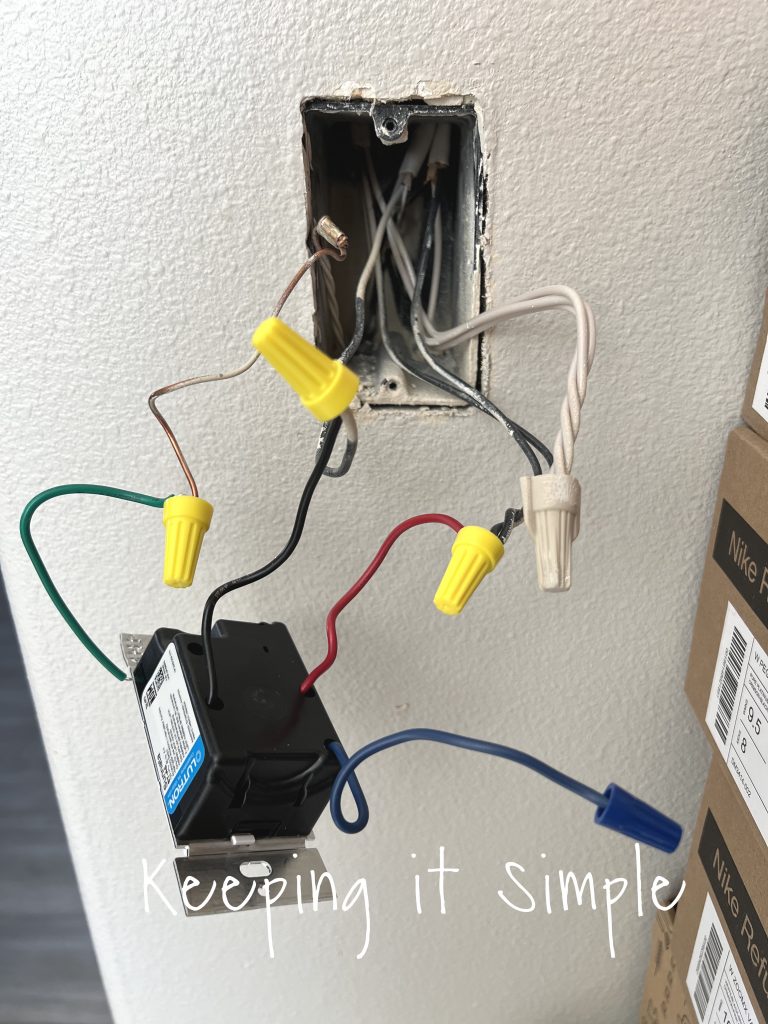
Credit: www.keepingitsimplecrafts.com
Maintaining Your Dimmer Switch
Maintaining your dimmer switch keeps it working well and lasts longer. Simple care helps avoid problems like flickering or buzzing lights. Clean and check your dimmer regularly for the best performance.
Cleaning The Dimmer Switch
Turn off the power before cleaning. Use a dry cloth to wipe dust and dirt. Avoid liquids or sprays that can damage the switch. Clean gently to keep buttons and knobs smooth.
Checking For Loose Connections
Switch off the main power before inspecting. Remove the switch cover carefully. Look for loose wires or screws. Tighten any loose parts to prevent flickering or failure. Safety first: avoid touching wires directly.
Replacing Worn-out Dimmer Switches
Signs of wear include buzzing, flickering, or no dimming. Replace the switch if problems persist. Use a dimmer that matches your light type and wattage. Follow instructions carefully or hire an electrician for help.

Credit: www.gelighting.com
Frequently Asked Questions
What Tools Do I Need To Connect A Dimmer Switch?
You need a screwdriver, voltage tester, wire stripper, and electrical tape. These tools ensure safe and efficient installation.
Can I Replace A Regular Switch With A Dimmer?
Yes, you can replace a standard switch with a dimmer if compatible with your bulbs and wiring.
How Do I Know If My Bulbs Work With Dimmers?
Check if your bulbs are labeled “dimmable. ” LED and CFL bulbs require special dimmer-compatible models.
Is It Safe To Install A Dimmer Switch Myself?
Yes, if you turn off power and follow instructions carefully. Otherwise, consult a professional electrician.
Conclusion
Connecting a dimmer light switch can change your room’s mood easily. Follow the steps carefully for a safe and smooth setup. Always turn off the power before starting any work. Use the right tools and double-check your wiring. Take your time and don’t rush the process.
Enjoy the comfort of adjustable lighting at home. Small efforts bring big changes to your space. Simple steps lead to better control of your lights. Feel proud of doing this task yourself.