Struggling with stubborn concrete wall anchors that just won’t budge? You’re not alone.
Removing these tough fasteners can be frustrating, especially when you want to avoid damaging your walls. But don’t worry—this guide will show you simple, step-by-step methods to get those anchors out quickly and safely. Whether you’re updating your space or fixing a mistake, mastering this skill will save you time and hassle.
Keep reading to discover easy tricks that make removing concrete wall anchors a breeze.
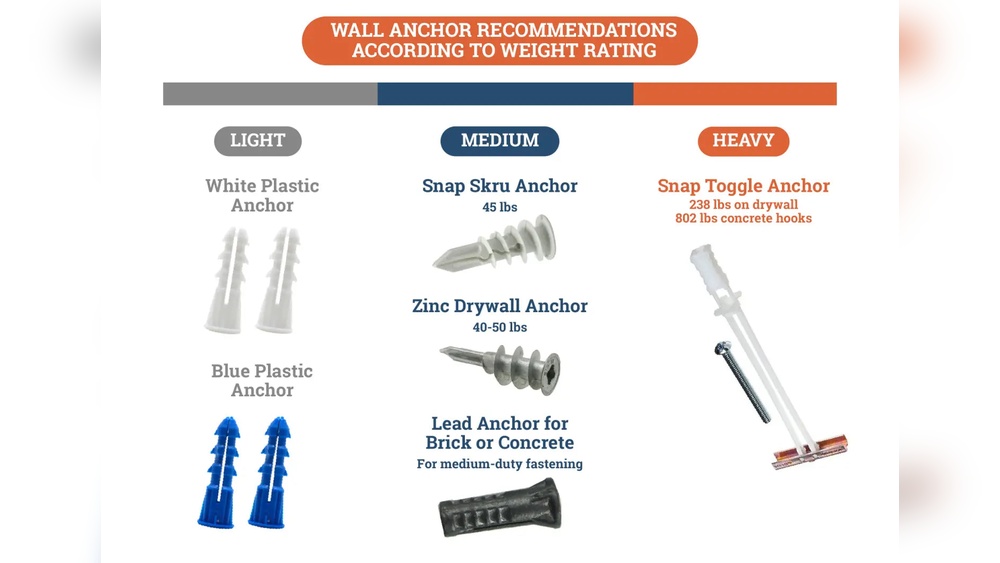
Types Of Concrete Wall Anchors
Concrete wall anchors come in several types. Each type fits different needs and surfaces. Knowing these types helps you choose and remove them safely. Here are the common types of concrete wall anchors.
Expansion Anchors
Expansion anchors work by expanding inside the hole. They create a tight grip in the concrete. These anchors often have a cone-shaped end. When you tighten the bolt, the anchor expands and locks in place.
Sleeve Anchors
Sleeve anchors have a metal sleeve around the bolt. The sleeve expands as you tighten the bolt. This expansion holds the anchor firmly in the concrete. Sleeve anchors are good for heavy loads.
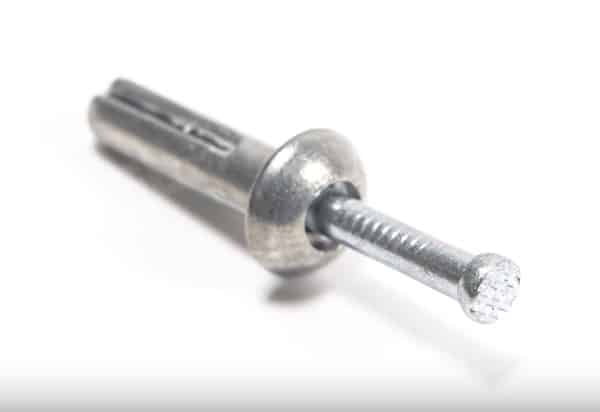
Wedge Anchors
Wedge anchors are strong and reliable. They have a wedge-shaped end that locks inside the hole. Tightening the bolt pulls the wedge into the anchor. This creates a very secure hold in the concrete.
Tapcon Screws
Tapcon screws are special concrete screws. They cut threads directly into the concrete. No anchor is needed with Tapcon screws. They are easy to install and remove with the right tools.

Credit: www.youtube.com
Tools Needed For Removal
Removing concrete wall anchors requires the right tools. Using proper tools makes the job easier and safer. This section covers essential tools for removing wall anchors from concrete surfaces.
Drill And Drill Bits
A drill helps to loosen anchors stuck in concrete. Choose drill bits made for masonry or concrete. Start with a small bit to create a guide hole. Then use larger bits if needed to widen the hole. A power drill saves time and effort during removal.
Pliers And Wrenches
Pliers grip the anchor firmly for pulling it out. Needle-nose or locking pliers work best. Wrenches can twist anchors loose, especially bolt anchors. Use the right size wrench to avoid damaging the anchor or wall.
Hammer And Chisel
A hammer and chisel help break anchors that won’t pull out. Place the chisel near the anchor edge. Tap gently with the hammer to chip away concrete around it. This technique frees anchors stuck deep inside walls.
Safety Gear
Wear safety goggles to protect eyes from dust and debris. Use gloves to avoid hand injuries from sharp edges. A dust mask prevents inhaling concrete dust. Always prioritize safety when working with concrete walls.
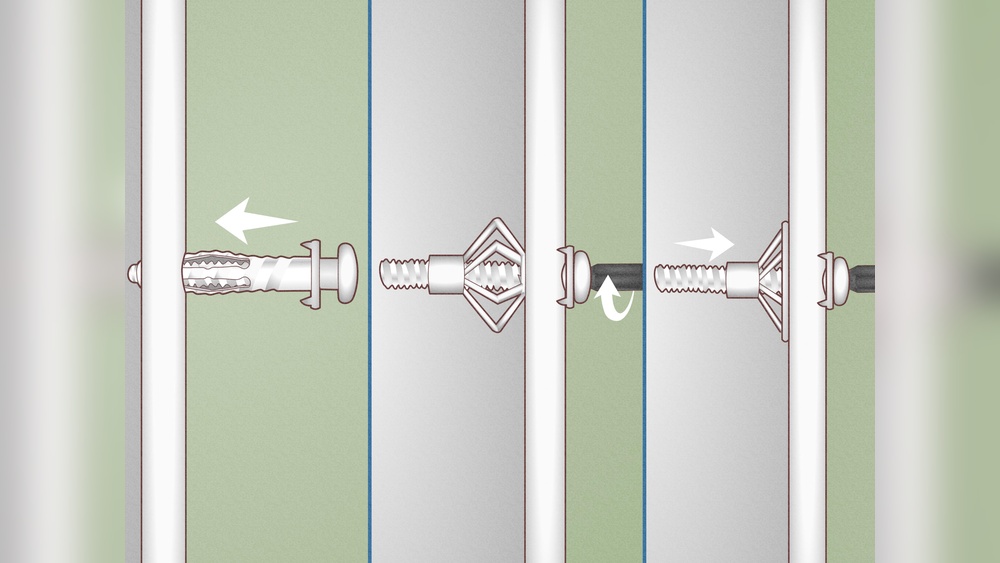
Removing Expansion And Sleeve Anchors
Removing expansion and sleeve anchors from concrete walls requires the right steps. These anchors hold tightly, so careful handling is key. Follow these simple methods to loosen and remove them safely without damaging the wall.
Loosening The Anchor
Start by cleaning around the anchor with a wire brush. Use a wrench or pliers to turn the anchor bolt counterclockwise. This helps break the grip inside the concrete. Tap gently with a hammer to loosen stuck parts. Take your time and avoid forcing it.
Pulling Out The Anchor
After loosening, grip the anchor head firmly with pliers. Pull it straight out with steady pressure. Use a pair of locking pliers for better grip if needed. For sleeve anchors, pulling the bolt may release the sleeve inside. Remove all parts carefully to prevent wall damage.
Dealing With Stuck Anchors
Use penetrating oil around the anchor to reduce rust and tightness. Let it sit for 10-15 minutes. Try tapping the anchor lightly to break the hold. If it still won’t budge, drill around the anchor to weaken the concrete. Remove the anchor pieces slowly to avoid cracks.
Removing Wedge Anchors
Removing wedge anchors from concrete walls can be tricky. These anchors hold tightly and need care to avoid wall damage. The right tools and steps make removal easier. Start by loosening the nut if it is still attached. Then try to tap the anchor out carefully. If that does not work, a slide hammer can help pull it free.
Unscrewing The Nut
Begin by turning the nut counterclockwise using a wrench. This frees the bolt from the anchor. Keep turning until the nut comes off completely. Without the nut, the wedge anchor can move more easily. If the nut is stuck, spray some lubricant. Let it sit for a few minutes before trying again.
Tapping The Anchor Out
Use a hammer and a punch or a small rod. Place the punch on the anchor’s end inside the wall. Tap gently but firmly with the hammer. The wedge should loosen and slide out slowly. Avoid hitting too hard to prevent wall cracks. Repeat tapping until the anchor releases.
Using A Slide Hammer
A slide hammer gives extra force to pull the anchor. Attach the hammer to the anchor’s threaded end. Pull the slide weight back sharply to create a strong pull. This motion helps pull the wedge out of the concrete. Use steady pulls, not quick jerks. The slide hammer works well on anchors stuck deep inside.
Removing Tapcon Screws
Removing Tapcon screws from concrete walls is a common task during renovations or repairs. These screws are designed to hold firmly in concrete, so removing them requires the right tools and techniques. With proper care, you can remove Tapcon screws without damaging your wall.
Using The Correct Drill Bit
Start by choosing the right drill bit size for your Tapcon screws. A drill bit that matches the screw diameter works best. Use a carbide-tipped bit designed for masonry to avoid damage. Drill slowly to prevent overheating and to keep the hole clean. This step helps loosen the screw for easier removal.
Backing Out The Screw
Use a screwdriver or drill with a reverse setting to back out the screw. Apply steady pressure and turn counterclockwise. Do not rush. If the screw resists, try applying a lubricant like WD-40 to ease removal. Keep the tool aligned with the screw to avoid stripping the head.
Handling Stripped Screws
Stripped screws can be tricky. Use a rubber band over the screw head to improve grip. A screw extractor bit can also help remove damaged screws. Drill carefully and avoid pushing too hard to prevent further damage. Patience is key for removing stripped screws safely.
Filling And Repairing Holes
After removing concrete wall anchors, you will notice holes left behind. These holes can make your wall look unfinished and rough. Filling and repairing these holes is important to restore the wall’s smooth surface. This process also helps prevent dirt and moisture from entering the wall. Proper repair ensures your wall looks clean and well-maintained.
Choosing The Right Filler
Select a filler made for concrete surfaces. Concrete patch or repair compound works best. Avoid regular spackle or wood filler. These do not bond well with concrete. Pick a product that matches the wall texture. Using the correct filler helps the repair last longer.
Applying Concrete Patch
Clean the hole by removing loose debris. Use a putty knife to apply the patch. Press the filler firmly into the hole. Smooth the surface to match the wall. Work in small sections for better control. Let the patch dry as per instructions. Drying time varies by product and temperature.
Sanding And Finishing
Once the patch is dry, sand it lightly. Use fine-grit sandpaper to blend the repair with the wall. Sand until the surface is smooth and even. Wipe away dust with a damp cloth. Now the wall is ready for paint or sealant. Proper finishing makes the repair almost invisible.
Tips For Avoiding Wall Damage
Removing concrete wall anchors can damage your wall if done carelessly. Taking steps to protect your wall helps keep it smooth and clean. Simple actions reduce holes, cracks, and marks. Follow these tips for best results.
Work Slowly And Carefully
Rushing can cause wall damage. Take your time to loosen anchors gently. Use steady pressure and avoid forcing tools. Small movements prevent cracks and chips. Patience helps keep the wall intact.
Use Proper Tools
Choose tools made for removing anchors. Pliers, screwdrivers, and a drill with a bit work well. Avoid tools that can dig into the wall. The right tool fits the anchor size. This reduces risk of extra damage.
Protect Surrounding Surfaces
Cover the area around the anchor with tape or cloth. This stops scratches and dust from spreading. Protect nearby furniture and floors too. Clean your workspace before and after the job. Keeping the area tidy prevents accidental harm.
Credit: www.gilgharda.com

Credit: www.youtube.com
Frequently Asked Questions
What Tools Are Needed To Remove Concrete Wall Anchors?
To remove concrete wall anchors, use pliers, a hammer, a screwdriver, and a drill. These tools help loosen and extract anchors safely and effectively without damaging the wall.
Can I Remove Concrete Anchors Without Damaging The Wall?
Yes, by using the right tools and techniques, you can remove anchors without wall damage. Work slowly, loosen the anchor gently, and fill holes afterward for a smooth finish.
How Do I Remove Different Types Of Concrete Anchors?
Different anchors require different methods. Expansion anchors need twisting and pulling. Sleeve anchors can be unscrewed. Tap anchors may require drilling around them to loosen before removal.
Is It Safe To Remove Concrete Wall Anchors Myself?
Yes, removing anchors yourself is safe if you use proper tools and methods. Wear safety glasses and gloves to protect yourself during the process.
Conclusion
Removing concrete wall anchors does not have to be hard. Use the right tools and take your time. Work carefully to avoid damage to the wall. Small holes can be fixed easily later. This guide helps you handle anchors safely.
Practice patience and follow each step clearly. Soon, your wall will look clean and smooth. Keep safety in mind throughout the process. Now, you are ready to tackle this task.