Have you ever tried to remove anchors from your wall and ended up with more holes or damage than you expected? You’re not alone.
Taking anchors out can be tricky if you don’t know the right steps. But don’t worry—removing them cleanly is easier than you think. You’ll learn simple, effective methods to get those anchors out without ruining your walls. Keep reading, and you’ll soon have smooth, damage-free walls ready for your next project.
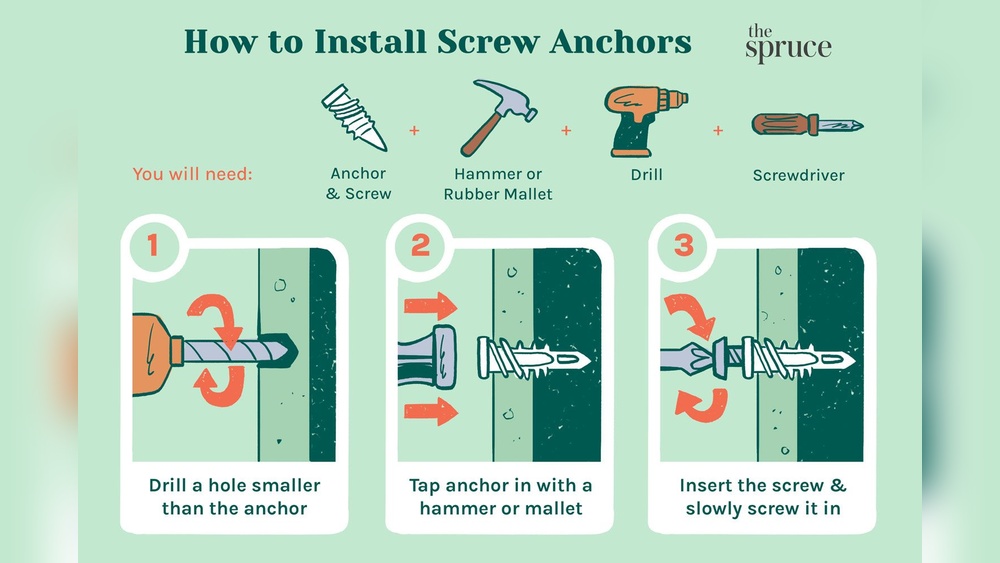
Types Of Wall Anchors
Wall anchors come in many types. Each type serves a specific purpose. Knowing which anchor you have helps in removing it safely. Here are common types of wall anchors found in homes.
Plastic Expansion Anchors
Plastic expansion anchors are simple and popular. They expand inside the wall when a screw is driven in. They fit drywall and light materials. Removal can be tricky because they may stay lodged inside.
Toggle Bolts
Toggle bolts have wings that open behind the wall. They hold heavy objects securely. The wings need space to spread out. Removing toggle bolts means pushing the wings through the wall cavity.
Molly Bolts
Molly bolts are metal anchors that expand inside the wall. They create a strong hold in drywall. The sleeve expands as the screw tightens. Removal might damage the wall if not done carefully.
Self-drilling Anchors
Self-drilling anchors look like screws but have wide threads. They screw directly into drywall without pre-drilling. They hold medium weight items. Pulling them out often damages the drywall surface.

Credit: theturquoisehome.com
Tools Needed For Removal
Removing anchors from a wall requires a few simple tools. Having the right tools makes the job easier and cleaner. You need to prepare before starting. Each tool plays a specific role in the removal process.
Pliers And Screwdrivers
Pliers help grip and pull anchors out of the wall. Needle-nose pliers work best for small anchors. Screwdrivers are useful to twist or pry anchors loose. Flathead screwdrivers fit under anchor edges. Phillips screwdrivers remove screws holding anchors in place.
Utility Knife
A utility knife cuts around the anchor area. It helps remove excess wall material or loosen paint. It can also trim any rough edges left after anchor removal. Use the knife carefully to avoid wall damage.
Drill And Bits
A drill with the right bits can remove stubborn anchors. Choose a bit size slightly smaller than the anchor. Drilling inside the anchor loosens it for easy removal. This method works well for plastic and metal anchors.
Spackling And Sandpaper
Spackling fills holes left by anchors. Apply it smoothly over the wall surface. After drying, sandpaper smooths the spackled area. Use fine-grit sandpaper for a clean finish. This step prepares the wall for painting or decorating.
Step-by-step Removal Techniques
Removing wall anchors can seem tricky. Each type needs a different method for easy removal. Follow these clear steps to take out anchors without damaging your wall. Simple tools and careful moves make the job smooth.
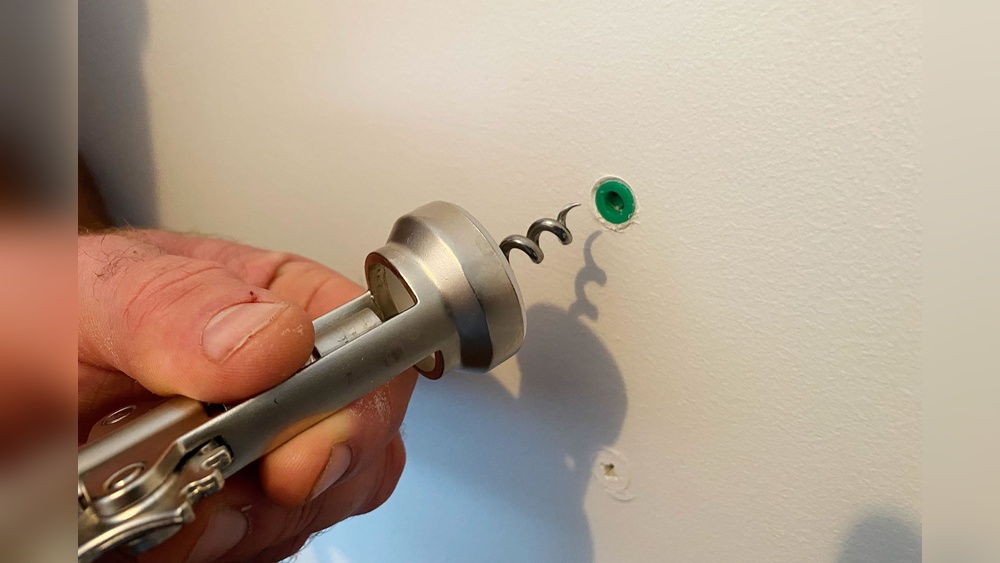
Removing Plastic Anchors
Use a screwdriver to turn the anchor counterclockwise. Pull it out gently with pliers if it does not come out. For stubborn anchors, push them into the wall cavity carefully. Avoid ripping the drywall around the hole.
Extracting Toggle Bolts
Unscrew the bolt first while holding the toggle inside the wall. The toggle will fall into the wall cavity once the bolt is out. Do not try to pull the toggle back through the hole. Patch the hole left by the toggle bolt afterward.
Taking Out Molly Bolts
Loosen the screw part with a screwdriver until the molly bolt expands less. Pull the screw out while holding the anchor firmly. For stuck anchors, tap them gently into the wall with a hammer. Repair any damage around the hole.
Handling Self-drilling Anchors
Turn the anchor counterclockwise with a screwdriver to unscrew it. If it resists, use pliers to grip and turn. Avoid forcing it out to prevent wall damage. Fill the hole after removal to keep your wall smooth.

Credit: www.youtube.com
Preventing Wall Damage
Removing anchors from a wall can be tricky. Doing it wrong causes damage. Cracked or chipped walls look bad and need repairs. Preventing wall damage saves time and money. It keeps walls smooth and ready for new decorations.
Gentle Pulling And Twisting
Start by pulling the anchor gently. Do not yank or pull hard. A slow, steady pull helps the anchor come out clean. Sometimes twisting the anchor back and forth loosens it. This method keeps the wall surface safe and intact.
Using The Right Tools
Choose tools made for anchor removal. Needle-nose pliers work well for small anchors. A screwdriver helps push or twist anchors carefully. Using the right tools reduces wall damage and makes the job easier.
Avoiding Excessive Force
Force can break anchors inside the wall. This makes removal harder and damages drywall. Stop if the anchor does not move. Try a different tool or method. Patience prevents holes and cracks in the wall.
Repairing Holes After Removal
Removing anchors from a wall often leaves holes that need fixing. Repairing these holes makes your wall look smooth and clean again. The size of the hole decides how you should repair it. Small holes require simple filling, while larger gaps need more work. Follow these easy steps to fix holes after anchor removal.
Filling Small Holes
Use spackling paste or wall filler for small holes. Apply a small amount with a putty knife. Press the filler into the hole firmly. Smooth the surface by scraping off extra filler. Let it dry completely before touching it. Small holes usually take less than an hour to dry.
Patching Larger Gaps
Large holes need a patch before filling. Cut a piece of mesh or drywall patch to fit the hole. Stick the patch over the hole carefully. Cover the patch with joint compound using a putty knife. Apply thin layers and let each dry before adding another. This builds a strong, flat surface for painting.
Sanding And Painting Tips
Sand the repaired area gently after it dries. Use fine-grit sandpaper to avoid scratches. Wipe off dust with a damp cloth. Paint over the patched spot with matching wall paint. Use a small brush or roller for even coverage. Let the paint dry, then check for smoothness. Repeat sanding and painting if needed.
Tips For Future Anchor Use
Using wall anchors correctly helps keep your walls strong and safe. Bad anchor use can cause damage and make walls weak. Follow simple tips to choose and install anchors well. This saves time and avoids future repairs.
Good habits in using anchors protect your walls and hold items firmly. Keep these tips in mind for your next project.
Choosing Appropriate Anchors
Select anchors based on wall type and weight of the item. Drywall anchors suit light objects, while masonry anchors fit brick or concrete. Use heavy-duty anchors for heavy items like shelves or TVs. Choosing the right anchor stops damage and keeps things secure.
Proper Installation Methods
Follow instructions carefully for each anchor type. Drill holes the correct size and depth. Avoid forcing anchors into walls. Use a level to keep items straight. Proper installation makes anchors hold better and prevents wall cracks.
Maintaining Wall Integrity
Do not overload anchors beyond their limit. Remove anchors gently to avoid wall damage. Patch holes quickly after removing anchors to keep walls smooth. Regularly check anchors for looseness and fix if needed. Maintaining walls helps them last longer and look good.
:max_bytes(150000):strip_icc()/how-to-remove-drywall-anchors-7562285-02-c01abbfe63374ad3a7bc1e52d0c15bb2.JPG)
Credit: www.thespruce.com
Frequently Asked Questions
How Do I Safely Remove Wall Anchors?
To safely remove wall anchors, first unscrew the anchor if possible. Use pliers to gently pull it out. For stubborn anchors, push them into the wall cavity to avoid damage. Always patch and repaint the hole afterward for a clean finish.
What Tools Do I Need To Remove Wall Anchors?
You will need a screwdriver, pliers, a drill, and a putty knife. These tools help unscrew, pull, or push out anchors. Having spackle or wall filler ready helps repair holes after anchor removal.
Can I Reuse Wall Anchors After Removal?
Most wall anchors lose grip after removal and aren’t reusable. It’s best to use new anchors for secure mounting. Reusing old anchors risks poor hold and potential wall damage.
How Do I Fix Holes After Removing Anchors?
Fill holes with spackle or wall filler using a putty knife. Let it dry completely, then sand smooth. Finally, repaint the patched area to match your wall color for a seamless look.
Conclusion
Removing anchors from a wall is easier than it seems. Use the right tools and take your time. Gently pull, twist, or push the anchor depending on its type. Fill any holes left behind to keep your wall smooth. This simple process saves you from damage and keeps your space neat.
Practice patience, and soon, you’ll handle wall anchors with confidence. Small steps lead to great results.