Are you tired of hanging heavy pictures or shelves only to have them fall down? Knowing how to install wall anchors can make all the difference in keeping your items secure and your walls damage-free.
Whether you’re a beginner or just want to get it right the first time, this guide will walk you through simple steps you can follow right now. By the end, you’ll feel confident tackling any wall project and avoid costly mistakes.
Ready to learn the secrets to strong, reliable wall anchors? Let’s get started!
Choosing The Right Wall Anchor
Choosing the right wall anchor is key to a strong, safe hold. Not every anchor fits every wall or weight. Picking the correct type helps prevent damage. It also keeps your items secure. This guide makes it easy to find the best anchor for your project.
Types Of Wall Anchors
Plastic expansion anchors are common for light loads. They spread inside the wall after insertion. Toggle bolts have wings that open inside hollow walls. They hold heavy items well. Molly bolts are metal anchors that expand behind drywall. They offer medium to heavy support.
Materials And Weight Capacity
Plastic anchors suit lightweight items under 20 pounds. Metal anchors handle heavier weights up to 50 pounds or more. Always check packaging for weight limits. Choose anchors rated for your item’s weight. This prevents accidents and wall damage.
Matching Anchors To Wall Types
Drywall needs different anchors than concrete or brick. Plastic or molly bolts work well with drywall. Use masonry anchors for brick or concrete walls. Studs offer the strongest hold. Locate studs before drilling for heavy loads. Using the right anchor for your wall type ensures durability.
Tools And Materials Needed
Installing wall anchors requires specific tools and materials. Having the right items makes the job easier and safer. This section lists what you need before starting.
Essential Tools
You need a drill with drill bits that match the anchor size. A screwdriver helps to tighten the anchors firmly. A hammer might be needed to tap the anchor into the wall gently. A tape measure ensures correct placement. A pencil marks the spots for drilling.
Safety Equipment
Wear safety glasses to protect your eyes from dust and debris. Use gloves to avoid splinters or sharp edges. A dust mask can prevent inhaling fine particles. Hearing protection is useful when drilling into hard surfaces.
Preparing Your Workspace
Clear the area around the wall to have enough room. Remove furniture or cover it with a cloth. Ensure good lighting to see the marks clearly. Keep tools close to avoid interruptions. Check the wall surface for pipes or wires before drilling.
Preparing The Wall
Preparing the wall is the first step to install wall anchors correctly. This stage ensures the anchors hold firm and keep your items secure. Proper preparation prevents damage and makes the process smoother.
Locating Studs And Marking Spots
Use a stud finder to locate studs behind the wall. Studs provide strong support for heavy items. Mark the spots where you want to place the anchors. Marking ensures accuracy and helps avoid mistakes.
Drilling Pilot Holes
Drill small pilot holes at the marked spots. Pilot holes guide the wall anchor into place. They prevent the wall from cracking or breaking. Choose a drill bit size that matches the anchor size.
Cleaning The Area
Remove dust and debris from the drilled holes. Use a brush or vacuum to clean the area well. Clean holes help anchors fit tightly and hold better. Dust can weaken the anchor’s grip.

Credit: www.do-it-yourself-help.com
Installing Different Anchors
Installing wall anchors correctly is key for strong, secure mounts. Different anchors suit different wall types and weights. Choosing the right one helps avoid damage and keeps items safe. Here are common types and how to install each.
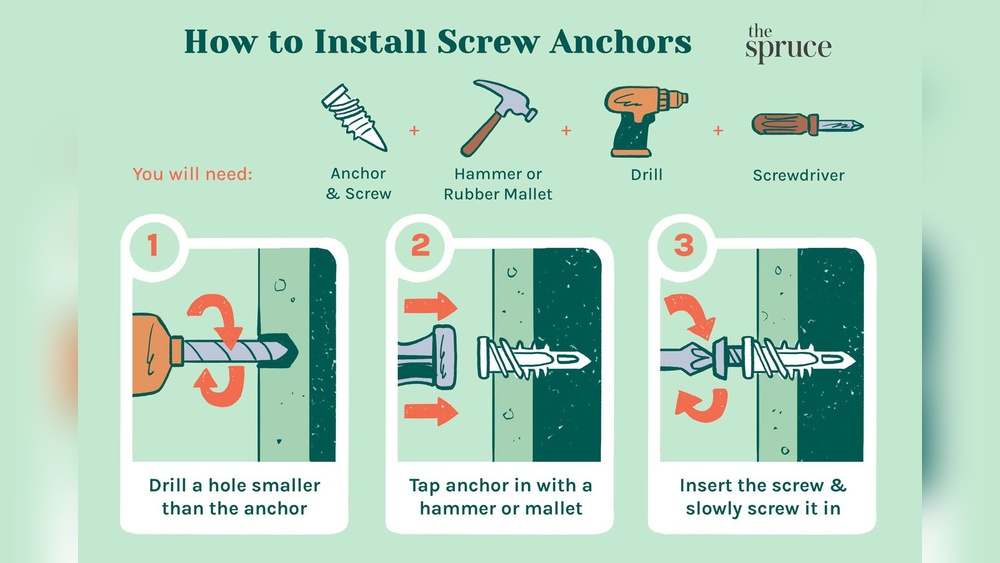
Plastic Expansion Anchors
Plastic expansion anchors are easy to use. First, drill a hole matching the anchor size. Push the anchor into the hole until flush with the wall. Insert the screw slowly. The anchor expands inside, holding tight to the wall.
Toggle Bolts
Toggle bolts work well for hollow walls. Drill a hole large enough for the folded toggle. Insert the bolt with toggle folded against the bolt. Push it through the hole. The toggle opens and grips behind the wall. Tighten the screw to secure.
Molly Bolts
Molly bolts fit drywall and plaster walls. Drill a hole for the bolt size. Push the molly bolt into the hole. Tighten the screw to expand the anchor behind the wall. Remove the screw, attach your item, then reinsert and tighten the screw fully.
Self-drilling Anchors
Self-drilling anchors need no pre-drilling. Twist the anchor directly into drywall using a screwdriver. The threads bite into the wall. Insert the screw into the anchor. These anchors hold medium loads well and install quickly.
Securing The Fixture
Securing the fixture is the final and most important step in installing wall anchors. This step ensures your item stays firmly attached to the wall without shifting or falling. Proper securing keeps the fixture stable and safe for everyday use.
Aligning And Positioning
Start by placing the fixture in its exact spot on the wall. Check if it lines up with the wall anchors perfectly. Make sure the holes on the fixture match the anchors. Adjust the position slightly if needed before tightening any screws.
Tightening Screws Properly
Use a screwdriver or drill to tighten the screws into the wall anchors. Turn the screws slowly and steadily. Stop once you feel resistance and the fixture feels solid. Avoid overtightening as this can damage the anchor or wall.
Avoiding Common Mistakes
Do not rush the tightening process. Skipping the alignment step can cause a crooked fixture. Avoid using screws that are too short or too long. Always ensure anchors are fully expanded inside the wall before tightening.

Credit: www.picturehangsolutions.com
Testing Anchor Strength
Testing the strength of wall anchors is important for safety and durability. It ensures the anchor can hold the weight without pulling out or breaking. This step prevents damage to walls and avoids accidents.
Applying Weight Gradually
Start by adding a small weight to the anchor. Increase the weight slowly to avoid sudden pressure. This helps check how well the anchor holds up under load. Watch for any signs of movement or loosening.
Checking For Stability
Observe the anchor closely while it carries weight. Make sure it does not wiggle or shift in the wall. Stability means the anchor is secure and ready to support items. Unstable anchors need attention before use.
When To Reinstall Or Replace
Replace the anchor if it moves or pulls out under light weight. Reinstall if the hole is too large or damaged. Using the right size and type of anchor is key. Safety depends on strong and stable anchors.
Tips For Long-lasting Support
Ensuring wall anchors provide strong, lasting support is key for any project. Proper care and attention keep the anchors secure and safe. Simple tips help maintain strength and prevent damage. Follow these guidelines for durable wall anchor installation.
Maintenance And Inspection
Check wall anchors regularly for signs of wear or loosening. Tighten screws if they become loose over time. Look for cracks or gaps around the anchor area. Clean dust and debris to keep the anchor area clear. Early detection of issues prevents bigger problems later.
Dealing With Different Wall Materials
Choose anchors based on the wall type: drywall, plaster, brick, or concrete. Use plastic anchors for drywall and heavy-duty anchors for masonry. Adjust drill size to match anchor size for a snug fit. Knowing your wall material ensures better anchor hold and safety.
Preventing Damage Over Time
Avoid overloading anchors beyond their weight limit. Spread weight evenly if hanging multiple items. Use anchors designed for the specific load and wall type. Avoid hammering or forcing anchors into walls. Gentle installation preserves wall integrity and anchor strength.

Credit: www.youtube.com
Frequently Asked Questions
What Tools Do I Need To Install Wall Anchors?
You need a drill, appropriate drill bit, screwdriver, wall anchors, and screws. These tools ensure secure and easy installation.
How Do I Choose The Right Wall Anchors?
Select anchors based on wall type and weight of the item. Use plastic anchors for light loads and metal anchors for heavy objects.
Can I Install Wall Anchors Without A Drill?
You can install some anchors by hand, like self-drilling ones. However, a drill provides better precision and stronger hold in most cases.
How Deep Should I Drill For Wall Anchors?
Drill a hole slightly deeper than the anchor length. This ensures the anchor fits fully and holds securely in the wall.
Conclusion
Installing wall anchors is easier than it seems. Choose the right anchor for your wall type. Use the correct drill bit size for a snug fit. Insert the anchor carefully without forcing it. Tighten screws slowly to avoid damage. Wall anchors keep your items secure and stable.
Follow these simple steps to hang with confidence. Practice makes perfect, so try on a small project first. Now, you are ready to install wall anchors safely and effectively.