Have you ever found yourself locked out or worried that someone else might have a key to your Kwikset deadbolt? Changing your locks doesn’t always mean calling a locksmith or buying a new one.
What if you could rekey your Kwikset deadbolt yourself—even without having the original key? It might sound tricky, but with the right steps, you can regain control over your home’s security quickly and easily. Keep reading, and you’ll discover how to take charge and protect your space without hassle or confusion.
Tools Needed
Rekeying a Kwikset deadbolt without a key requires the right tools. These tools help you open the lock and change the pins inside. Having the correct tools makes the job easier and faster. Below, find the tools you need to start.
Essential Tools
- Flathead screwdriver – to remove the deadbolt screws
- Phillips screwdriver – for screws that need a cross-head
- Plug follower – to push the lock cylinder out without losing pins
- Pinning kit – includes new pins for the lock cylinder
- Tweezers – to handle small pins carefully
- Key gauge – to measure pin sizes accurately
Optional Tools
- Lubricant spray – for smooth lock operation after rekeying
- Flashlight – to see small parts clearly inside the lock
- Magnifying glass – helps to view tiny pins and springs
- Pick set – useful if you need to manipulate the lock pins
- Work mat – keeps all small parts organized and prevents loss
Safety Precautions
Safety is very important when rekeying a Kwikset deadbolt without a key. Taking simple steps keeps you safe and protects the lock. Careful handling helps avoid damage and injury. Follow these safety tips to make the process smooth and safe.
Work Area Preparation
Clear your work area before starting. Remove any clutter or items that may cause accidents. Use good lighting to see small parts clearly. Have a clean, flat surface ready to place lock pieces. Keep tools organized and within reach. Avoid distractions and focus on the task. Wear safety glasses to protect your eyes from dust or small parts.
Handling Lock Components
Handle lock parts gently to avoid damage. Small springs and pins can easily fly out. Use a tray or cloth to catch loose pieces. Keep parts away from children and pets. Do not force any component; it may break the lock. Use the right tools for each part. Wash your hands after working with lock grease or dirt.
Removing The Deadbolt
Removing the deadbolt is the first step in rekeying a Kwikset lock without a key. You must take out the lock carefully to access its internal parts. This process requires simple tools and some patience. Follow the steps below to remove the deadbolt safely.
Locating Screws
Find the screws that hold the lock in place. They are usually on the inside part of the door. Check both the interior and exterior sides. Use a screwdriver to spot the screws. These screws keep the deadbolt firmly attached to the door.
Detaching The Lock
Unscrew all visible screws completely. Hold the lock tightly while removing screws. Pull the interior and exterior parts apart gently. Be careful not to damage the door or lock. After separation, you can access the lock cylinder to continue rekeying.

Credit: www.youtube.com
Accessing The Cylinder
Accessing the cylinder is the first key step in rekeying a Kwikset deadbolt without a key. The cylinder holds the pins and springs that control the lock’s function. Removing it allows you to change the pins and reset the lock to work with a new key.
This process takes patience and care. You must handle small parts and keep track of their order. Understanding the cylinder’s parts helps you work more confidently and safely.
Removing The Cylinder
Start by unscrewing the deadbolt faceplate on the door’s edge. This exposes the cylinder and allows you to pull it out. Use a screwdriver to remove all screws holding the cylinder in place.
Gently pull the cylinder from the door. If it feels stuck, wiggle it slightly but avoid force. The cylinder should slide out smoothly once screws are removed.
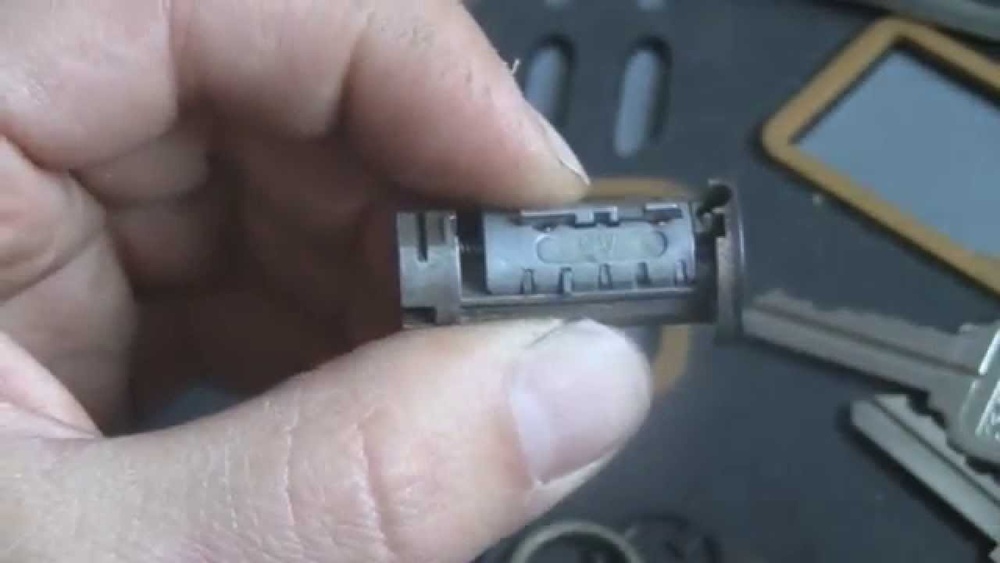
Identifying The Plug
The plug is the round part inside the cylinder where the key goes. It contains the pins that match the key shape. Identifying the plug helps you focus on where to change the pins.
Look for the plug’s small hole for the key. This hole is the main point to work on when rekeying. Knowing its position makes the next steps easier and clearer.
Removing Old Pins
Removing old pins is a key step in rekeying a Kwikset deadbolt without a key. It prepares the lock cylinder for new pins that match your new key. This process requires careful handling to avoid damaging the lock parts.
Old pins sit inside the plug and must be taken out before inserting new ones. Using the right tools makes this task easier and faster. Follow each step closely for the best results.
Using A Follower Tool
A follower tool helps push the plug out of the cylinder smoothly. It keeps the pins and springs in place during removal. Insert the follower behind the plug and push gently. Avoid forcing it to prevent damage inside the lock.
Work slowly as the plug moves out. The follower supports the pins and springs, so they do not fall out. This tool keeps everything aligned and safe.
Clearing The Plug
Once the plug is out, remove all old pins from the plug’s chambers. Use tweezers or small needle-nose pliers for this task. Check each chamber to ensure it is empty before adding new pins.
Clear all debris or dust from the plug. Clean chambers help the new pins fit perfectly. A clean plug ensures smooth operation of the lock after rekeying.
Credit: www.homedepot.com
Selecting New Pins
Selecting new pins is a key step in rekeying your Kwikset deadbolt without the original key. Pins control how the lock cylinder works with the new key. Choosing the right pins ensures the lock turns smoothly and stays secure.
Each pin must fit perfectly to match the new key’s cuts. Pins too long or too short will cause the lock to jam or not turn. Careful selection helps your lock work as it should with the new key.
Matching Pin Sizes
Start by identifying the pin sizes in your Kwikset lock. Use a pinning chart or guide for reference. Match each new pin to the size needed for the new key cuts. Check pins twice to avoid mistakes. Correct pin sizes help the lock open easily with the new key.
Arranging Pins Correctly
After choosing the right sizes, place pins in the right order. The pin order matches the cuts on your new key. Insert pins carefully into the plug chambers. Incorrect arrangement can stop the lock from working. Proper pin placement ensures smooth lock operation and security.
Reassembling The Lock
Reassembling the lock is a key step in rekeying your Kwikset deadbolt without the original key. This part requires careful attention to detail. Each piece must fit perfectly for the lock to work smoothly again. Take your time and handle all parts gently.
Inserting The Plug
Start by placing the plug back into the cylinder. Align the plug with the pins inside the lock. Make sure the new pins are set correctly. Slide the plug in slowly to avoid disturbing the pins. The plug should fit snugly without forcing it.
Securing Components
Next, secure the plug with the retaining clip or screw. This keeps the plug firmly in place. Check all parts for proper alignment before tightening. Tighten screws carefully to avoid stripping them. Confirm the lock turns smoothly after assembly.

Credit: www.reddit.com
Testing The Rekeyed Deadbolt
Testing the rekeyed Kwikset deadbolt is an important step. It ensures the lock works correctly and keeps your home secure. After rekeying, you must verify the key fits and the lock operates smoothly. This prevents future problems with locking or unlocking.
Checking Key Operation
Insert the new key into the deadbolt. Turn it slowly in both directions. The key should fit easily without force. It should turn smoothly and unlock or lock the door. If the key sticks or does not turn, the rekeying may need adjustment. Test the key several times to confirm consistent operation.
Ensuring Smooth Locking
Close the door and turn the deadbolt to lock it. Make sure the bolt slides fully into the door frame. It should not catch or feel rough. Unlock the door using the key and check for smooth movement. Smooth locking means the pins inside align perfectly. This confirms the rekeying is successful and reliable.
Troubleshooting Tips
Troubleshooting is important when rekeying a Kwikset deadbolt without a key. Problems can slow down the process or stop it. Understanding common issues helps solve them fast. This section covers common problems and quick fixes. Follow these tips to finish rekeying smoothly.
Common Issues
The cylinder does not turn. This happens if pins are stuck or misaligned.
Key pins fall out during reassembly. It often occurs when you remove the plug without care.
The plug gets stuck in the cylinder. Dirt or damaged parts may cause this problem.
New keys do not work. This can be due to wrong pin sizes or incorrect pin placement.
Quick Fixes
Use a plug follower to keep pins in place when removing the plug.
Lubricate the cylinder with graphite powder to ease turning and prevent sticking.
Check the pins carefully. Match each pin to the correct size for the new key.
Keep parts organized on a clean surface to avoid losing pins or springs.
Frequently Asked Questions
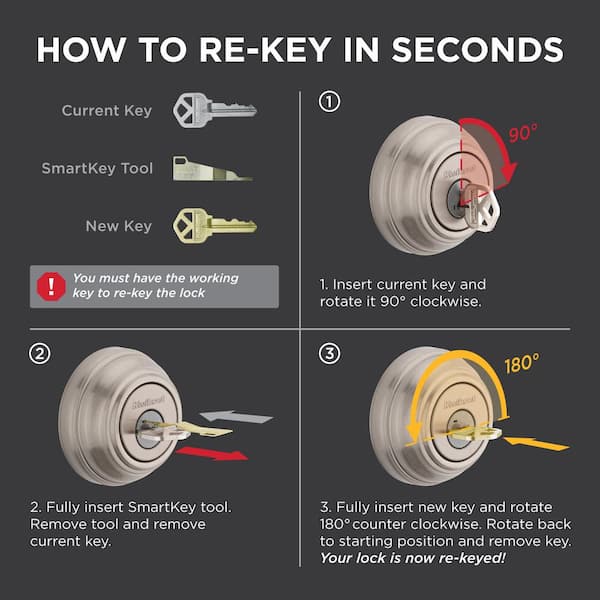
How Can I Rekey A Kwikset Deadbolt Without A Key?
You can rekey by removing the lock cylinder and using a special rekeying kit. Follow step-by-step instructions carefully.
What Tools Are Needed To Rekey Kwikset Locks?
You’ll need a Kwikset rekey kit, screwdriver, tweezers, and new keys. These tools help you change pins safely.
Is It Safe To Rekey A Kwikset Deadbolt Myself?
Yes, if you follow instructions closely, it’s safe. Rekeying saves money and improves security without locksmith help.
How Long Does It Take To Rekey A Kwikset Deadbolt?
Rekeying typically takes 20 to 30 minutes with proper tools and instructions. Practice makes the process quicker.
Conclusion
Rekeying a Kwikset deadbolt without a key can be simple. Follow the steps carefully to avoid mistakes. Take your time and use the right tools. Practice helps you get better and faster. Changing your lock improves your home’s security. You can feel safer knowing only you have access.
Keep your new key in a safe place. This guide makes rekeying easy for anyone. Try it yourself and save money on locksmith fees. Safety first—always double-check your work before finishing.


