Are you looking to control a power outlet with a simple flick of your light switch? Connecting a power outlet to a light switch can make your daily life easier and more convenient.
Whether you want to turn lamps on and off without unplugging them or add extra control to your room’s lighting, this guide is for you. By the end, you’ll know exactly how to do it safely and efficiently—even if you’re not an expert.
Ready to take control of your power outlets? Let’s dive in.

Credit: www.youtube.com
Tools And Materials Needed
Before connecting a power outlet to a light switch, gather all necessary tools and materials. Having the right items helps the job go smoothly and safely. This section lists what you need to complete the task.
Essential Tools
- Screwdriver (flathead and Phillips)
- Wire stripper
- Voltage tester
- Needle-nose pliers
- Electrical tape
- Drill (optional, for mounting)
Required Materials
- Power outlet (receptacle)
- Light switch
- Electrical wires (14 or 12 gauge)
- Wire nuts
- Outlet and switch covers
- Electrical box (if not already installed)
Safety Gear
- Insulated gloves
- Safety goggles
- Non-conductive shoes
- Flashlight (in case of low light)

Credit: www.angi.com
Basic Electrical Concepts
Understanding basic electrical concepts is key to safely connecting a power outlet to a light switch. Knowing how wiring works helps you avoid mistakes and hazards. It also makes your work neat and functional. This section explains the core ideas you need before starting.
Power Outlet Wiring
Power outlets have three main wires: live, neutral, and ground. The live wire carries electricity from the power source. The neutral wire completes the circuit by returning electricity. The ground wire protects from electric shocks. These wires connect inside the outlet box. Correct wiring ensures the outlet works safely and reliably.
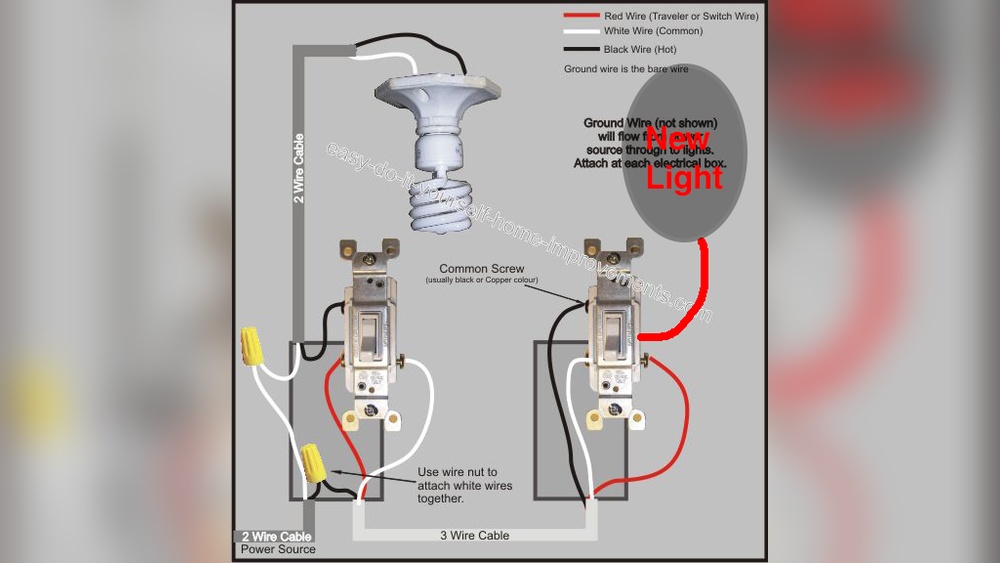
Light Switch Wiring
A light switch controls the flow of electricity to a light. It usually has two wires: live and load. The live wire brings power to the switch. The load wire sends power to the light fixture. When the switch is on, electricity flows; when off, it stops. Some switches also have a ground wire for safety.
Circuit Breaker Role
The circuit breaker is a safety device in your electrical panel. It stops electricity flow if there is too much current. This prevents wires from overheating and causing fires. Every outlet and switch should connect to a circuit protected by a breaker. It helps keep your home safe from electrical damage.
Preparing For The Project
Preparing for the project is the first step to a safe and successful connection. Proper preparation helps prevent accidents and ensures everything works well. Take your time to understand each task before starting the actual wiring. Safety and planning are the keys to a smooth job.
Turning Off Power
Always turn off the power at the circuit breaker before starting work. This stops electric shocks and accidents. Use the main switch to cut power to the area where you will work. Double-check that the power is off by trying to turn on the light or outlet.
Testing For Live Wires
Use a voltage tester or a multimeter to check for live wires. Touch the tester to each wire carefully. If the tester shows no voltage, the wires are safe to handle. Never skip this step. It confirms the power is really off and protects you from harm.
Planning The Wiring Route
Plan the path for the wires before installing them. Choose a route that is neat and clear of obstacles. Avoid sharp corners and areas with water pipes or heating ducts. Mark the path with a pencil or tape. Good planning makes the wiring easier and safer.

Credit: www.youtube.com
Wiring The Power Outlet
Wiring the power outlet is a crucial part of connecting it to a light switch. This step ensures electricity flows safely to the outlet. Follow each part carefully to avoid mistakes and keep the setup secure.
Connecting The Live Wire
The live wire carries electricity from the power source. Usually, it has a black or red color. Attach this wire to the brass or gold terminal on the outlet. Make sure the connection is tight. Loose wires can cause sparks or shorts.
Connecting The Neutral Wire
The neutral wire completes the circuit by returning current. It is often white. Connect this wire to the silver terminal on the outlet. Check that it is secure and not touching other terminals. Proper connection helps the outlet work correctly.
Grounding The Outlet
Grounding protects against electrical shocks. The ground wire is usually green or bare copper. Attach it to the green grounding screw on the outlet. This step is vital for safety. It directs extra electricity safely into the ground.
Wiring The Light Switch
Wiring the light switch is a key step in connecting a power outlet to a light switch. This process controls the flow of electricity to the light or outlet. Proper wiring ensures safety and functionality. Understanding the switch terminals and correct wire connections is essential.
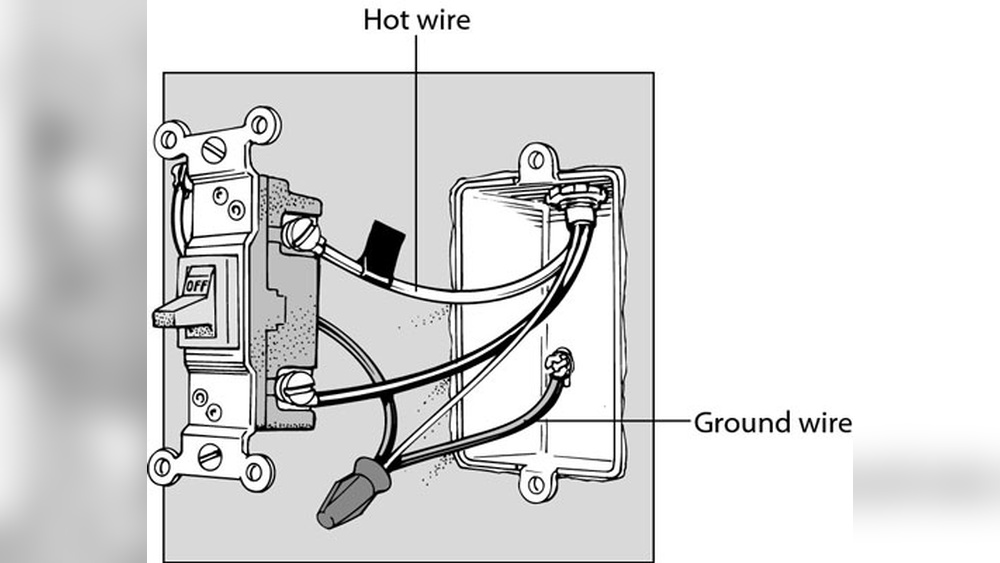
Identifying Switch Terminals
A light switch has two main terminals. One terminal is for the live wire coming from the power source. The other terminal connects to the wire leading to the outlet or light. Some switches also have a ground terminal for safety. Identifying these terminals helps avoid wiring mistakes.
Connecting The Live Wire To Switch
Locate the live wire from your power supply. It usually has a brown or black color. Attach this live wire to the common terminal on the switch. Tighten the screw securely to hold the wire firmly. This connection sends power to the switch.
Linking Switch To Outlet
Next, connect the wire from the switch’s output terminal to the outlet or light fixture. This wire carries power when the switch is ON. Make sure the wire is firmly attached to prevent loose connections. Check that all connections are safe before testing the switch.
Finalizing Connections
Finalizing connections is a crucial step in wiring a power outlet to a light switch. This stage ensures all wires are safely and firmly attached. Proper finishing prevents electrical issues and guarantees the setup works correctly.
Each wire must be double-checked for secure connections. Loose wires can cause sparks or outages. Take time to organize and tighten all terminals before moving forward.
Securing Wires
Start by twisting wire strands tightly. Attach them firmly to the correct terminals on the outlet and switch. Use a screwdriver to tighten screws fully. Avoid over-tightening to prevent damage. Neatly arrange wires inside the box, avoiding overlaps or pinches.
Mounting Outlet And Switch
Carefully push the outlet and switch into the electrical box. Align them properly with the box edges. Screw them in place using the mounting screws. Ensure both fit snugly without forcing. Check that neither device moves when pressed.
Restoring Power
Turn the circuit breaker back on. Test the light switch to confirm it controls the outlet correctly. Use a voltage tester to ensure power flows safely. If all works well, replace the outlet cover. This completes the connection process safely and neatly.
Testing And Troubleshooting
Testing and troubleshooting are key steps after connecting a power outlet to a light switch. These steps ensure everything works safely and correctly. Testing helps find any wiring errors or faulty parts. Troubleshooting fixes problems that stop the outlet or switch from working.
Checking Outlet Functionality
Start by testing the power outlet. Use a voltage tester or plug in a small device like a lamp. If the device turns on, the outlet works. If not, check the circuit breaker or fuse box. Make sure power is reaching the outlet. Confirm the wiring is secure and connected properly.
Checking Switch Control
Next, test the light switch control. Flip the switch on and off while watching the outlet or connected light. The outlet should turn on or off with the switch. If it does not respond, inspect the switch wiring. Look for loose connections or damaged wires. Replace the switch if needed.
Common Issues And Fixes
Loose wires cause many problems. Tighten all connections at the outlet and switch. Wrong wiring can prevent power flow. Double-check wiring diagrams and match wires correctly. A faulty switch or outlet might need replacement. Use a multimeter to test components. Reset breakers or replace fuses if trips occur.
Safety Tips And Precautions
Working with electricity can be risky. Following safety tips protects you from harm. Taking precautions helps avoid accidents and damage. Safety is the first step before connecting a power outlet to a light switch.
Avoiding Electrical Hazards
Turn off the main power before starting any work. Use a voltage tester to check wires. Wear insulated gloves to prevent shocks. Do not touch wires with wet hands. Use tools with insulated handles only. Keep your work area dry and clean. Avoid overloading circuits to prevent fires.
When To Call A Professional
Complex wiring needs expert help. Unclear wiring diagrams or damaged wires require a pro. If unsure about connections, stop and call an electrician. Faulty wiring can cause fires or shocks. Professionals have the right tools and knowledge. It is safer and saves time.
Maintaining Your Wiring
Check outlets and switches regularly. Look for cracks, burns, or loose parts. Tighten screws and replace damaged covers. Clean dust and debris from electrical boxes. Avoid pulling cords or yanking plugs. Proper maintenance extends wiring life and keeps your home safe.
Frequently Asked Questions
How Do I Connect A Power Outlet To A Light Switch Safely?
Turn off the main power before starting. Use proper wiring techniques and follow electrical codes. Connect the outlet’s hot wire to the switch’s output terminal. Ensure grounding is secure. Test the connection before restoring power to avoid hazards.
Can I Control An Outlet Using A Light Switch?
Yes, you can control an outlet with a light switch by wiring the outlet’s hot wire through the switch. This setup allows the switch to turn the outlet’s power on or off, ideal for lamps or other devices.
What Tools Are Needed To Connect Outlet To Light Switch?
You need a voltage tester, wire stripper, screwdriver, electrical tape, and wire nuts. These tools help safely strip wires, secure connections, and test the circuit during installation. Always use insulated tools for safety.
Is It Legal To Wire An Outlet To A Light Switch?
Yes, it is legal if you follow local electrical codes and standards. Proper permits and inspections may be required. Always consult a licensed electrician if unsure to ensure compliance and safety.
Conclusion
Connecting a power outlet to a light switch is easier than it seems. Always follow safety rules and turn off the power first. Use the right tools and check your wiring carefully. Take your time and double-check each step. This simple skill can help you handle small home projects.
Practice makes perfect, so don’t rush. Stay safe and confident while working with electricity. You can improve your home’s functionality with basic knowledge. Keep learning and trying new things one step at a time.