Are you looking to control several lights with just one switch? It’s easier than you think, and it can save you time, effort, and even money.
Imagine flipping a single switch and brightening up your entire room or hallway without running around to multiple switches. You’ll discover simple steps to connect multiple lights on one switch safely and effectively. Keep reading, and by the end, you’ll have the confidence to upgrade your lighting setup like a pro.
Credit: www.youtube.com
Tools And Materials Needed
Connecting multiple lights to one switch needs the right tools and materials. Using proper items helps make the job safe and easy. This section lists what you need before starting the work.
Having everything ready saves time. It also avoids mistakes that can cause problems later. Check each tool and material carefully.
Basic Electrical Tools
You need tools for cutting, stripping, and twisting wires. Wire strippers help remove insulation without damage. A screwdriver fits screws on switches and light fixtures. Needle-nose pliers grip and bend wires easily.
Wire Types And Lengths
Use electrical wires rated for home lighting. Usually, 14 or 12 gauge wires work best. Buy enough wire to connect all lights and the switch. Extra wire helps reach difficult spots and makes connections neat.
Switch And Light Fixtures
Select a switch designed for your lighting load. Single-pole switches are common for one location. Choose light fixtures that match your room style. Check the wattage limits on both switch and lights.
Wire Connectors And Electrical Tape
Wire connectors join wires securely and safely. Use twist-on wire nuts that fit wire sizes. Electrical tape insulates wire connections and prevents shorts. Wrap tape around connectors for extra safety.
Voltage Tester
A voltage tester checks if wires carry electricity. It helps avoid shocks and confirms power is off. Always test wires before touching them. This tool protects you during installation.
Safety Tips Before Starting
Working with electrical wiring requires care and attention. Safety is the top priority before connecting multiple lights to one switch. Small mistakes can cause shocks or fires. Taking time to prepare helps avoid accidents and ensures the project goes smoothly.
Follow clear safety steps to protect yourself and your home. Use the right tools and check your equipment. Understanding basic safety rules can save you trouble later.
Turn Off Power At The Circuit Breaker
Always switch off the power at the circuit breaker. Do not rely on the wall switch alone. Use a voltage tester to confirm no electricity flows in the wires. This step stops electric shocks while working.
Use Proper Tools And Equipment
Use insulated tools made for electrical work. Avoid metal tools without insulation. Wear rubber-soled shoes and avoid wet areas. Use a sturdy ladder if needed to reach high places.
Check Local Electrical Codes
Follow local electrical codes and regulations. Codes ensure safe wiring practices. Check if you need permits for the work. Inspectors may require a review after installation.
Wear Safety Gear
Wear safety glasses to protect your eyes. Gloves help prevent cuts and shocks. Avoid loose clothing or jewelry that can catch on wires or tools.
Plan Your Wiring Layout
Draw a simple plan before starting. Know where each light and switch will go. Plan wire routes to avoid damage and confusion. Clear plans reduce mistakes and save time.
Basic Wiring Concepts
Basic wiring concepts help you connect several lights to one switch safely. Understanding these ideas keeps your work clear and efficient. It also avoids common mistakes that can cause damage or injury.
Start with the basics. Know the parts of your home wiring and how electricity flows. This knowledge makes the process easier and safer.
Types Of Wiring
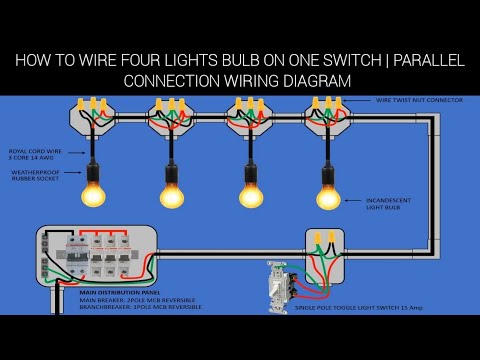
There are two main types of wiring for lights: series and parallel. Series wiring connects lights one after another. This means if one light breaks, all others go out.
Parallel wiring connects each light directly to the power source. This way, one light going out does not affect the others. Parallel wiring is the most common choice for home lighting.
Choose parallel wiring for better safety and control. It also allows each light to work independently.
Understanding Circuits
A circuit is a path where electricity flows. It starts at the power source and ends back there after passing through devices like lights and switches.
You need a complete circuit for lights to work. This includes a hot wire, a neutral wire, and often a ground wire for safety.
The switch controls the flow of electricity by opening or closing the circuit. When the switch is on, the circuit is closed and lights turn on. When off, the circuit breaks and lights go off.
Planning Your Lighting Setup
Planning your lighting setup is a key step before connecting multiple lights to one switch. Careful preparation helps avoid electrical problems and ensures your lights work safely and well. This phase involves checking the power load and selecting the right switches and bulbs. Both tasks are important for a smooth installation and long-lasting lighting.
Understanding these basics makes the setup clear and easy. It saves time and prevents costly mistakes. Let’s explore how to plan your lighting setup with simple steps.
Calculating Load Capacity
Load capacity means how much power your switch can handle. Each light uses electricity, measured in watts. Add the wattage of all lights you want to connect. The total must not be more than the switch’s limit. Check the switch label for its maximum load.
For example, if a switch can handle 600 watts, your combined lights should use less than that. Too much load can cause the switch to overheat or fail. Always keep a safe margin below the maximum wattage. This protects your wiring and prevents hazards.
Choosing Suitable Switches And Lights
Select switches made for multiple lights or higher loads. Some switches are designed to control many lights at once. Make sure the switch matches the total wattage of your lighting setup. Choose lights that fit your room’s style and brightness needs.
Use LED bulbs when possible. They use less power and last longer. LED lights reduce the total load on the switch. This helps keep your lighting system safe and efficient. Check the compatibility of switches with LED bulbs to avoid flickering or damage.
Step-by-step Wiring Process
Connecting multiple lights to one switch requires careful wiring. Following the right steps ensures safety and proper function. This guide breaks down the wiring process into clear, easy actions.
Turning Off Power
Start by turning off the power at the circuit breaker. This step is critical to avoid electric shock. Use a voltage tester to confirm no current flows. Never skip this safety step.
Running Wires To Lights
Run the electrical wires from the switch box to each light fixture. Use cable clamps to secure wires along the path. Keep wires neat and avoid sharp bends. Proper wire routing prevents damage and hazards.
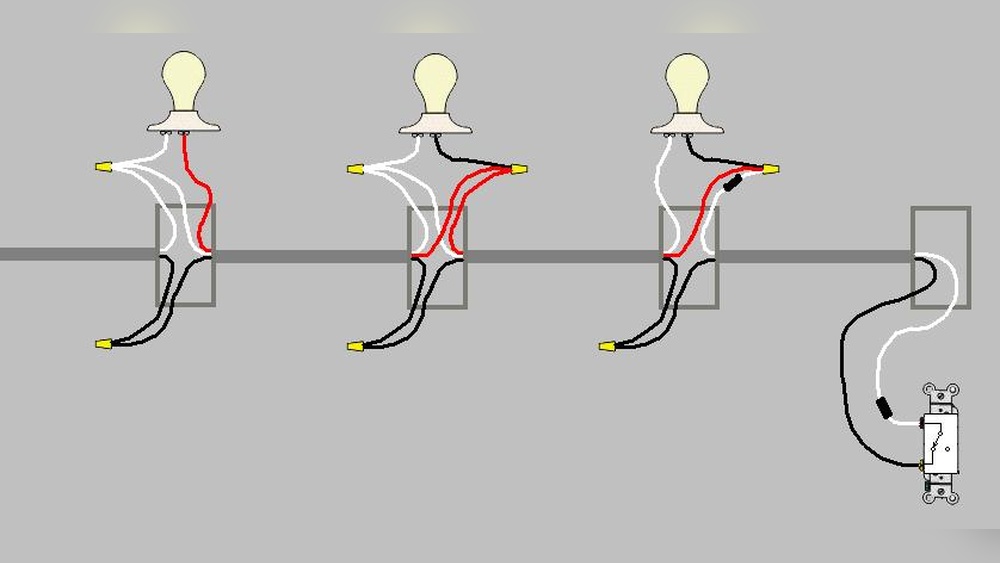
Connecting To The Switch
Strip the wire ends to expose about half an inch of copper. Connect the black (hot) wires from the lights to the switch terminal. Attach the white (neutral) wires together with a wire nut. Connect the green or bare copper wire to the ground screw on the switch.
Securing Connections
Twist wire nuts tightly on all wire connections. Wrap electrical tape around wire nuts for extra security. Push wires gently back into the boxes without forcing. Secure the switch and cover plate firmly to the wall.

Credit: diy.stackexchange.com
Testing Your Setup
Testing your setup is an important step after connecting multiple lights to one switch. It ensures that everything works safely and correctly. Testing helps find any wiring problems early. This saves time and prevents electrical hazards. Take your time and follow these steps carefully.
Checking For Proper Operation
Turn on the switch to check if all lights turn on. Each light should glow evenly without flickering. Walk around the room to see every bulb clearly. If some lights do not turn on, note which ones. Listen for any unusual sounds near the switch or lights. A steady hum or buzz can mean loose connections. Make sure the switch feels normal when toggled. It should move smoothly and not stick.
Troubleshooting Common Issues
If some lights do not work, start with the bulbs. Replace any burned-out bulbs with new ones. Check the wiring at the switch and light fixtures. Loose or disconnected wires can stop lights from working. Use a voltage tester to check power flow. Tighten any loose wire connections carefully. If the switch feels hot, turn off power immediately. This could mean a wiring problem or overload. Call a professional if you cannot find the issue. Safety is the top priority.
Tips For Efficient Lighting Control
Controlling multiple lights with one switch can save energy and improve comfort. Using smart techniques helps manage brightness and mood. Efficient lighting control makes your space flexible and cozy. It also lowers electricity bills and extends bulb life.
Simple tools like dimmers and smart switches give you more control. These options let you adjust light levels easily. They fit many room styles and needs. Here are some tips to help you get the best out of your lighting setup.
Using Dimmers
Dimmers let you change light brightness with a small turn or slide. They work well with many types of bulbs. Dimming lights reduces energy use and sets a calm mood. Choose dimmers that match your bulb type for best results. Installing dimmers is easy and can be done with basic tools. They add value by making rooms feel warm and inviting.
Smart Switch Options
Smart switches connect to your phone or voice assistant. Control lights from anywhere in your home or outside. Set schedules to turn lights on or off automatically. Some smart switches work with multiple lights on one circuit. They offer features like dimming and color change. Smart switches improve convenience and help save energy. Installing them may need simple wiring but offers great benefits.

Credit: www.electrical-online.com
Frequently Asked Questions
How Many Lights Can One Switch Control Safely?
A single switch can control multiple lights, typically up to 10-12. However, the total wattage should not exceed the switch’s rated capacity to ensure safety and functionality.
What Wiring Method Connects Multiple Lights To One Switch?
The most common method is wiring lights in parallel. This ensures each light receives full voltage and operates independently when the switch is toggled.
Can I Use One Switch For Indoor And Outdoor Lights?
Yes, one switch can control both indoor and outdoor lights if wiring is correctly installed and rated for outdoor use.
Do I Need Special Switches For Multiple Lights?
No special switch is necessary; a standard single-pole switch works. Ensure it matches the total electrical load of all connected lights.
Conclusion
Connecting multiple lights on one switch can save space and add convenience. Always check your wiring carefully for safety. Use the right tools and follow simple steps. Turn off power before starting any electrical work. Test your connections to ensure all lights work properly.
This setup suits many rooms and lighting styles. With patience, you can handle this project yourself. Enjoy the ease of controlling several lights at once. Safety first, then enjoy your improved lighting system.


