Have you ever wished you could control your lights without getting up? A remote control light switch can make that happen, giving you convenience and saving energy.
But how do you connect one properly? If you want to learn the simple steps to set it up yourself, you’re in the right place. Keep reading, and by the end, you’ll know exactly how to install your remote control light switch quickly and safely.
Your home will feel smarter, and you’ll wonder why you didn’t do this sooner.
Tools And Materials Needed
Connecting a remote control light switch needs the right tools and materials. This ensures safety and smooth installation. Gather everything before starting the work. It saves time and avoids frustration.
Basic Electrical Tools
Start with a screwdriver set. Both flathead and Phillips screwdrivers are useful. Use a wire stripper to remove insulation safely. A voltage tester checks if wires carry power. Needle-nose pliers help to bend and hold wires.
Remote Control Light Switch Kit
Buy a remote control light switch designed for your home wiring. The kit usually includes the switch and a remote. Check the instructions to confirm compatibility with your system.
Electrical Tape And Wire Nuts
Use electrical tape to cover wire connections. Wire nuts secure wire ends together. These materials prevent short circuits and keep connections tight.
Safety Gear
Wear insulated gloves to protect from electric shock. Safety glasses shield your eyes from dust and sparks. Use a flashlight if the workspace is dark.

Credit: www.amazon.com
Choosing The Right Remote Control Switch
Choosing the right remote control switch is key for a smooth setup. It affects how well your lights respond to commands. The right switch saves time and avoids frustration. It fits your home’s wiring and your daily needs.
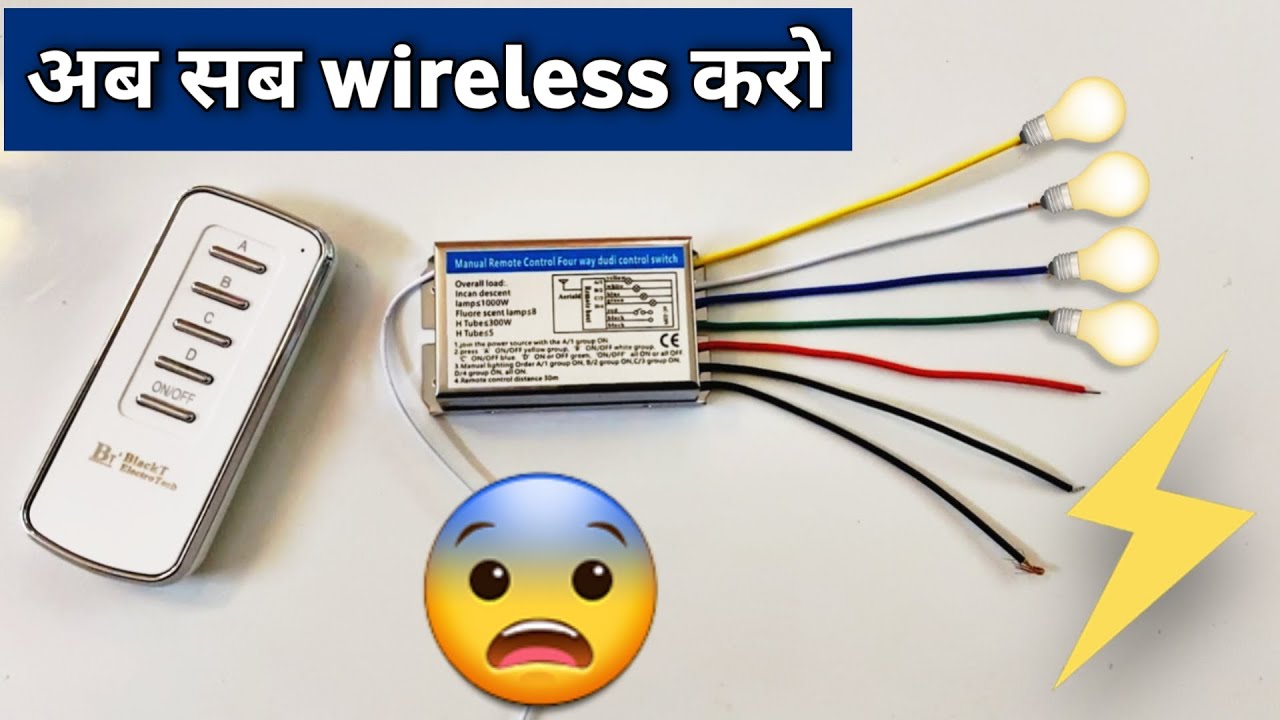
Understanding Different Types Of Remote Control Switches
Remote control switches come in various types. Some use radio frequency (RF) signals. Others use Wi-Fi to connect with your phone. Choose a type that matches your home’s technology. RF switches work without internet. Wi-Fi switches give more control and features.
Checking Compatibility With Your Home Wiring
Not all switches work with every wiring setup. Some need a neutral wire in the wall box. Others work without it. Find out what wiring you have before buying. Wrong compatibility can cause installation problems or damage.
Considering Power Source And Battery Life
Some remote switches need batteries, others connect to power lines. Battery-powered switches offer flexible placement. Wired switches give constant power without changing batteries. Choose what fits your home best and requires less maintenance.
Evaluating Range And Signal Strength
Remote switches have different signal ranges. Short-range switches work for small rooms. Long-range switches cover larger areas or multiple rooms. Consider walls and obstacles that may block signals. Pick a switch that works well in your home layout.
Looking At Features And Ease Of Use
Some switches offer dimming, timers, or group controls. Simple switches turn lights on and off only. Choose based on what you need daily. Easy-to-use switches reduce confusion for everyone in your home.
Safety Precautions
Safety is the top priority when connecting a remote control light switch. Working with electrical wiring can be dangerous. Taking proper precautions helps avoid shocks and accidents. Follow simple steps to protect yourself and your home.
Always prepare your workspace before starting. Clear the area to avoid trips or falls. Have the right tools ready. Wear safety gear like gloves and goggles to protect your hands and eyes.
Turn Off The Power
Shut off the main power supply at the circuit breaker. Confirm the power is off by testing the switch with a voltage tester. Never assume the power is off without checking.
Use Insulated Tools
Choose tools with insulated handles. This reduces the risk of electric shock. Avoid using metal tools without insulation around electrical parts.
Check For Damaged Wires
Inspect all wires for cracks or wear. Replace any damaged wires before installation. Damaged wiring can cause short circuits or fires.
Follow Manufacturer Instructions
Read the manual carefully before starting. Follow the step-by-step guide exactly. Incorrect installation can lead to problems or hazards.
Work In A Dry Environment
Make sure your hands and workspace are dry. Water conducts electricity and increases the risk of shock. Avoid working in damp or wet conditions.
Keep Children And Pets Away
Keep kids and pets out of the work area. This prevents distractions and accidents. A focused environment helps maintain safety.
Turning Off The Power
Turning off the power is the first and most important step before connecting a remote control light switch. It keeps you safe from electric shock and prevents damage to the switch or wiring. Always make sure the power is completely off before you start working.
Take your time. Safety cannot be rushed. Follow these simple steps to turn off the power correctly.
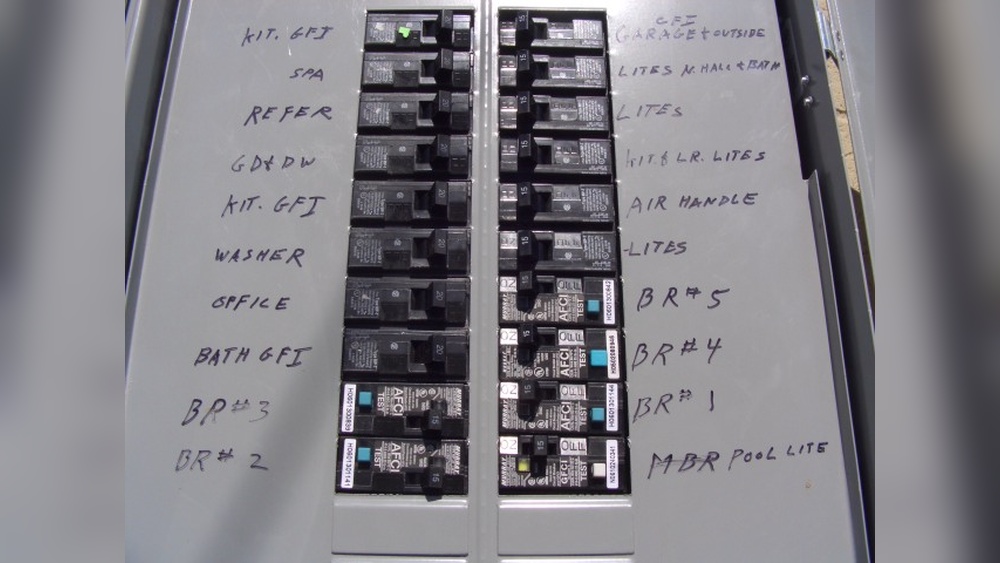
Locate The Circuit Breaker
Find the main electrical panel in your home. It is usually in the basement, garage, or utility room. Open the panel door carefully. Look for the breaker switch that controls the light circuit you want to work on.
Switch Off The Correct Breaker
Flip the breaker switch to the OFF position. This stops electricity from flowing to the light switch. Double-check the label on the breaker to make sure it matches the room or area where you will install the remote switch.
Test The Power Is Off
Use a voltage tester or a simple lamp to check the power. Turn on the light switch to see if the light works. If the light stays off, the power is safely turned off. If not, switch off the main breaker for full power cut.
Removing The Existing Switch
Removing the existing light switch is the first step to install a remote control switch. Safety is the top priority. Turn off the power at the circuit breaker. Double-check that the switch is not live using a voltage tester.
Next, remove the switch cover plate with a screwdriver. Keep the screws safe to use later. Unscrew the switch from the electrical box carefully. Pull the switch out gently to expose the wires behind it.
Take note of the wire connections. Label the wires with tape or take a photo. This helps to connect the new remote control switch correctly. Disconnect the wires by loosening the terminal screws or pulling off wire connectors.
Turn Off Power At The Breaker
Find the correct breaker for the light switch circuit. Switch it off to cut power. Test the switch with a voltage tester. Confirm no electricity flows before touching wires.
Remove The Switch Cover Plate
Use a screwdriver to take out screws. Remove the cover plate carefully. Avoid breaking or cracking the plate. Set it aside for reuse or disposal.
Unscrew And Pull Out The Old Switch
Unscrew the mounting screws holding the switch. Pull the switch out slowly. Avoid yanking or damaging wires behind it. Keep the switch steady while working.
Label And Disconnect The Wires
Note each wire’s position and color. Use tape to label each wire. Take a clear photo for reference. Loosen screws or connectors to free the wires.
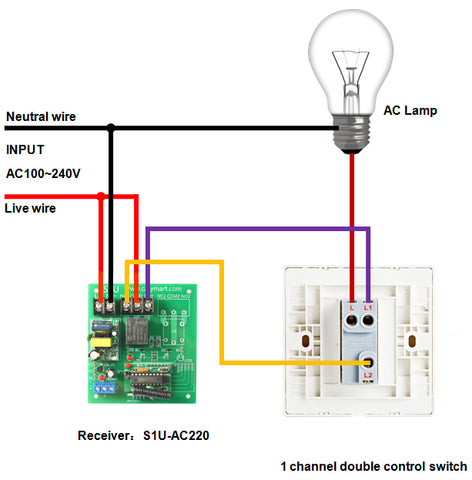
Wiring The Remote Control Switch
Wiring the remote control switch is an important step. It ensures the switch works safely and correctly. Proper wiring connects your home’s electrical system to the new switch. This part needs care and attention to avoid risks.
Before starting, turn off the power at the circuit breaker. Use a voltage tester to confirm no electricity flows to the wires. Safety first. Now, follow these simple steps for each wire connection.
Connecting The Live Wire
The live wire carries electricity to the switch. Usually, it is colored black or red. Connect the live wire from the wall to the live terminal on the switch. Tighten the screw firmly to hold the wire in place. Loose connections can cause sparks or failure.
Connecting The Neutral Wire
The neutral wire completes the electrical circuit. It is often white or blue. Attach the neutral wire to the neutral terminal on the switch. Make sure it fits snugly. This wire helps the switch function properly without interruption.
Connecting The Ground Wire
The ground wire prevents electric shocks. It is green or bare copper. Connect the ground wire to the ground terminal on the switch or the metal box. This connection adds safety by directing electricity away from users.
Mounting The New Switch
Mounting the new remote control light switch is a key step in the installation process. Proper mounting ensures the switch works safely and looks neat. Take your time to fit the switch correctly into the wall box. Follow these simple steps to secure the switch firmly and align it well.
Prepare The Wall Box
Check the wall box for any loose wires or debris. Clean the space to avoid any connection issues. Make sure the wires are straight and ready for connection. Confirm the box is deep enough to hold the new switch.
Attach The Switch To The Wires
Connect the wires to the switch terminals carefully. Match the wires according to the instruction manual. Tighten the screws to hold the wires firmly. Avoid loose connections to prevent sparks or shorts.
Secure The Switch In Place
Push the switch gently into the wall box. Keep wires inside without pinching them. Use screws to fasten the switch to the box. Tighten screws evenly to avoid tilting.
Install The Switch Cover Plate
Place the cover plate over the switch. Align it with the screw holes. Screw the cover plate in place gently. This protects the switch and completes the look.
Credit: www.remote-control-switch.com
Pairing The Remote Control
Pairing the remote control with your light switch is a key step. It lets you control the light wirelessly. This process is simple and does not take much time. Follow clear steps to complete the pairing correctly.
Preparing The Remote And Light Switch
Start by making sure the light switch is powered on. Keep the remote control close to the switch. Check the batteries in the remote. Replace them if they are weak or dead. This helps avoid connection problems during pairing.
Entering Pairing Mode On The Light Switch
Press and hold the pairing button on the light switch. Hold it for about 5 to 10 seconds. The switch’s indicator light will start blinking. This shows it is ready to connect with the remote control. Release the button once the blinking begins.
Pairing The Remote Control With The Switch
Press a button on the remote control to send a signal. Usually, this is the power or “on” button. The switch will stop blinking once it detects the remote. This means the remote is paired and ready to use.
Testing The Connection
Press the remote control buttons to test the light. The light should turn on and off smoothly. Try dimming or changing modes if available. A strong response confirms successful pairing.
Testing The Switch
Testing the remote control light switch is a key step after installation. It makes sure the switch works well and controls the light properly. This step helps find any issues early, so you can fix them quickly.
Follow these easy steps to test the switch safely and correctly. Testing avoids damage and ensures your light responds to the remote control.
Turn On The Power
First, restore power to the circuit. Flip the breaker or switch on the fuse box. This sends electricity to the switch and light fixture.
Make sure the area is safe before continuing. Avoid touching wires or metal parts.
Use The Remote Control
Point the remote at the switch. Press the on/off button. Watch if the light turns on or off.
Try all buttons on the remote. Confirm they control the light as expected.
Check The Range
Walk around with the remote. Note how far it works from the switch.
Test in different rooms or behind walls. The signal should reach the switch easily.
Observe Any Delays
Notice if the light takes time to respond. A delay may mean interference or weak batteries.
Replace batteries in the remote if needed. Retest to see if it improves.
Inspect The Light Switch
Look at the switch for any flickering or odd behavior. Flickering can signal wiring problems.
Make sure the switch feels normal to press. A stuck button may cause issues.
Troubleshooting Common Issues
Troubleshooting common issues helps keep your remote control light switch working well. Problems may happen during setup or use. Simple checks can fix many problems fast.
Read the steps below to solve frequent problems. These tips save time and avoid frustration. Follow them carefully to get your switch running smoothly.
Check The Power Source
Make sure the light switch has power. Test the circuit breaker or fuse box. Replace any blown fuses or reset breakers. Without power, the switch won’t work.
Verify Remote And Switch Pairing
Confirm the remote is paired with the light switch. Follow the instructions to pair them again if needed. A lost connection stops the switch from responding.
Inspect Battery Levels
Check the remote control battery. Low batteries cause weak signals or no response. Replace old batteries with new ones. Use the correct battery type for best results.
Test Signal Range And Interference
Stay within the remote’s range for proper control. Walls and furniture can block signals. Remove obstacles or move closer to the switch. Avoid devices that cause interference nearby.
Reset The Light Switch
Try resetting the switch to factory settings. This clears errors and restores normal function. Follow the manual steps carefully to reset your device. Resetting solves many common issues.
Credit: www.youtube.com
Frequently Asked Questions
What Tools Are Needed To Connect A Remote Control Light Switch?
You need a screwdriver, voltage tester, wire stripper, and electrical tape. Also, have the remote control switch and batteries ready. Safety gloves are recommended for protection during installation.
How Do I Safely Turn Off Power Before Installation?
Locate your home’s circuit breaker panel and switch off the power to the light switch. Use a voltage tester to confirm no current flows. This step prevents electrical shock during installation.
Can I Install A Remote Switch On Any Light Fixture?
Most remote switches fit standard fixtures but check compatibility. Some require neutral wires or specific voltage. Always verify the remote switch specifications before installation.
How Do I Pair The Remote Control With The Light Switch?
Follow the manufacturer’s instructions to pair the remote. Usually, press a button on the switch and the remote simultaneously. Proper pairing ensures smooth remote operation.
Conclusion
Connecting a remote control light switch is simple and useful. Follow the steps carefully to ensure safety and proper function. Test the switch after installation to confirm it works well. Enjoy the convenience of controlling lights from anywhere in your home.
This small change can make daily life easier. Keep your tools ready and instructions close while working. Always double-check connections to avoid any issues. Now, your lighting control is smarter and more flexible.