Are you struggling to get your Leviton motion sensor light switch to work just right? Whether your lights turn off too quickly or don’t detect movement as expected, small adjustments can make a big difference.
In this guide, you’ll learn simple, step-by-step tips to fine-tune your motion sensor switch so it fits your needs perfectly. Keep reading, and soon you’ll enjoy smart lighting that reacts exactly how you want it to—no more guesswork or frustration.
Credit: store.leviton.com
Leviton Motion Sensor Basics
Leviton motion sensor light switches offer an easy way to control lighting using motion. These switches detect movement and turn lights on or off automatically. They save energy and add convenience to any room.
Understanding the basics of Leviton motion sensors helps you adjust them correctly. This ensures the lights respond well to your needs and environment.
Key Features
Leviton motion sensors include adjustable sensitivity to detect motion at different distances. You can set the time delay to keep lights on for a certain period. Many models have manual override options to control lights anytime. These switches work with various bulb types, including LED and CFL. Some models offer daylight sensing to avoid turning on lights during the day.
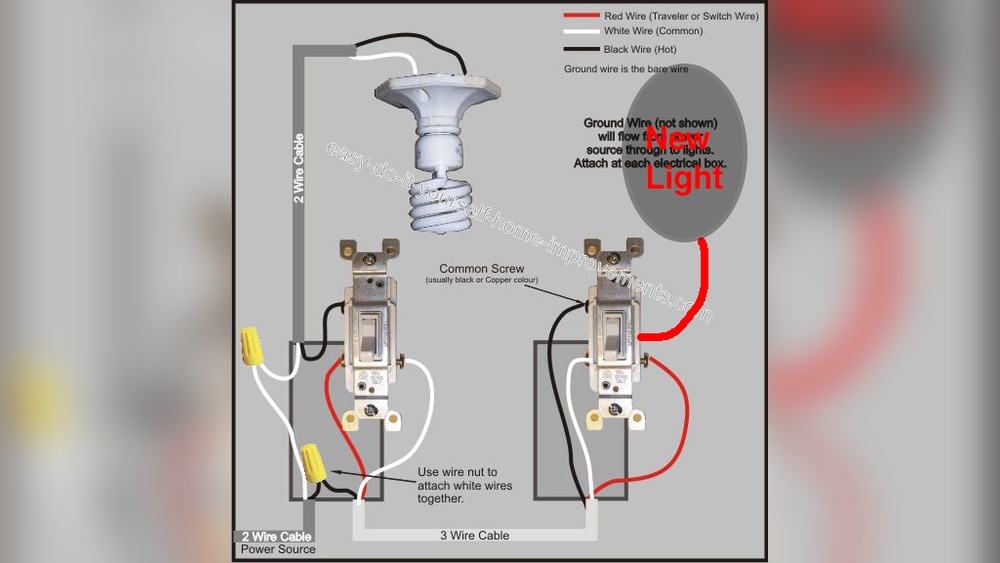
Types Available
Leviton offers different motion sensor switches for different needs. Single-pole switches control one light or group of lights from one location. Three-way switches work with two switches controlling the same light. There are also occupancy sensors that turn lights off after no motion is detected. Vacancy sensors require manual switch on but turn off automatically. Some models are designed for indoor use, while others suit outdoor areas.
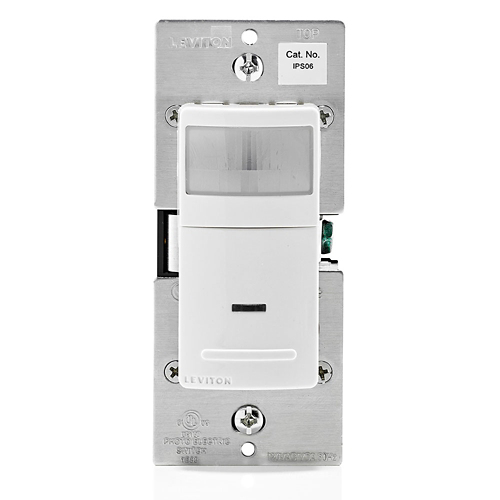
Credit: leviton.com
Tools Needed
Adjusting a Leviton motion sensor light switch is simple. Having the right tools makes the job easier. This section lists the tools needed for a smooth adjustment process.
Flathead Screwdriver
A flathead screwdriver helps remove the switch plate. It also loosens screws on the switch. Choose one with a comfortable handle.
Phillips Screwdriver
The Phillips screwdriver fits screws with a cross shape. It is essential for most light switch covers. Pick a size that matches your switch screws.
Voltage Tester
A voltage tester ensures power is off before working. It keeps you safe from electric shocks. Test the wires to confirm no current flows.
Wire Stripper
A wire stripper prepares wires for connection. It removes insulation without damaging the wire. Use it if you need to adjust wiring length.
Flashlight
A flashlight helps see inside dark switch boxes. It is useful in rooms with little light. Choose a bright, compact model for easy handling.
Safety Precautions
Safety is the top priority when adjusting a Leviton motion sensor light switch. Taking the right precautions protects you and your home. Even a small mistake with electrical devices can cause harm. Follow these key safety steps before starting your adjustment.
Turn Off Power At The Circuit Breaker
Always switch off the power at the main circuit breaker. This stops electricity from flowing to the switch. Use a voltage tester to confirm the power is off. Never rely only on the wall switch position.
Use Insulated Tools
Choose tools with insulated handles. These protect you from electric shocks. Avoid using metal tools without insulation. This simple step reduces the risk of injury.
Work In A Dry Environment
Ensure the area around the switch is dry. Water and electricity do not mix well. Avoid working in damp or wet conditions. This lowers the chance of electric shock.
Read The Manufacturer’s Instructions
Review the Leviton manual before starting. The guide offers important safety warnings. Follow the recommended steps exactly. This helps you avoid common mistakes.
Wear Protective Gear
Use safety glasses to protect your eyes. Gloves can also provide extra protection. Wearing gear helps prevent injuries from sparks or debris.
Locating Adjustment Controls
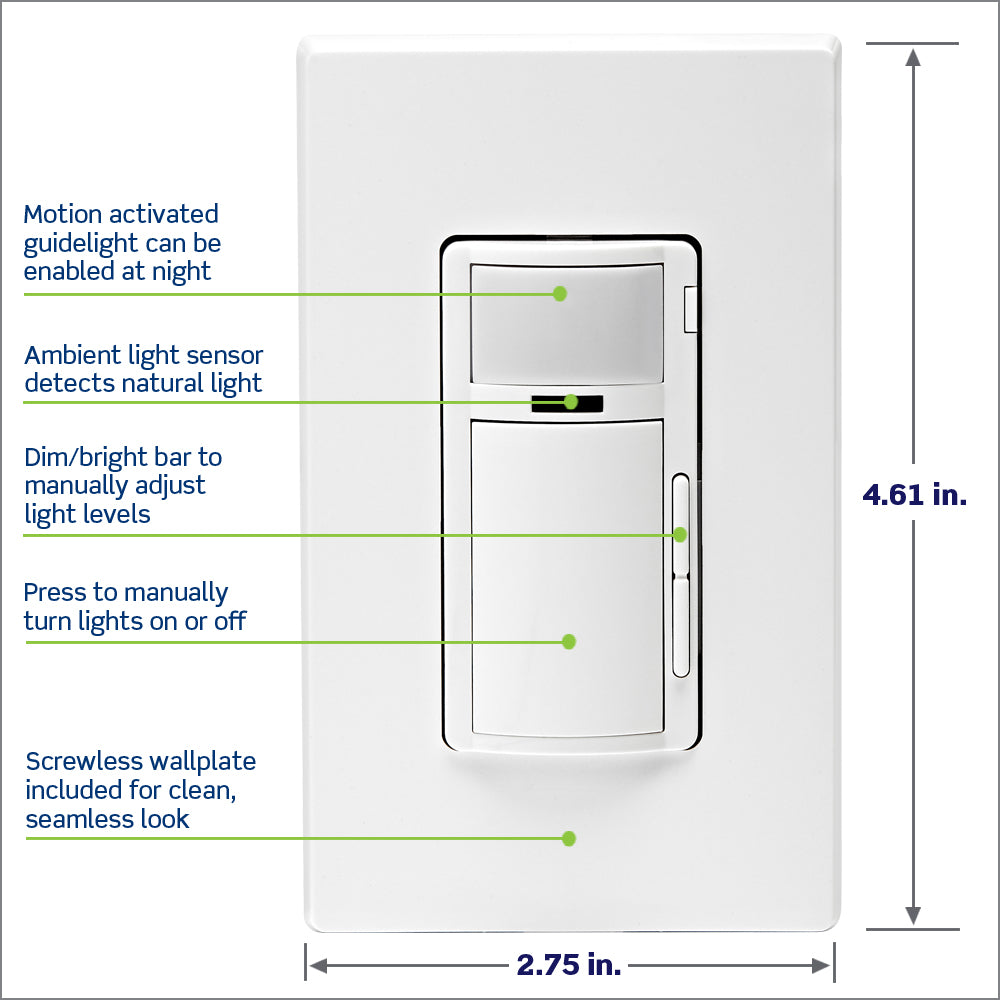
Finding the adjustment controls on your Leviton motion sensor light switch is the first step in customizing its performance. These controls let you change how the sensor reacts to movement, light, and time. Knowing their location helps you make quick and easy adjustments for better use.
Sensitivity Dial
The sensitivity dial controls how much motion the sensor detects. Usually, it is a small round knob inside the switch’s front panel. Turn it to increase or decrease the sensor’s range. Higher sensitivity picks up smaller movements. Lower sensitivity avoids false triggers from pets or minor motion.
The time delay setting determines how long the light stays on after no motion is detected. This control is often a slider or dial near the sensitivity dial. Adjust it to keep the light on for a few seconds or several minutes. Choose a longer delay for more convenience or shorter to save energy.
Ambient Light Sensor
The ambient light sensor stops the light from turning on during daylight. It senses natural light levels in the room. This control is sometimes a small dial or switch inside the unit. Set it to prevent the light from activating when there is enough sunlight. This feature helps reduce power use.
Adjusting Motion Sensitivity
Adjusting the motion sensitivity of your Leviton motion sensor light switch helps control how it reacts to movement. This setting lets you choose how close or far the sensor detects motion. Proper adjustment saves energy and avoids unwanted light activation.
Changing the sensitivity ensures the light turns on only when needed. It helps prevent the light from switching on due to small pets or distant movement. Setting the right sensitivity also extends the sensor’s lifespan.
Locate The Sensitivity Control
Start by finding the sensitivity dial or button on your switch. This control is usually inside the switch cover or on the front panel. Check your switch manual if unsure about the exact location.
Adjust Sensitivity Level
Turn the dial or press the button to change sensitivity. Increase sensitivity to detect smaller or farther movements. Decrease sensitivity to ignore minor motions or pets. Make small changes and test the sensor after each adjustment.
Test The Sensor After Adjustment
Walk in front of the sensor to check its reaction. Notice if the light turns on at the right distance. Adjust again if the sensor is too sensitive or not sensitive enough. Repeat until you find the perfect setting.

Credit: www.youtube.com
Setting Time Delay
Setting the time delay on a Leviton motion sensor light switch controls how long the light stays on after no motion is detected. Adjusting this time helps save energy and fits your daily routine. A proper time delay ensures the light doesn’t turn off too soon or stay on too long.
Locate The Time Delay Adjustment
First, find the small dial or button on the switch. It is often labeled as “Time” or “Delay.” This control changes the light’s off delay. Check the switch’s manual if you cannot find it.
Choose Your Desired Time Delay
Turn the dial or press the button to set the time delay. Options usually range from 30 seconds to 30 minutes. Shorter times work well for quick tasks. Longer times suit rooms where you stay longer.
Test The New Time Delay Setting
After adjusting, walk out of the sensor’s range. Watch how long the light stays on. Adjust again if needed until the time feels right. This trial helps get the perfect setting for your space.
Configuring Light Level
Configuring the light level on your Leviton motion sensor switch controls when the lights turn on. This setting adjusts the sensor’s sensitivity to ambient light. It helps save energy by keeping lights off during daylight. Setting the right light level ensures comfort and convenience.
Understanding The Light Level Dial
The light level dial is usually found on the switch face. It lets you set the threshold of ambient light. Turning the dial changes the sensor’s sensitivity. Clockwise increases sensitivity to darkness. Counterclockwise decreases it, allowing more light before activation.
Adjusting The Light Level For Daylight
To keep lights off during the day, set the dial to a higher level. This means the sensor detects less light before turning on. Test by covering the sensor and checking if lights activate. Adjust until the lights stay off in natural daylight.
Setting Light Level For Night Use
For night use, lower the dial so the sensor triggers at low light. This helps lights come on when it gets dark. Avoid setting too low to prevent lights turning on unnecessarily. Small adjustments can improve comfort and energy use.
Testing And Fine-tuning The Light Level
After adjusting, test the sensor in different lighting conditions. Observe how the lights respond at dusk and dawn. Make small changes to the dial for best results. Fine-tuning helps balance energy savings and lighting needs.
Testing Your Settings
Testing your settings on a Leviton motion sensor light switch is important. It ensures the switch works as you want. You can check if the sensor detects motion correctly. Also, you verify the light stays on for the right time.
Testing helps avoid problems like lights turning off too soon. Or lights staying on when no one is around. Taking time to test saves frustration later.
Activate The Sensor
Start by turning on the power to your switch. Walk in front of the sensor to trigger it. The light should turn on quickly. If it does not, check your settings or wiring.
Adjust The Time Delay
Set the time delay for how long the light stays on. Wait and watch if the light turns off after the set time. Change the delay if the light turns off too fast or stays on too long.
Test The Sensor Range
Move around the room to check the sensor’s range. The light should turn on only within this area. If the light reacts too early or too late, adjust the sensor’s sensitivity.
Check For False Triggers
Make sure the light does not turn on without motion. Test by standing still near the sensor. Watch for any false activations. Adjust sensitivity or placement to reduce false triggers.
Troubleshooting Common Issues
Troubleshooting common problems with your Leviton motion sensor light switch helps keep it working well. This guide covers simple fixes for usual issues. Small adjustments often solve these problems quickly.
Sensor Not Detecting Motion
Check if the sensor lens is clean. Dirt or dust can block motion detection. Make sure nothing blocks the sensor’s view. Adjust the sensor angle to cover the area better. Verify the sensor is set to the correct sensitivity level. Low sensitivity may miss small movements.
Light Stays On Too Long
Set the timer to a shorter duration. The switch may keep the light on for too long by default. Make sure the ambient light sensor is working. Bright light may prevent the sensor from turning off. Test different timer settings to find the right time.
Light Won’t Turn On
Confirm the power supply to the switch is on. Check circuit breakers or fuses for issues. Ensure the bulbs are not burnt out or loose. Verify the switch is properly installed and wired. Reset the switch by turning it off and on again. If it still won’t work, consult the manual or a professional.
Maintenance Tips
Keeping your Leviton motion sensor light switch in good shape helps it work better. Regular care extends its life and keeps it sensitive to motion. Follow these simple tips to maintain your sensor switch easily.
Cleaning The Sensor Lens
Dust and dirt can block the sensor’s view. Clean the lens gently with a soft cloth. Avoid harsh chemicals that may damage the surface. Wipe it regularly to keep detection sharp.
Checking The Sensor Range
Test the sensor’s range every few months. Walk through the detection area to ensure it reacts properly. Adjust the angle or position if needed to cover the desired space.
Replacing Batteries
Some Leviton sensors use batteries. Check battery levels often and replace them promptly. Weak batteries reduce sensor performance and light response time.
Inspecting The Switch For Damage
Look for cracks or loose parts on the switch. Damaged parts can cause poor function or safety issues. Replace the switch if you find any signs of wear or damage.
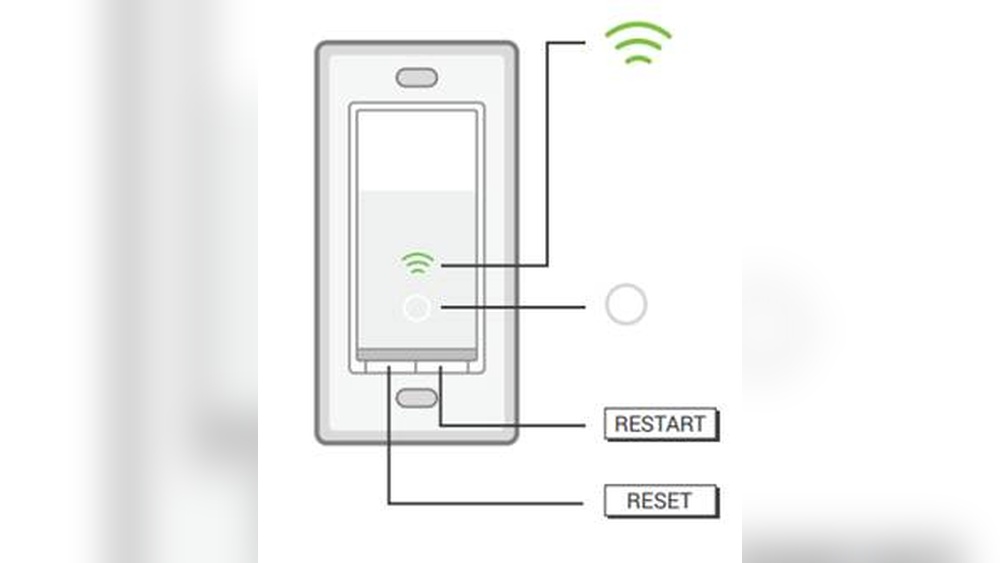
Resetting The Sensor
Occasionally, the sensor might act oddly. Resetting it restores default settings and fixes minor problems. Follow the user manual to reset your specific model properly.
Frequently Asked Questions
How Do I Adjust The Sensitivity On A Leviton Motion Sensor?
To adjust sensitivity, use the sensor’s dial or buttons. Turn clockwise to increase sensitivity and counterclockwise to decrease it. This helps control how far the sensor detects motion, optimizing energy use and comfort.
Can I Change The Time Delay On Leviton Motion Switches?
Yes, the time delay is adjustable. Use the switch’s settings to set how long the light stays on after motion stops. Options typically range from seconds to several minutes, allowing personalized control.
How Do I Set The Ambient Light Level On Leviton Sensors?
Adjust the ambient light threshold with the dial or app settings. This controls when the sensor activates based on surrounding light, preventing lights from turning on unnecessarily during daylight.
What Is The Best Way To Test A Leviton Motion Sensor Switch?
Test by walking within the sensor’s range and observing if the light turns on. Adjust settings if needed. Testing ensures proper placement and sensitivity for reliable operation.
Conclusion
Adjusting your Leviton motion sensor light switch is simple and quick. Follow the steps carefully for the best results. You can control how long the light stays on and the detection range. This helps save energy and adds convenience to your space.
Take your time to test different settings until it feels right. Enjoy the comfort and efficiency your sensor switch provides every day.