Have you ever wished you could brighten up another corner of your room without adding a whole new switch? Adding an additional light to an existing switch can be simpler than you think.
Imagine controlling two lights with just one flick—more convenience, less clutter. In this guide, you’ll discover easy steps to make your space more functional and cozy. Ready to light up your home smarter? Keep reading, and you’ll learn exactly how to do it safely and efficiently.
Credit: www.reddit.com
Assess Existing Setup
Before adding an extra light to an existing switch, check the current setup. This step helps avoid electrical problems and makes the process safer. Understanding your setup saves time and effort during installation.
Start by knowing what type of switch you have. Then find the electrical box and see how much power the circuit can handle. These details are important for a smooth upgrade.
Identify Switch Type
Look closely at your switch. It might be a single-pole, three-way, or dimmer switch. Each type works differently and changes how you add a light. Single-pole switches control one light from one place. Three-way switches control one light from two places. Dimmer switches adjust the light’s brightness. Knowing your switch type guides your next steps.
Locate Electrical Box
Find the box behind the switch on the wall. This box holds wires and connections. Make sure the box is big enough to add new wires safely. Sometimes, boxes are small and need replacing. Also, check if the box is plastic or metal, as this affects wiring rules. A clear view of the box helps plan the new light installation.
Check Circuit Capacity
Know how much electricity the circuit can handle. Look at the circuit breaker or fuse for the switch’s line. Common household circuits support 15 or 20 amps. Adding more lights can overload the circuit if you exceed this limit. Use a simple calculator or ask an expert to see if your circuit is strong enough. This prevents tripping breakers and electrical hazards.
Gather Tools And Materials
Before adding a new light to your existing switch, gather all necessary tools and materials. This step saves time and keeps your work organized. Having the right items ready helps the project go smoothly and safely.
Required Tools List
Start with basic electrical tools. You will need a screwdriver, wire stripper, and voltage tester. Pliers and electrical tape are essential too. A drill may be required for mounting the fixture. Always check that tools are in good condition.
Choosing The Right Light Fixture
Pick a light fixture that matches your room style and switch type. Consider the size and brightness needed. Choose LED bulbs for energy savings. Ensure the fixture fits the wiring and mounting space.
Safety Equipment
Wear safety goggles to protect your eyes. Use insulated gloves to avoid shocks. Have a flashlight ready for dark areas. Turn off the power at the breaker before starting. Safety is the top priority in any electrical work.
Turn Off Power
Turning off the power is the first and most important step before adding a light to a switch. It keeps you safe from electric shocks. Always take this step seriously. Never start any electrical work without cutting the power first.
Locate Circuit Breaker
Find the main electrical panel in your home. This is usually in the basement, garage, or utility room. Open the panel door carefully. Look for the breaker that controls the switch you want to work on. It may be labeled with the room name or area. If not, use a helper to test each breaker.
Confirm Power Is Off
After switching off the breaker, check that the power is really off. Use a voltage tester or a simple lamp. Turn on the switch you plan to work on. The light should stay off. This confirms the circuit is dead. Never assume the power is off without testing.
Prepare Wiring
Preparing the wiring is the first step to add a new light to an existing switch. It sets the base for safe and smooth work. Checking the wires and planning the route helps avoid problems later. Take time to do this carefully.
Remove Switch Cover
Start by turning off the power at the breaker. Use a screwdriver to remove the switch cover plate. Keep the screws safe for later. Gently pull the switch out from the wall. This exposes the wiring behind it.
Inspect Existing Wires
Look closely at the wires connected to the switch. Check for damage, like frayed or exposed wires. Identify the hot, neutral, and ground wires by their colors. Make sure the wires are tightly connected and not loose. This step ensures the wiring is safe to work with.
Plan Wiring Route
Decide how the new wire will run from the switch to the light. Look for the shortest and safest path along walls or ceilings. Avoid areas with pipes or other hazards. Use cable clips or conduits to secure the wire along the route. Planning saves time and keeps the wiring neat and safe.
Install Additional Light
Installing an additional light to an existing switch is a smart way to brighten up your space. This process involves a few key steps to ensure safety and functionality. Follow these clear instructions for a smooth installation.
Run Wires To New Light
Start by turning off power at the circuit breaker. Use a voltage tester to confirm no electricity flows. Next, run electrical wires from the existing switch box to the new light location. Use wire staples to secure cables along walls or ceilings. Leave enough wire length at both ends for connections.
Connect Wiring Properly
Strip about ¾ inch of insulation from each wire end. Match wires by color: black to black, white to white, and ground to ground. Twist wires together using wire connectors. Make sure connections are tight and secure. Tuck wires carefully into the switch box and the light fixture box.
Mount Light Fixture
Attach the mounting bracket to the electrical box. Connect the fixture wires to the house wires as explained earlier. Secure the light fixture to the bracket with screws. Install the light bulb and attach any covers or shades. Restore power and test the light switch to confirm it works.

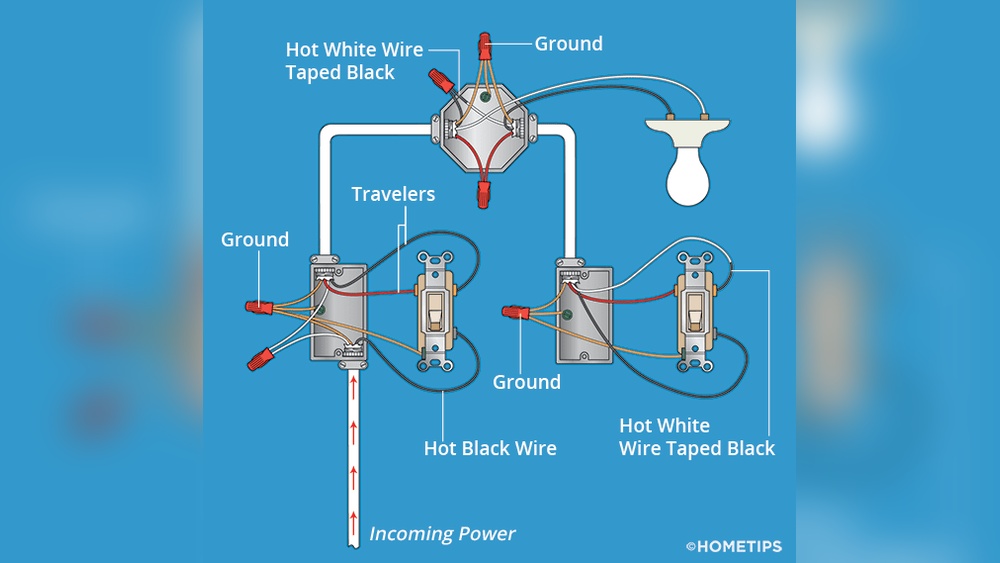
Credit: www.finehomebuilding.com
Test The Installation
Testing the installation is a key step after adding a new light to an existing switch. It ensures everything works safely and correctly. Proper testing prevents potential electrical problems. Follow these steps carefully to check your work.
Restore Power
First, turn the power back on at the circuit breaker. This supplies electricity to the switch and light. Make sure the breaker is fully switched on. Avoid touching wires or terminals while power is on. Safety comes first.
Operate Switch
Next, use the switch to control the new light. Flip the switch up to turn the light on. Check if the light glows steadily without flickering. Flip the switch down to turn it off. The light should go out immediately. Test a few times to confirm smooth operation.
Troubleshoot Common Issues
If the light does not turn on, check the bulb first. Replace it with a known working bulb if needed. Ensure all wire connections are tight and secure. Loose wires can cause problems. If flickering occurs, it may mean a poor connection. Turn off power before fixing any wiring. Use a voltage tester to confirm power flow if unsure.
Safety Tips And Best Practices
Adding an extra light to an existing switch can brighten a room and improve your home’s lighting. Safety is very important during this task. Follow these tips and best practices to avoid hazards and ensure a safe installation.
Taking precautions helps prevent electrical problems and keeps your home secure. Use the right tools and materials. Know your limits and when to seek help.
Avoid Overloading Circuits
Circuits have limits on how much electricity they can handle. Adding a light might increase the load. Too much load can cause breakers to trip or wires to overheat. Check the circuit’s capacity before adding new lights. Spread electrical devices across different circuits to balance the load.
Use Proper Wire Gauges
Wires come in different thicknesses, called gauges. Using the right gauge is key for safety. Thin wires can overheat and cause fires. Check the wire gauge recommended for your light fixture and circuit. Match new wires to existing ones to keep the system stable.
Consult A Professional When Needed
Electrical work can be tricky and dangerous. If unsure about any step, call a licensed electrician. Professionals have the tools and knowledge to do the job safely. They can spot problems you might miss. Hiring help can save time and avoid costly mistakes.

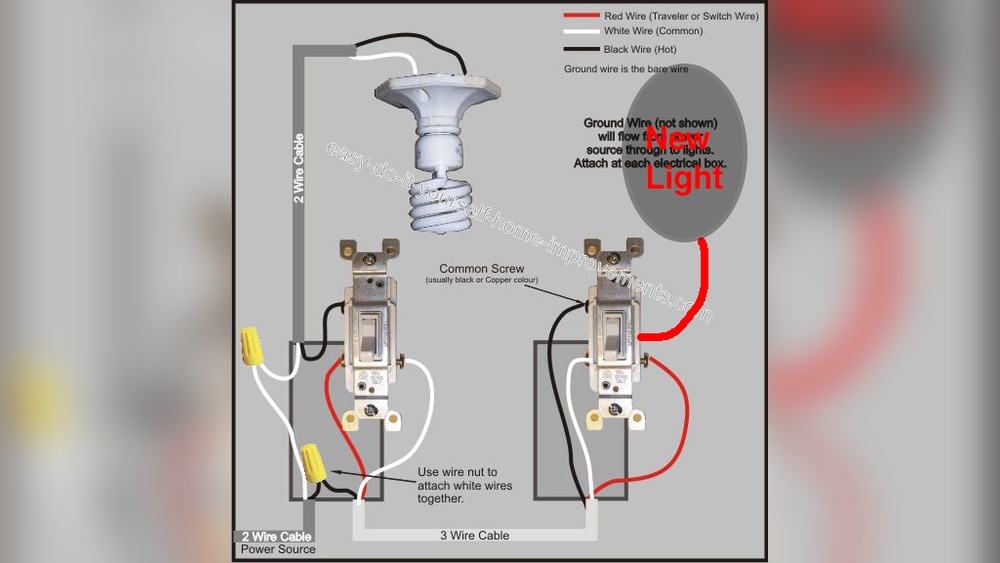
Credit: diy.stackexchange.com
Frequently Asked Questions
How Do I Add A Light To An Existing Switch?
Turn off the power at the breaker. Run wiring from the switch box to the new light. Connect wires properly and secure the fixture. Turn power back on and test the light.
Can I Use The Same Switch For Multiple Lights?
Yes, you can control multiple lights with one switch. Ensure the switch and wiring can handle the total load. Use proper gauge wire and follow electrical codes for safety.
What Tools Are Needed To Add Another Light?
You’ll need a voltage tester, wire strippers, screwdriver, electrical tape, wire nuts, and a drill. These tools help ensure safe, efficient installation of the additional light.
Is It Safe To Install Lights Without An Electrician?
Only if you have electrical knowledge and follow safety codes. Always turn off power before working. If unsure, hire a licensed electrician to avoid hazards.
Conclusion
Adding an extra light to a switch is easier than you think. Follow the steps carefully and stay safe. Make sure to turn off power before starting work. Use the right tools and check your connections twice. A well-done job brings better lighting and comfort.
Take your time and ask for help if unsure. Brighten your space with confidence and care.