Are you tired of struggling with that old bathroom light switch that never seems to work right? Changing it yourself might sound tricky, but it’s easier than you think—and you don’t need to be an expert.
Imagine flipping a switch that instantly brightens your bathroom, making your daily routine smoother and safer. In this guide, you’ll learn simple, step-by-step instructions to replace your bathroom light switch quickly and safely. Keep reading, and you’ll be surprised at how empowering this small change can be!

Credit: www.youtube.com
Tools And Materials Needed
Changing a bathroom light switch is a simple task with the right tools and materials. Having everything ready makes the job faster and safer. This section lists what you need to complete the switch replacement smoothly.
Basic Tools Required
Start with a flathead screwdriver and a Phillips screwdriver. These help remove the switch cover and screws. A voltage tester is essential to check power before touching wires. Wire strippers make wire preparation easy and safe.
Materials For The Switch Replacement
Choose a new light switch that matches your bathroom’s electrical system. Use electrical tape to cover exposed wires. Wire nuts are needed to connect wires securely. A new switch plate cover may be necessary for a fresh look.
Safety Equipment
Wear insulated gloves to protect against electric shocks. Safety glasses shield your eyes from dust or sparks. A flashlight helps if the bathroom light is off during work.
Safety Precautions
Safety is the top priority when changing a bathroom light switch. Electricity can be dangerous. Taking the right steps keeps you safe and avoids accidents. Follow these safety rules before and during the work.
Turn Off Power At The Circuit Breaker
Locate the circuit breaker box. Find the switch for the bathroom light. Flip it to the OFF position. This stops electricity flow to the switch. Use a voltage tester to confirm the power is off.
Use Proper Tools And Equipment
Choose tools with insulated handles. This reduces the risk of electric shock. Have a voltage tester ready. Use a sturdy ladder to reach the switch safely. Avoid using damaged or worn tools.
Wear Safety Gear
Wear rubber-soled shoes for better grip. Use safety glasses to protect your eyes. Avoid loose clothing or jewelry that might catch on wires. Keep your hands dry at all times.
Work In A Dry Environment
Never work with electricity in wet or damp areas. Make sure the bathroom is dry before starting. Wipe any moisture from the switch and surrounding area. Use a dry cloth to handle wires and tools.
Follow Proper Wiring Techniques
Identify wires correctly before disconnecting them. Keep track of wire positions for easy reinstallation. Tighten all wire connections securely. Do not force wires into the switch terminals.
Test The New Switch Carefully
Turn the power back on only after wiring is complete. Test the switch to ensure it works properly. If unsure, turn the power off again and check connections. Never touch wires with power on.
Turning Off Power
Turning off power is the first and most important step before changing a bathroom light switch. It keeps you safe from electric shocks. Always treat electricity with respect. Never skip this step.
Before starting, locate your home’s main electrical panel. This panel controls all the power in your house. Knowing its location saves time and avoids confusion.
Locate The Correct Circuit Breaker
Find the circuit breaker that controls your bathroom lights. It is usually labeled. If not, test by turning breakers off and on. Be careful and patient during this process.
Switch Off The Power
Flip the correct circuit breaker to the OFF position. This stops electricity flow to the bathroom light switch. Double-check by trying to turn on the bathroom light.
Confirm Power Is Off
Use a voltage tester or a simple light tester. Touch the tester to the switch wires. No light or beep means power is off. Do not touch wires without testing first.

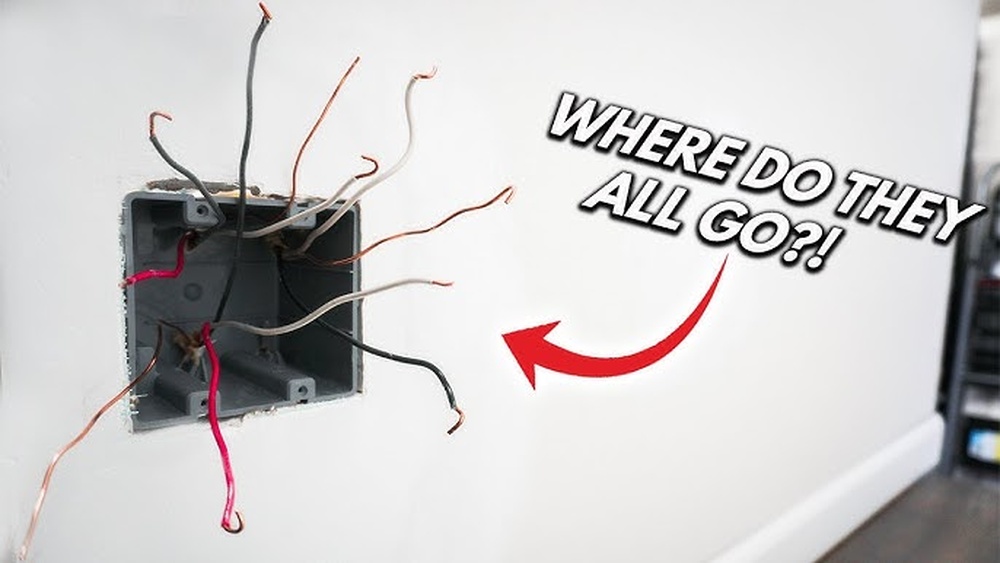
Credit: www.reddit.com
Removing The Old Switch
Removing the old bathroom light switch is the first step in the replacement process. It requires care and attention to avoid electrical hazards. Follow these steps to remove the switch safely and prepare for installing the new one.
Turn Off The Power
Switch off the circuit breaker that controls the bathroom light. Test the switch to confirm no electricity flows. Use a voltage tester for safety. Never skip this step.
Remove The Switch Cover Plate
Unscrew the cover plate carefully. Keep the screws in a safe place. Removing the cover exposes the switch and wires behind it.
Unscrew The Old Switch
Loosen the screws holding the switch to the electrical box. Gently pull the switch out to see the wires attached. Avoid yanking or pulling hard on wires.
Note The Wire Connections
Look closely at how the wires connect to the switch. Take a photo or label the wires. This step helps during the new switch installation.
Disconnect The Wires
Loosen the terminal screws or release the wire connectors. Carefully detach all wires from the old switch. Keep wires separated to avoid confusion.
Identifying Wires
Identifying wires is the first step to safely change a bathroom light switch. You must know which wire does what before you start. Each wire has a role in making the switch work. Understanding these roles helps you avoid mistakes and keeps you safe.
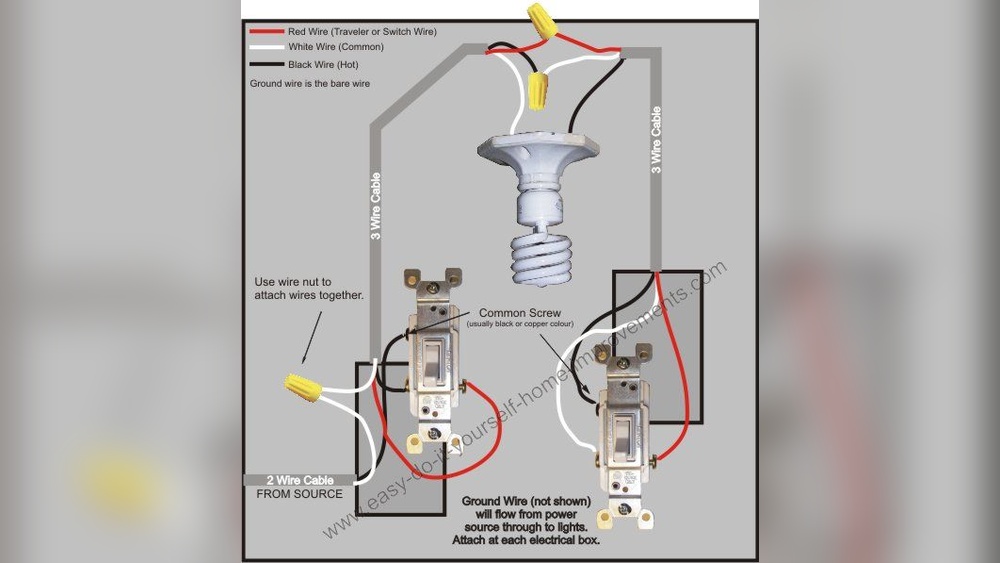
Understanding Wire Colors
Most wires have colors that tell their purpose. Black wires usually carry power. White wires are neutral and return power to the panel. Green or bare wires are ground wires. These colors help you know which wire connects where.
Using A Voltage Tester
A voltage tester shows if a wire has power. Touch the tester to each wire carefully. If the tester lights up, the wire carries current. This tool is important to check before touching wires. It keeps you safe from electric shocks.
Identifying The Hot Wire
The hot wire carries electricity from the power source. It is often black or red. Use a voltage tester to confirm. The hot wire connects to the switch’s terminal. Knowing this helps you connect the new switch correctly.
Locating The Neutral Wire
The neutral wire completes the electrical circuit. It is usually white. Neutral wires do not connect to the switch. They connect to the light fixture or the electrical box. Recognizing the neutral wire is important for safe wiring.
Finding The Ground Wire
The ground wire protects you from electrical faults. It is green or bare copper. Ground wires connect to the switch’s green screw or grounding point. This connection helps prevent shocks in case of a fault.
Wiring The New Switch
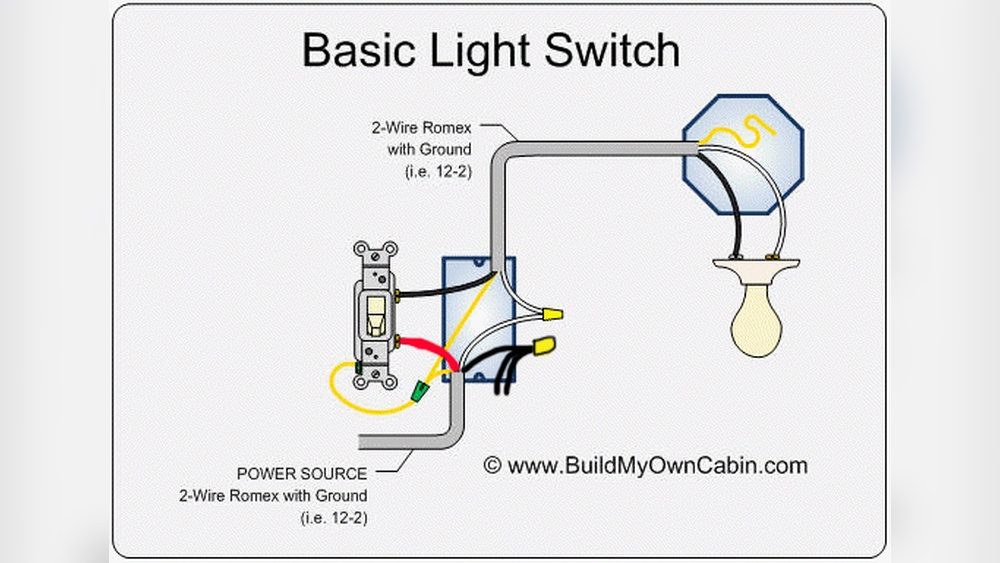
Wiring the new switch is a key step in changing a bathroom light switch. This process connects your new switch to the electrical system safely. Proper wiring ensures the switch works correctly and prevents electrical hazards.
Before starting, make sure the power is off at the breaker. Use a voltage tester to confirm no electricity is flowing. Safety first.
Identify The Wires
Look inside the switch box. You will see several wires. Usually, there is a black (hot), white (neutral), and green or bare copper (ground) wire. Each wire has a specific role in the electrical circuit.
Connect The Ground Wire
Start by attaching the ground wire. Connect the bare copper or green wire to the green screw on the new switch. This step is important for safety and prevents shocks.
Attach The Hot And Load Wires
Next, connect the black wires. One black wire goes to the switch’s brass screw. This is the hot wire from the power source. The other black wire goes to the other brass screw. This wire leads to the light fixture.
Secure The Neutral Wires
In many switches, neutral wires do not connect to the switch directly. Instead, twist the white wires together with a wire nut. Push them back into the box carefully.
Double Check Connections
Review all wire connections. Make sure wires are tightly secured under screws. Loose wires can cause flickering or dangerous shorts. Tight connections ensure the switch works well.
Securing The Switch And Cover Plate
Securing the switch and cover plate is the final step in changing a bathroom light switch. It keeps the switch steady and safe. Proper installation stops wires from moving and protects you from electrical shocks.
This step also gives a neat, finished look to your bathroom. A loose switch or cover plate can cause problems later. Follow the steps carefully to avoid issues.
Aligning The Switch In The Electrical Box
Place the new switch inside the electrical box. Make sure the switch is straight and fits well. Check that wires are not pinched or bent sharply. A good fit prevents damage and helps the switch work properly.
Fastening The Switch With Screws
Use the screws that came with the switch. Tighten them evenly to hold the switch firmly. Do not over-tighten. Screws that are too tight can crack the switch or box. The switch should not wobble or move.
Attaching The Cover Plate
Place the cover plate over the switch. Line up the holes on the plate with the screws on the switch. Screw the cover plate in gently. The plate should sit flush against the wall. Avoid overtightening to prevent cracking the plate.
Restoring Power And Testing
Restoring power and testing the bathroom light switch is the final step in your project. This part ensures everything works safely and correctly. You must follow the steps carefully to avoid any electrical issues.
First, turn the power back on at the circuit breaker. Then test the switch to check if the light turns on and off smoothly. Proper testing confirms the switch is installed right.
Turning The Power Back On
Go to your home’s electrical panel. Find the breaker that controls the bathroom light. Flip the switch back to the ON position. This restores electricity to the light switch circuit.
Be careful. Make sure your hands are dry. Avoid touching any wires or metal parts during this process.
Testing The Light Switch
Return to the bathroom light switch. Flip the switch ON and OFF several times. The bathroom light should respond immediately each time.
If the light does not turn on, double-check your wiring connections. Loose wires can cause problems. Tighten all screws and ensure wires are secure.
Checking For Safety
Look for any sparks, flickering, or unusual sounds from the switch. These signs may indicate a problem. If you notice anything strange, turn off the power again.
Use a voltage tester to confirm no current flows when the switch is off. This step helps prevent electrical shocks later.
Troubleshooting Common Issues
Troubleshooting common issues helps fix problems fast. Changing a bathroom light switch may seem simple. Yet, issues can still arise. Knowing how to spot and solve these problems saves time and effort.
Start by checking the basics. Power off the circuit to stay safe. Use a tester to ensure no electricity flows. This step avoids shocks and damage.
Checking For A Loose Connection
Loose wires cause flickering or no light at all. Gently pull the wires to test tightness. Tighten any loose screws on the switch terminals. Secure connections improve switch performance and safety.
Testing The Switch Functionality
Sometimes the switch itself is faulty. Use a multimeter to check continuity. No continuity means the switch needs replacement. A good switch completes the circuit to power the light.
Inspecting The Circuit Breaker
Tripped breakers cut power to the switch. Look at the breaker box for any switches in the off position. Flip the breaker back on if it tripped. A breaker that keeps tripping indicates electrical issues.
Verifying The Light Fixture
The problem might be the light fixture, not the switch. Test the fixture by connecting it to a different power source. Replace bulbs or fixtures that don’t work. Faulty fixtures can mimic switch problems.

Credit: www.reddit.com
Frequently Asked Questions
How Do I Safely Turn Off Power Before Changing A Switch?
Turn off the bathroom circuit breaker to cut power. Use a voltage tester to confirm the switch is off. This prevents electrical shocks during replacement and ensures your safety.
What Tools Are Needed To Replace A Bathroom Light Switch?
You’ll need a screwdriver, voltage tester, wire stripper, and replacement switch. These tools help you remove the old switch and install the new one safely and correctly.
Can I Replace A Bathroom Light Switch Myself?
Yes, if you follow safety steps and have basic electrical knowledge. Always turn off power and test wires before starting. If unsure, consult a professional electrician.
How Do I Identify Wires On A Bathroom Light Switch?
Look for black (hot), white (neutral), and green or bare (ground) wires. The hot wire connects to the switch’s brass terminal. Proper identification ensures correct installation and safety.
Conclusion
Changing a bathroom light switch can be simple and safe. Always turn off the power first. Use the right tools and follow each step carefully. Double-check your work before turning the power back on. This small task can save money and give you confidence.
Take your time and stay safe. Now, your bathroom light switch works just like new!