Are you tired of fumbling for a light switch in the dark? Imagine controlling your lights from two different spots—like at the top and bottom of the stairs—without any hassle.
Connecting a 2 way light switch can make this possible, giving you convenience and control right at your fingertips. In this guide, you’ll discover simple, clear steps to set it up yourself, even if you’re not an expert. By the end, you’ll have the confidence to install a 2 way light switch and transform how you light up your home.
Ready to make your space smarter and more functional? Let’s get started!
Tools And Materials Needed
Connecting a 2-way light switch requires specific tools and materials. Having the right items makes the work safer and easier. Prepare everything before starting your project. This saves time and avoids mistakes.
Essential Tools
A few basic tools help complete the wiring task. A screwdriver is needed to open switch boxes and tighten screws. Wire strippers remove insulation from wires without damage. A voltage tester checks if wires have power, ensuring safety. Pliers help bend and hold wires firmly. A drill may be necessary for mounting switch boxes or screws.
Required Materials
Two 2-way light switches are the main parts for this setup. Electrical wires connect switches and the light fixture. Use wires with the correct gauge for your home wiring. Wire connectors secure wire connections safely. Electrical tape insulates exposed wires and prevents shorts. Switch boxes hold switches firmly and protect wiring connections.
Safety Equipment
Safety gear protects you during electrical work. Insulated gloves reduce the risk of electric shock. Safety goggles protect eyes from dust and debris. A flashlight helps see inside dark switch boxes. Always turn off power before starting any electrical work.
Safety Precautions
Working with electrical wiring needs care and attention. Safety must come first when connecting a 2-way light switch. Taking the right steps can prevent accidents and damage. This section covers key safety tips to protect you and your home during installation.
Turn Off The Power
Always switch off power at the circuit breaker. Do not rely on the wall switch alone. Use a voltage tester to check that wires are not live. This step stops electric shocks and injuries.
Use Proper Tools
Choose insulated tools designed for electrical work. Avoid using damaged or worn-out equipment. Proper tools help you work safely and efficiently without risks.
Wear Safety Gear
Wear rubber-soled shoes and safety glasses. These protect you from shocks and flying debris. Gloves can protect hands but avoid thick ones that reduce finger feeling.
Follow Wiring Diagrams
Use clear, correct wiring diagrams for your switch type. Incorrect wiring can cause short circuits or fires. Double-check connections before turning power back on.
Work In A Dry Area
Keep your work area dry and well-lit. Water and electricity create dangerous conditions. A dry space lowers the chance of accidents.
Do Not Rush
Take your time and stay focused. Rushing causes mistakes and hazards. Plan each step carefully for a safe installation.
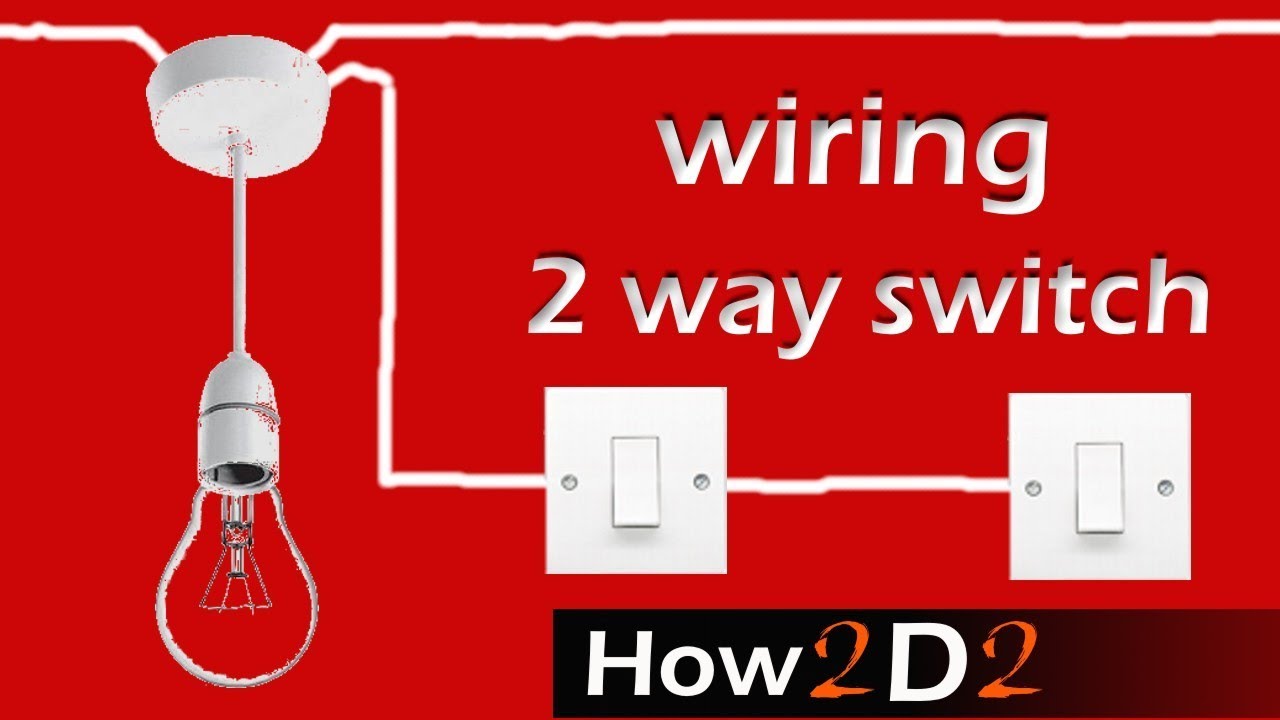
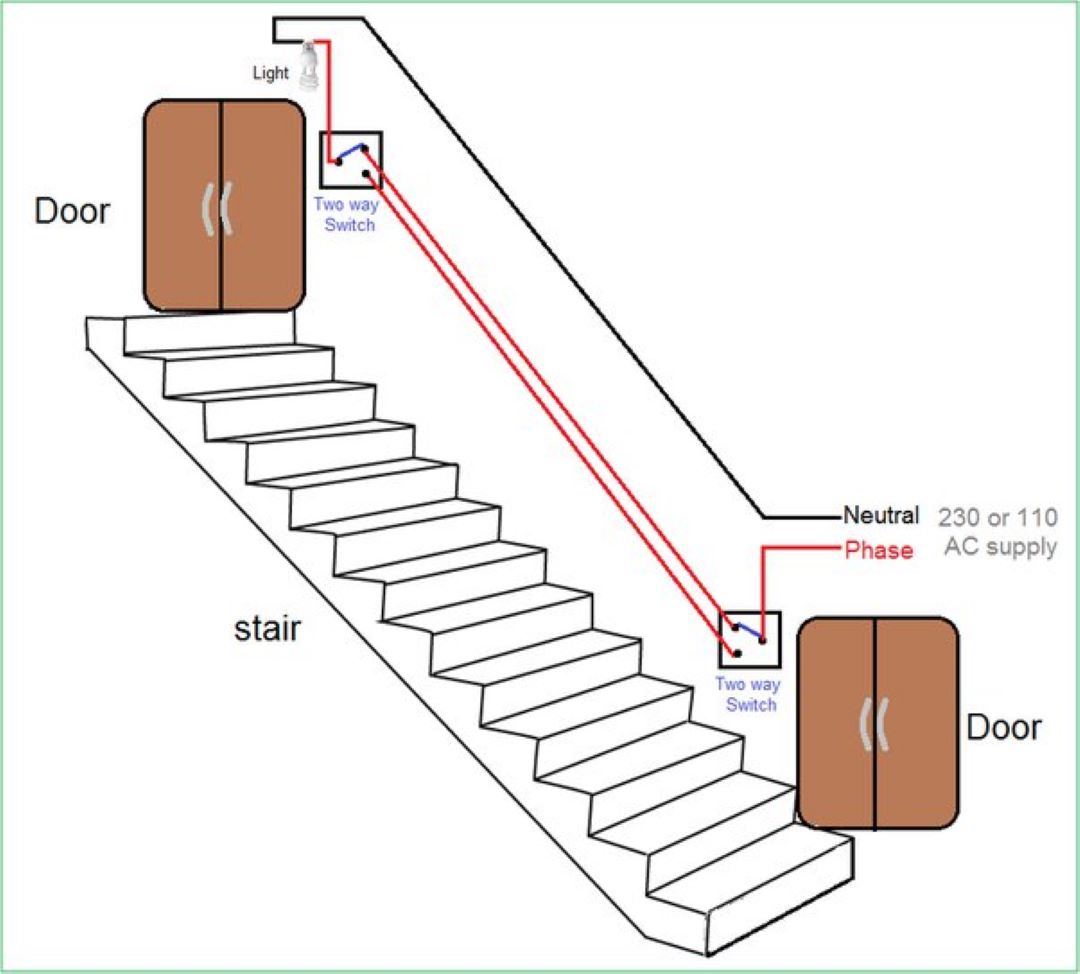
How Two-way Switches Work
Two-way switches control one light from two different places. This setup is common in hallways, stairs, and large rooms. It lets you turn the light on or off from either switch.
The switches are connected by wires that carry electricity. Each switch can change the path of the electric current. This change controls whether the light is on or off.
Basic Components Of Two-way Switches
Two-way switches have three terminals. One terminal is the common terminal. The other two are called traveler terminals. Wires connect these terminals between the two switches.
How Electricity Flows In Two-way Switches
Electricity flows through the common terminal. It travels to one of the two traveler terminals. Depending on the switch position, the current reaches the light or stops.
Switch Positions And Light Control
Each switch has two positions. Changing a switch flips the current path. This action either turns the light on or off from either switch.
Credit: www.youtube.com
Identify Wires In Your Setup
Identifying wires is a key step in connecting a 2 way light switch. You must know which wire does what. This helps avoid mistakes and keeps you safe.
Wires come in different colors and types. Each color has a role in your lighting circuit. Understanding these roles makes your work easier and more accurate.
Types Of Wires In A 2 Way Switch Setup
Usually, you will find live, neutral, and earth wires. Live wires carry current to the switch. Neutral wires complete the circuit. Earth wires protect from electric shocks.
How To Identify Wire Colors
Look for standard colors. Brown or red is often live. Blue is usually neutral. Green or yellow-green means earth. Check local rules as colors may vary.
Using A Voltage Tester Safely
A voltage tester helps confirm live wires. Turn off power first. Then test each wire one by one. Only touch insulated parts to stay safe.
Labeling Wires For Easy Connection
Mark each wire after identification. Use tape or labels. This avoids confusion when connecting switches. Clear labels save time and reduce errors.
Turn Off Power Supply
Turning off the power supply is the first and most important step before working on a two-way light switch. It keeps you safe from electric shocks. Never start any electrical work without cutting off the electricity first.
Electricity flows through wires even when switches are off. The main power source must be switched off to stop this flow. This step protects you and your home from accidents.
Locate The Main Circuit Breaker
Find the main circuit breaker in your home. It is usually in the electrical panel or fuse box. The panel is often in the basement, garage, or utility room. Look for a box with switches inside.
Turn Off The Correct Breaker
Identify the breaker that controls the light switch circuit. Switch it to the “off” position. If unsure, turn off the main breaker to cut power to the whole house. This ensures full safety.
Verify Power Is Off
Use a voltage tester or a simple lamp to check the power. Test the wires or the light fixture to confirm no electricity flows. If the tester shows no power, it is safe to proceed.
Wear Safety Gear
Use insulated gloves and safety glasses. They add extra protection while working with electrical parts. Even with power off, safety gear helps prevent injury.
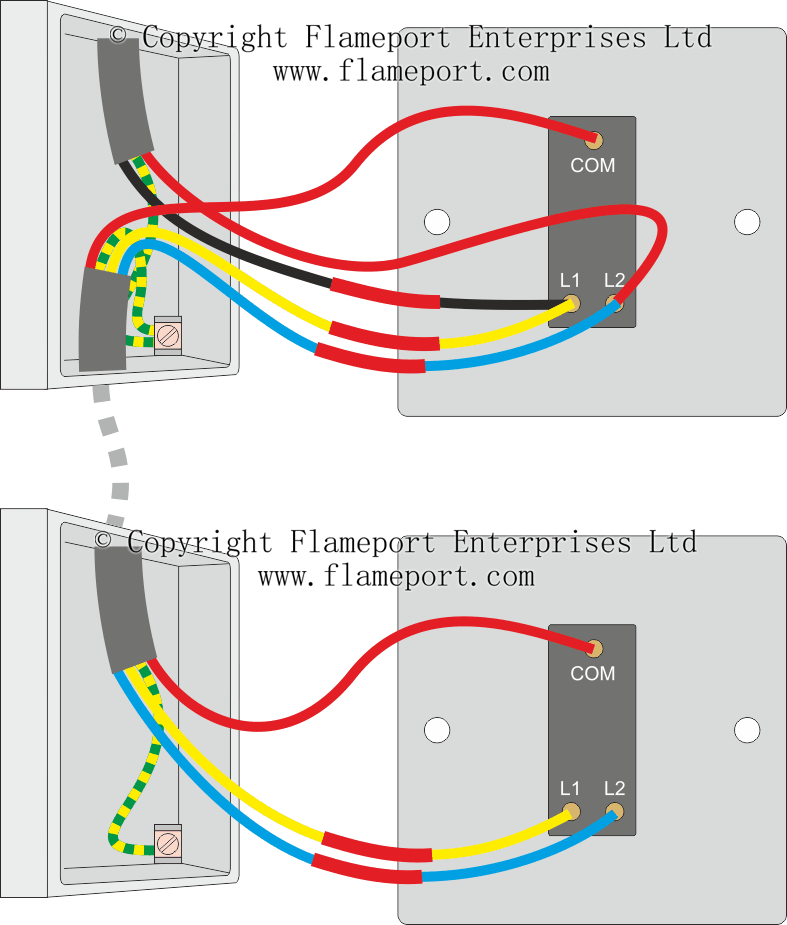
Credit: flameport.com
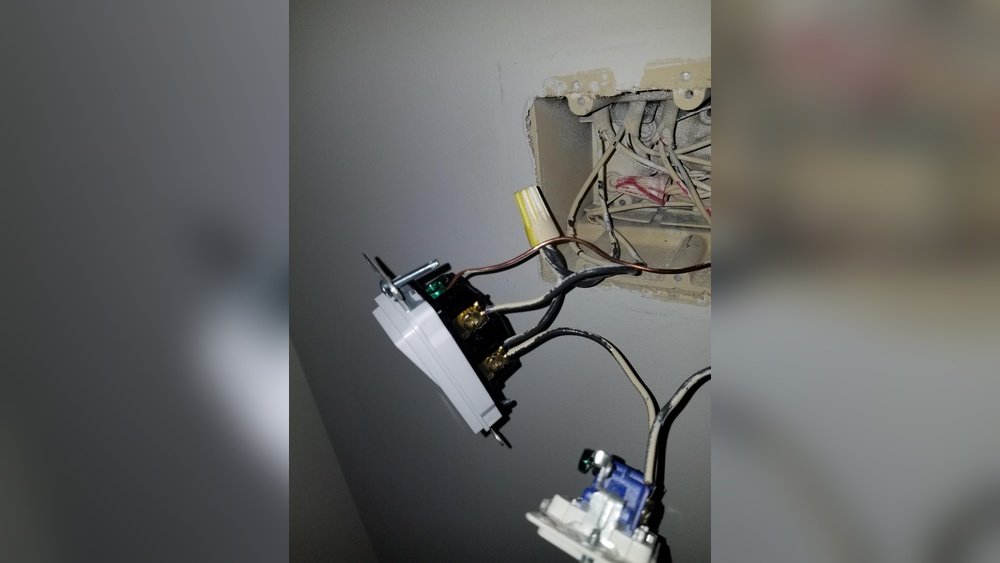
Wiring The First Switch
Wiring the first switch is the first step to connect a two-way light switch. This switch controls the light from one location. Understanding its wiring is key to making the system work.
The first switch has three terminals. These are called common, L1, and L2. Each terminal has a specific wire connection. Knowing which wire goes where is important for safety and function.
Identify The Wires
Look for three wires inside the switch box. One is the live wire. It carries power to the switch. The other two are traveler wires. They connect the first switch to the second switch.
The live wire usually has a black or brown color. Traveler wires can be red, black, or other colors. Use a voltage tester to find the live wire before you start.
Connect The Live Wire To The Common Terminal
Attach the live wire to the common terminal on the first switch. This terminal is often marked as “COM” or colored differently. Tighten the screw to secure the wire firmly.
Make sure there is no loose wire. Loose connections can cause sparks or the switch to fail. Double-check the connection before moving forward.
Attach The Traveler Wires To L1 And L2
Connect the two traveler wires to the L1 and L2 terminals on the switch. These terminals control the path of electricity between switches. It does not matter which traveler goes to L1 or L2.
Secure each wire tightly under the screws. Ensure no copper wire is exposed outside the terminal. This prevents short circuits and keeps the wiring safe.
Wiring The Second Switch
Wiring the second switch is a key step in setting up a two-way light switch. This step allows you to control the same light from two different locations. The process may seem tricky, but following clear steps makes it simple.
The second switch connects to the first one through traveler wires. These wires carry current back and forth between switches. Understanding the wiring layout helps avoid mistakes and ensures safety.
Identify The Traveler Wires
First, find the traveler wires coming from the first switch. These wires usually have the same color and connect both switches. Mark or remember these wires to avoid confusion.
Connect The Traveler Wires To The Second Switch
Attach the traveler wires to the traveler terminals on the second switch. These terminals are often labeled or colored differently. Tighten screws firmly to secure the wires and maintain good contact.
Connect The Common Terminal
Locate the common terminal on the second switch. Connect the wire that leads to the light fixture here. This terminal controls the power flow to the light.
Attach The Ground Wire
Connect the ground wire to the grounding screw on the switch. This step is important for safety. The ground wire is usually green or bare copper.
Check All Connections
Double-check every connection for tightness and correctness. Loose wires can cause the switch to fail or create hazards. Use a tester to verify proper wiring.
Connecting The Light Fixture
Connecting the light fixture is a key step in setting up a 2 way light switch. This step ensures that the light turns on and off from two different switches. The wiring must be done correctly to avoid any electrical issues or malfunction.
First, identify the wires coming from the ceiling or wall box where the fixture will be installed. Usually, there are three types of wires: live (hot), neutral, and ground. Knowing each wire helps make the connection safe and proper.
Preparing The Light Fixture Wires
Strip about half an inch of insulation from the fixture wires. This exposes the copper that connects to the house wiring. Twist the wire ends to keep them neat. Check if the fixture has clear markings for live, neutral, and ground wires.
Connecting Live And Neutral Wires
Attach the fixture’s live wire to the live wire in the ceiling box. Use a wire connector (wire nut) to secure the connection. Repeat the process for the neutral wires. Make sure the connections are tight and no copper is exposed.
Attaching The Ground Wire
Connect the ground wire from the fixture to the ground wire in the ceiling box. The ground wire is usually green or bare copper. This step is important for safety and helps prevent electric shocks.
Securing The Fixture
Once all wires are connected, tuck them carefully into the box. Mount the light fixture according to the manufacturer’s instructions. Use screws to hold it firmly in place. Ensure the fixture is stable and level before finishing.
Testing The Setup
Testing the setup is a crucial step after wiring a 2 way light switch. It confirms the switches work correctly. It also ensures safety before final use.
Test each switch carefully and look for any wiring errors. This process helps avoid future problems with the lighting system.
Testing The Power Supply
Turn on the main power supply. Check if the switches get electricity. Use a voltage tester for safety. If no power, stop and check wiring again.
Checking Switch Operation
Flip the first switch. The light should turn on or off. Then flip the second switch. The light should respond again. Both switches control the light independently.
Verifying Wiring Connections
If the light does not work, check connections. Make sure wires are tight and in correct terminals. Loose wires cause failure. Correct any mistakes and retest.
Testing For Safety
Look for sparks or unusual sounds. These signs show a wiring problem. Turn off power immediately. Fix the issue before using the switches again.
Troubleshooting Common Issues
Troubleshooting common issues in a 2 way light switch setup saves time and effort. Electrical wiring can be tricky. Small mistakes cause the switch not to work properly. Most problems have simple fixes. Understanding these fixes helps solve problems quickly. This section covers frequent issues and easy steps to fix them.
Check For Loose Connections
Loose wires often cause a 2 way switch to fail. Turn off the power before checking. Use a screwdriver to tighten all terminal screws. Make sure wires are firmly connected. Loose connections can cause flickering or no light.
Verify Correct Wire Placement
Wires must connect to the right terminals. Each switch has common, L1, and L2 terminals. Swap wires if the light does not switch correctly. Refer to the wiring diagram for your switch model. Correct placement ensures smooth operation between switches.
Test The Switches Individually
One faulty switch can break the circuit. Use a voltage tester or multimeter to check each switch. Turn off power before testing. Replace any switch that does not show proper continuity. Testing each switch isolates the problem quickly.
Inspect The Light Bulb And Fixture
Sometimes the issue is the bulb or fixture. Test the bulb in another socket. Check the fixture for damage or loose parts. Replace the bulb or repair the fixture if needed. Ensure the bulb matches the fixture’s requirements.
Check The Circuit Breaker
A tripped breaker can stop the light from working. Locate your home’s breaker panel. Reset any breaker that has switched off. If it trips again, call a professional electrician. The breaker protects your home from electrical faults.
Tips For A Professional Finish
Achieving a clean and professional finish when connecting a 2 way light switch improves safety and appearance. Small details make a big difference. Simple steps help avoid common mistakes and ensure the wiring looks neat and works well.
Follow these tips to create a tidy setup that lasts longer and stays safe. A careful approach shows in the final result.
Use The Right Tools
Choose quality screwdrivers, wire strippers, and testers. Proper tools make work easier and more precise. Avoid using damaged or worn-out equipment for safety.
Strip Wires Correctly
Strip only the needed length of insulation. Too much or too little exposed wire causes loose connections or shorts. Keep the wire ends neat and straight.
Secure Connections Firmly
Tighten screws until wires do not move but do not overtighten. Loose connections lead to flickering lights. Over-tightening may damage wires or terminals.
Organize Wires Inside The Box
Arrange wires flat and avoid crossing them. Use cable ties if needed. This prevents strain and keeps the box easy to close.
Test Before Closing
Use a voltage tester or multimeter to check connections. Confirm the switches control the light properly. Fix any issues before putting the cover plate back.
Use Proper Cover Plates
Select cover plates that fit well and match the switch size. Tighten screws evenly to avoid gaps. Clean the plate for a polished look.
Credit: www.litoelectrical.com
Frequently Asked Questions
What Is A 2 Way Light Switch?
A 2 way light switch controls a light from two different locations. It is commonly used in hallways or staircases for convenience and flexibility.
How Do I Wire A 2 Way Light Switch?
To wire a 2 way switch, connect the live wire to the common terminal. Then, link the traveler terminals between both switches to control the light.
Can I Replace A 1 Way Switch With A 2 Way Switch?
Yes, but you must add a second switch and run traveler wires. This allows control of the same light from two locations.
What Tools Are Needed To Connect A 2 Way Light Switch?
You need a screwdriver, wire stripper, voltage tester, electrical tape, and appropriate cables. Always turn off power before starting any wiring work.
Conclusion
Connecting a 2 way light switch can seem tricky at first. Take your time and follow each step carefully. Double-check your wiring before turning on the power. Safety always comes first during any electrical work. With patience, you can control lights from two places easily.
This setup adds convenience to your home lighting. Practice makes perfect, so don’t rush the process. Soon, you’ll feel confident handling simple electrical tasks yourself.