Looking for a simple way to add personality and style to your home? Decorating your light switch covers is an easy and affordable trick that can transform any room instantly.
You might overlook these small details, but they hold the power to make your space feel more inviting and unique. You’ll discover fun and creative ideas to turn plain switch covers into eye-catching accents. Get ready to give your walls a fresh new look with just a few simple steps!
Credit: www.homedit.com
Choosing The Right Covers
Choosing the right light switch covers is key to enhancing your room’s look. These small details can change the feel of any space. Picking covers that fit well and match your style makes decorating easier.
Materials And Finishes
Light switch covers come in many materials. Plastic is common and easy to clean. Metal covers offer a sleek, modern look. Wood adds warmth and charm to rooms. Choose finishes like matte, glossy, or brushed to fit your taste. The material affects durability and style.
Sizes And Shapes
Switch covers come in different sizes. Single covers fit one switch. Double or triple covers hold two or three switches. Shapes vary from square to rounded edges. Measure your switches before buying covers. Proper size ensures a neat, secure fit on your wall.
Matching Your Decor Style
Pick covers that match your room’s design. Simple white covers work in modern and classic spaces. Bright colors add fun to kids’ rooms. Vintage or decorative covers fit traditional styles. Match covers to wall color or contrast for a bold look. This small choice boosts the whole room’s style.
Painting Techniques
Painting light switch covers is an easy way to add style to any room. Simple techniques can change plain covers into unique art pieces. Choose your favorite colors and styles. Use painting to reflect your personality and home decor. This guide shows three easy painting methods for light switch covers.
Using Stencils And Patterns
Stencils help create neat, repeatable designs. Place a stencil on the cover. Use a small sponge or brush to apply paint. Light dabbing works best to avoid smudging. Let the paint dry before removing the stencil. Patterns like stars, flowers, or geometric shapes look great. Stencils save time and make painting simple for beginners.
Hand-painting Designs
Hand-painting allows full creative freedom. Use fine brushes for small details. Start with a base coat of paint. Draw your design lightly with a pencil first. Paint over the pencil lines carefully. Popular ideas include flowers, animals, or abstract shapes. Hand-painting adds a personal touch to your switch covers.
Spray Painting Tips
Spray paint gives a smooth, even finish. Work outdoors or in a well-ventilated space. Lay the cover flat on newspaper or cardboard. Hold the spray can about 8 inches away. Apply thin coats to avoid drips. Let each coat dry before adding the next. Use painter’s tape to create sharp lines or blocks of color.
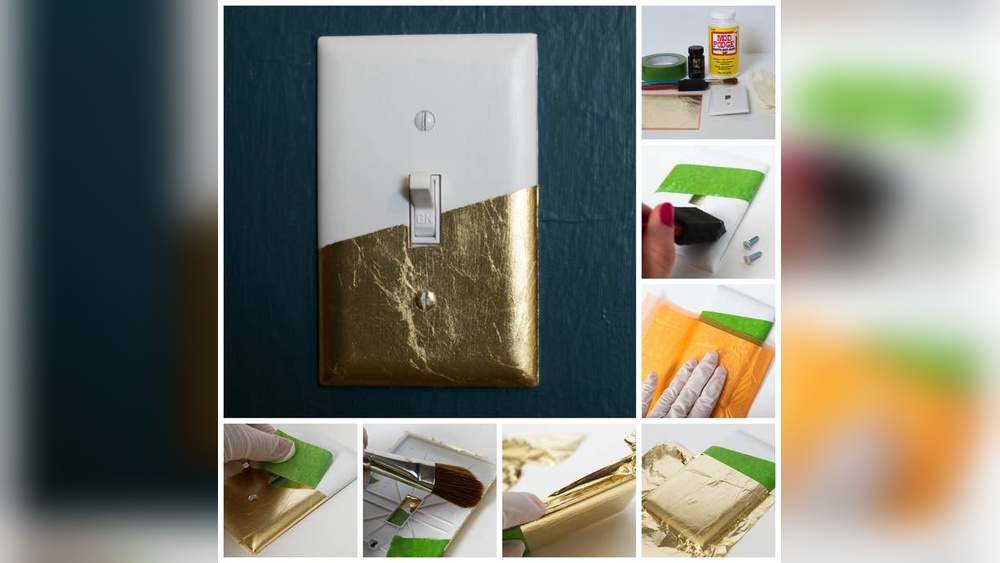
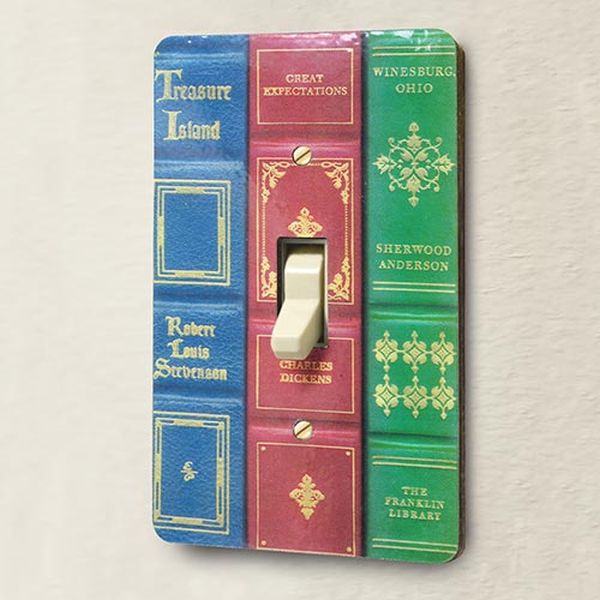
Decoupage And Collage Ideas
Decoupage and collage offer creative ways to decorate light switch covers. These techniques use paper and fabric pieces to add color and texture. They turn plain covers into art pieces that brighten any room. This method is simple and fun, perfect for all skill levels.
Selecting Papers And Fabrics
Choose papers and fabrics with interesting patterns. Scrapbook paper, old book pages, and magazine cutouts work well. Use lightweight fabrics like cotton or linen. Pick colors that match your room’s style. Avoid thick materials that are hard to glue. Cut shapes and sizes that fit the cover.
Applying Glue And Sealants
Use a decoupage glue or white craft glue for sticking. Apply a thin, even layer on the cover surface. Place the paper or fabric carefully to avoid wrinkles. Smooth out air bubbles gently with a soft brush or fingers. Once dry, add a sealant to protect the design. A clear acrylic spray or brush-on varnish works well. Let it dry completely for lasting results.
Creating Themed Designs
Pick themes that suit the room or season. Floral patterns brighten living rooms. Geometric shapes fit modern spaces. Vintage prints add charm to bedrooms. Holiday themes create festive moods. Mix different papers and fabrics to build layers. Use small embellishments like buttons or ribbons for extra touch. Keep the design balanced and neat for best effect.
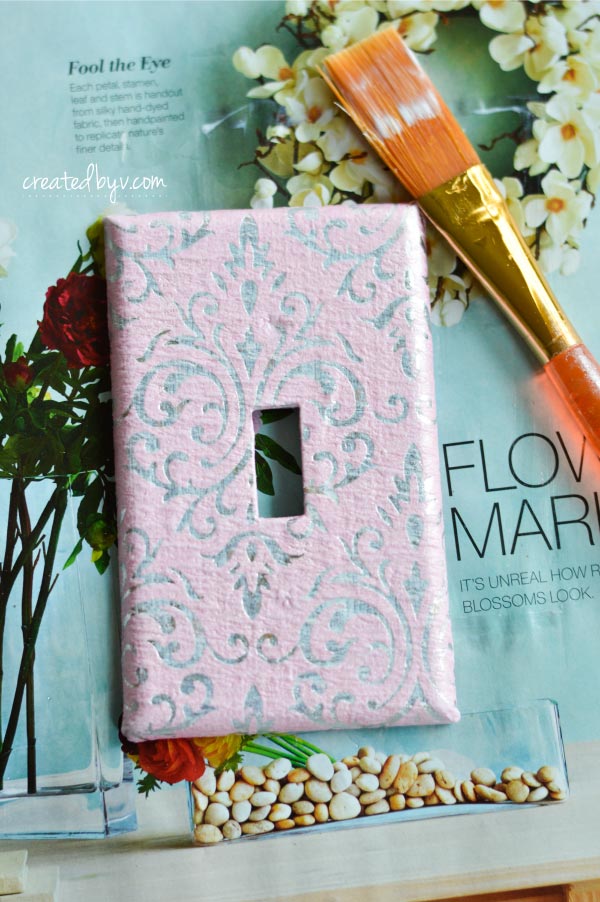
Credit: createdbyv.com
Adding Texture And Embellishments
Adding texture and embellishments to light switch covers creates a unique, tactile look. It transforms plain covers into stylish accents. Simple materials can give a cover charm and character. Small touches make a big visual impact. These ideas fit any room style and are easy to do.
Using Beads And Rhinestones
Beads and rhinestones add sparkle and depth. Choose colors that match your room’s theme. Glue them in patterns or random designs. Use small beads for a delicate look. Larger rhinestones create a bold, eye-catching style. These shiny elements reflect light and brighten the space.
Attaching Fabric Or Lace
Fabric and lace bring softness and texture. Cut fabric to fit the cover size. Use glue or double-sided tape to attach it smoothly. Lace adds a vintage or romantic touch. Patterns like floral or geometric enhance visual interest. Fabric also offers endless color and design choices.
Incorporating Natural Elements
Natural items add warmth and earthiness. Small twigs, dried flowers, or pressed leaves work well. Attach them carefully with strong glue. These elements create a rustic or boho vibe. Natural textures contrast nicely with smooth switch covers. This style connects indoor spaces with nature.
Using Wallpaper And Contact Paper
Using wallpaper and contact paper is a simple way to decorate light switch covers. These materials come in many colors and patterns. They can give plain switch covers a fresh, new look. Both wallpaper and contact paper are easy to work with and affordable.
This method lets you match the switch covers to your room’s style. You can choose subtle designs or bold prints. It is a fun project that anyone can do in a short time.
Cutting And Fitting Techniques
Start by removing the switch cover from the wall. Measure the cover’s size carefully. Cut the wallpaper or contact paper slightly larger than the cover. This extra size helps when wrapping edges.
Place the paper face down on a flat surface. Lay the cover on top, backside up. Trim the paper to fit around the screw holes. Use a sharp craft knife or scissors for clean edges. Wrap the paper edges around the cover and secure them.
Choosing Patterns For Impact
Pick patterns that match your room’s style. Small prints work well for tiny covers. Large patterns can create a bold look. Stripes or geometric shapes add modern flair. Floral designs bring softness and charm.
Use colors that stand out against the wall. Contrast draws attention to the switch cover. Or choose tones that blend in for a subtle effect. The pattern choice sets the mood of the space.
Protecting The Finish
Seal the paper with a clear acrylic spray or decoupage glue. This protects from dirt and moisture. Apply thin, even coats and let each dry well. Avoid thick layers that can bubble or peel.
Sealing keeps the paper smooth and shiny. It also makes cleaning easy. Use a soft cloth to wipe the covers gently. Proper protection helps the design last longer.
Creative Diy Ideas
Decorating light switch covers is a fun way to add personality to any room. Creative DIY ideas let you customize covers with simple tools and materials. These projects are easy and affordable, perfect for beginners and experienced crafters alike.
Mini Chalkboard Covers
Mini chalkboard covers turn your light switch into a tiny message board. Paint the cover with chalkboard paint and let it dry. Use chalk to write notes, reminders, or doodles. This idea works well in kitchens, offices, or kids’ rooms. It adds a playful and practical touch.
Magnetic Switch Covers
Magnetic switch covers hold small metal objects like paper clips or notes. Attach thin magnetic sheets to the cover’s surface. You can easily stick and remove items as needed. This design helps keep tiny items organized and close at hand. It fits well in workspaces and craft rooms.
Upcycling Old Materials
Upcycling old materials gives new life to switch covers. Use scraps of fabric, wallpaper, or even old maps. Cut the material to fit the cover and glue it on securely. Seal with clear varnish for durability. This method saves money and reduces waste while creating unique designs.
Maintenance And Care Tips
Keeping your decorated light switch covers looking fresh takes simple care. Proper maintenance helps your designs last longer. Follow easy steps to clean, touch up, and replace covers safely. These tips keep your switches neat and stylish.
Cleaning Different Materials
Clean covers gently to avoid damage. Use a soft cloth or sponge. For plastic covers, mild soap and water work well. Avoid harsh chemicals that can fade colors or ruin paint. Wood covers need a dry or slightly damp cloth. Avoid soaking wood to stop warping. For metal covers, use a damp cloth and dry immediately. Regular dusting prevents buildup and keeps decorations clear.
Touching Up Paint And Decorations
Small chips or scratches happen over time. Keep matching paint or markers on hand. Lightly sand rough spots before repainting. Apply thin layers of paint to match the original color. For stickers or decals, replace any that peel or fade. Use clear sealant spray to protect hand-painted designs. This step keeps your covers looking new.
Replacing Covers Safely
Turn off power before removing covers. Use a screwdriver that fits screws well. Remove screws slowly to avoid stripping. Check that new covers fit properly and do not block switches. Tighten screws just enough to hold covers firmly. Avoid overtightening, which can crack the cover. Restoring covers safely protects your home and your art.

Credit: www.youtube.com
Frequently Asked Questions
How Can I Decorate Light Switch Covers Easily?
You can decorate light switch covers using paint, washi tape, or decorative stickers. These methods are quick, affordable, and customizable. Choose colors or patterns that match your room’s theme. Seal with a clear coat for durability and a polished look.
What Materials Work Best For Decorating Switch Covers?
Acrylic paint, adhesive vinyl, and decoupage paper work best for decorating switch covers. These materials stick well, are easy to apply, and offer vibrant designs. Avoid water-based markers as they may fade or smudge over time.
Can I Use Fabric To Cover Light Switch Plates?
Yes, fabric can be used to cover light switch plates using decoupage glue or spray adhesive. Choose lightweight fabric and smooth out wrinkles carefully. Seal with a clear coat to protect the fabric and ensure long-lasting decoration.
How Do I Remove Old Paint From Switch Covers Safely?
Remove old paint by soaking switch covers in warm soapy water, then gently scrubbing with a soft brush. For stubborn paint, use a mild paint remover or rubbing alcohol. Always wear gloves and work in a well-ventilated area.
Conclusion
Decorating light switch covers adds charm to any room. It is a simple way to show your style. Use paint, stickers, or fabric to create unique designs. Changing covers often can refresh your space easily. Small details like these make a big difference.
Try different ideas and enjoy your creative work. Your home will feel more inviting and personal. Keep experimenting and have fun with each project.