Are you looking to install or replace a single pole light switch but don’t know where to start? You’re not alone.
Connecting a single pole switch might seem tricky at first, but with the right steps, you can do it safely and confidently. Imagine controlling your lights with ease, saving on electrician costs, and gaining a new skill you’ll use again and again.
In this guide, you’ll discover simple, clear instructions that take the guesswork out of wiring your switch. Keep reading—you’re just moments away from mastering a basic home improvement task that makes a big difference.
Tools And Materials Needed
Connecting a single pole light switch requires some basic tools and materials. Having the right items makes the job easier and safer. You will save time and avoid mistakes by preparing ahead.
Below is a list of essential tools and materials. Each plays a specific role in the installation process. Gather them before starting your project.
Tools Needed
- Flathead screwdriver for removing switch plate and screws
- Phillips screwdriver for securing the switch
- Wire stripper to remove insulation from wires
- Voltage tester to check if wires carry electricity
- Needle-nose pliers for bending and holding wires
- Electrical tape to insulate wire connections
Materials Needed
- Single pole light switch
- Wire nuts for safe wire connections
- Electrical box if replacing or installing a new switch
- Wire connectors to join wires securely
- Light fixture compatible with the switch
:max_bytes(150000):strip_icc()/how-to-wire-and-install-single-pole-switches-1152330-05-2de77af170364a6fb3846f30634a5cd3.jpg)
Credit: www.thespruce.com
Safety First
Safety is the top priority before starting any electrical work. Connecting a single pole light switch involves working with electricity. A small mistake can cause shock or fire. Take all precautions to protect yourself and others.
Always turn off the power at the circuit breaker. Do not trust the light switch’s off position alone. Use a voltage tester to confirm no electricity flows to the wires. This step is crucial to avoid electric shock.
Wear insulated gloves and use tools with insulated handles. Keep your hands dry while working. Avoid standing on wet surfaces. Electricity and water are a dangerous mix. Safety gear reduces risk.
Work in a well-lit area. Clear the workspace of clutter to avoid accidents. If unsure about any step, consult a professional electrician. Safety matters more than saving time or money.
Turn Off Power At Circuit Breaker
Locate your home’s circuit breaker panel. Find the switch controlling the light circuit. Flip it to the off position. Confirm the power is off using a voltage tester on the wires.
Use A Voltage Tester
Voltage testers detect electrical current safely. Touch the tester to each wire connected to the switch. No reading means no power. Do this test twice before touching wires.
Wear Safety Gear
Insulated gloves protect against shocks. Tools with insulated handles prevent current flow. Wear shoes with rubber soles. These simple steps keep you safe.
Work In A Safe Environment
Clear the area around the switch. Remove any liquids and debris. Good lighting helps you see wires clearly. Stay alert and focused during the task.
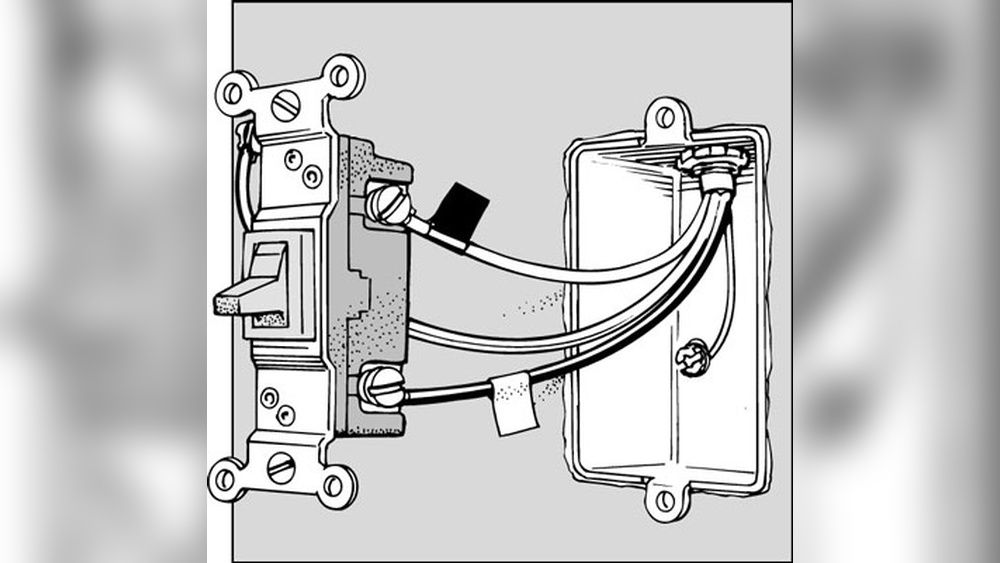
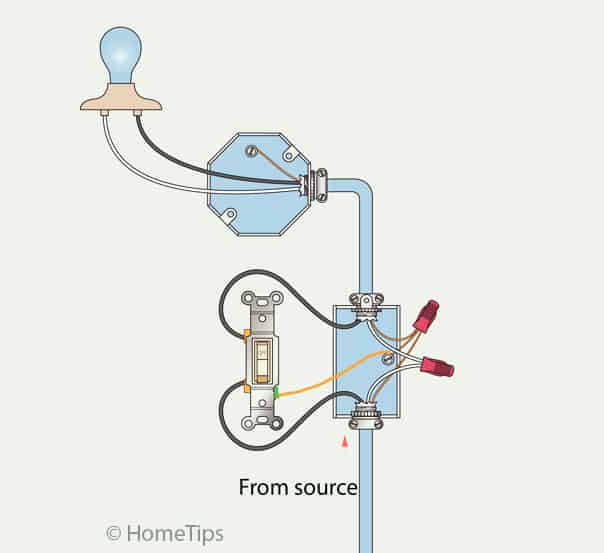
Identify The Wires
Before you connect a single pole light switch, identifying the wires is important. Each wire has a specific job in the switch’s function. Knowing which wire is which helps you connect safely and correctly. You will usually find three types of wires: hot, load, and ground. Understanding these wires makes the installation easier and safer.
Hot Wire
The hot wire carries electricity from the power source. It is usually black or red. This wire connects to the switch to control the light. Always handle the hot wire with care. It can cause electric shock if touched while live.
Load Wire
The load wire goes from the switch to the light fixture. It carries electricity to the light when the switch is on. This wire is often black or red, like the hot wire. It is important to connect the load wire correctly to make the light work.
Ground Wire
The ground wire is a safety wire. It is usually green or bare copper. This wire prevents electric shock by directing electricity to the ground. Always connect the ground wire to the switch’s grounding screw or metal box. It protects you and your home.
Credit: www.finehomebuilding.com
Turn Off The Power
Turning off the power is the first and most important step. It keeps you safe from electric shocks. Before starting any work on a light switch, make sure the electricity is completely off.
Electricity can cause serious injury or even death. Never skip this step. It protects you and your home.
Locate The Circuit Breaker
Find the main electrical panel in your house. It is usually in the basement, garage, or utility room. Open the panel door to see the breakers.
Each breaker controls power to a different part of the house. Look for the one labeled for the room or area with the light switch.
Switch Off The Correct Breaker
Flip the breaker switch to the OFF position. This stops electricity from flowing to the switch and light fixture. Double-check by moving the switch on and off. The light should not turn on.
Use A Voltage Tester
Test the wires with a voltage tester. This tool shows if electricity is still present. Touch the tester to the wires connected to the switch.
If the tester shows no voltage, the power is off. If it shows voltage, turn off the breaker again or check another breaker.
Confirm Safety Before You Start
Always assume wires are live until tested. Take time to be sure power is off. Safety first. Only then begin connecting your single pole light switch.
Remove The Old Switch
Removing the old switch is the first step to connect a single pole light switch. It is important to do this safely and carefully. This process helps prepare the wiring for the new switch installation. Follow these steps to remove the old switch properly.
Start by switching off the power at the circuit breaker. This stops electricity from flowing to the switch. Use a voltage tester to make sure the power is off. Safety comes first to avoid electric shock.
Remove The Switch Cover Plate
Use a screwdriver to take off the cover plate. This exposes the switch and wires. Keep the screws safe to use later. The cover plate is usually held by one or two screws.
Unscrew The Old Switch
Next, unscrew the old switch from the wall box. Pull the switch out gently to see the wires. Keep the wires connected until you are ready to work on them.
Note The Wire Connections
Look carefully at how the wires connect to the switch. Usually, two wires are attached to the terminals. Remember or mark their positions. This helps connect the new switch correctly.
Disconnect The Wires
Loosen the screws on the terminals to free the wires. Pull the wires off the switch carefully. Avoid damaging the wire ends. Now the old switch is ready to be removed.
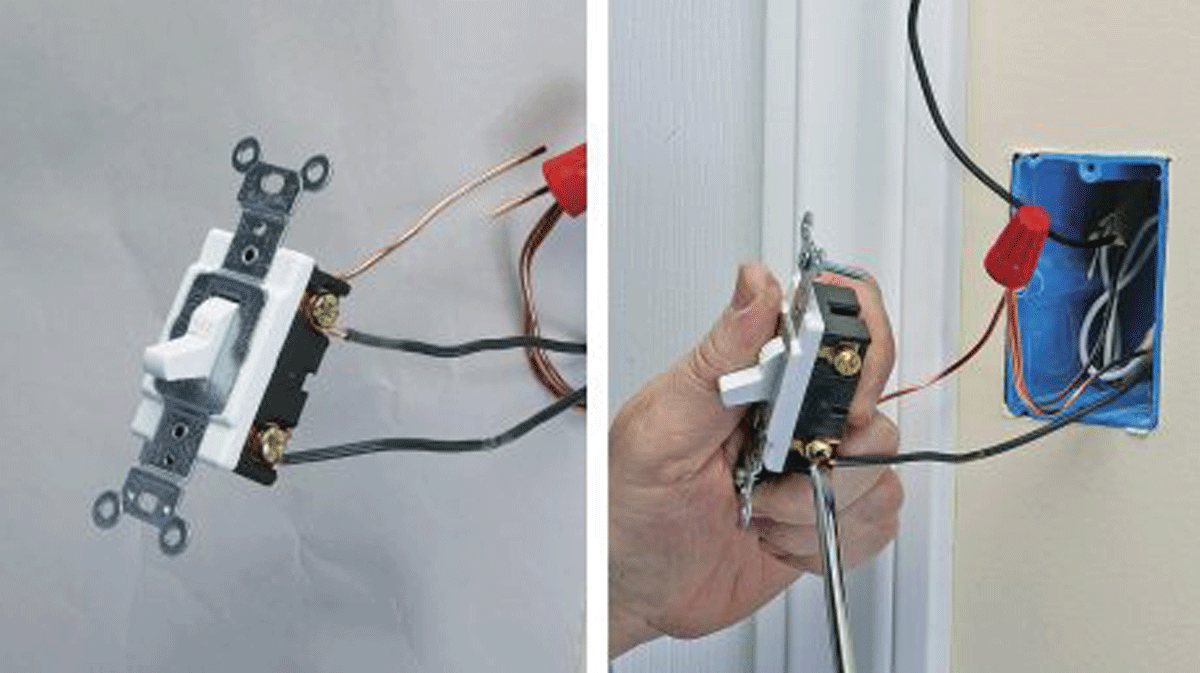
Connect The New Switch
Connecting a new single pole light switch is simple with clear steps. This part focuses on attaching the wires to the switch. Each wire has a specific place on the switch. Correct connections ensure the switch works safely and properly.
Attach Hot Wire
Locate the hot wire, usually black or red. Connect it to the brass screw on the switch. Wrap the wire clockwise around the screw. Tighten the screw firmly to hold the wire in place.
Attach Load Wire
Find the load wire, which goes to the light fixture. This wire is often black or red as well. Connect it to the other brass screw on the switch. Secure the wire tightly to ensure good contact.
Connect Ground Wire
Identify the ground wire, usually green or bare copper. Attach it to the green grounding screw on the switch. Tighten the screw to keep the ground wire secure. Grounding is important for safety and to prevent shocks.
Secure The Switch And Cover
Securing the switch and cover is the final step in wiring a single pole light switch. This step ensures safety and neatness in your electrical work. A properly secured switch prevents loose connections and protects wires from damage. It also gives a clean look to your wall. Follow these simple instructions to secure the switch and cover safely.
Secure The Switch To The Electrical Box
First, position the switch inside the electrical box carefully. Align the screw holes of the switch with the box holes. Use a screwdriver to tighten the mounting screws. Do not overtighten. The switch should be firm but not cracked. Check if the switch moves or feels loose. Tighten screws a bit more if needed.
Attach The Switch Cover Plate
Place the cover plate over the switch. Match the holes of the cover with the switch screws. Insert the screws and tighten gently. Avoid forcing the screws too hard. The cover plate should sit flat on the wall. A loose cover can expose wires and cause hazards. A tight cover keeps everything safe and tidy.
Test The Switch Functionality
After securing the switch and cover, restore power. Flip the switch on and off. Confirm the light works smoothly. No flickering or unusual sounds should occur. This check ensures the switch is properly installed. If the switch does not work, turn off power and check connections again.
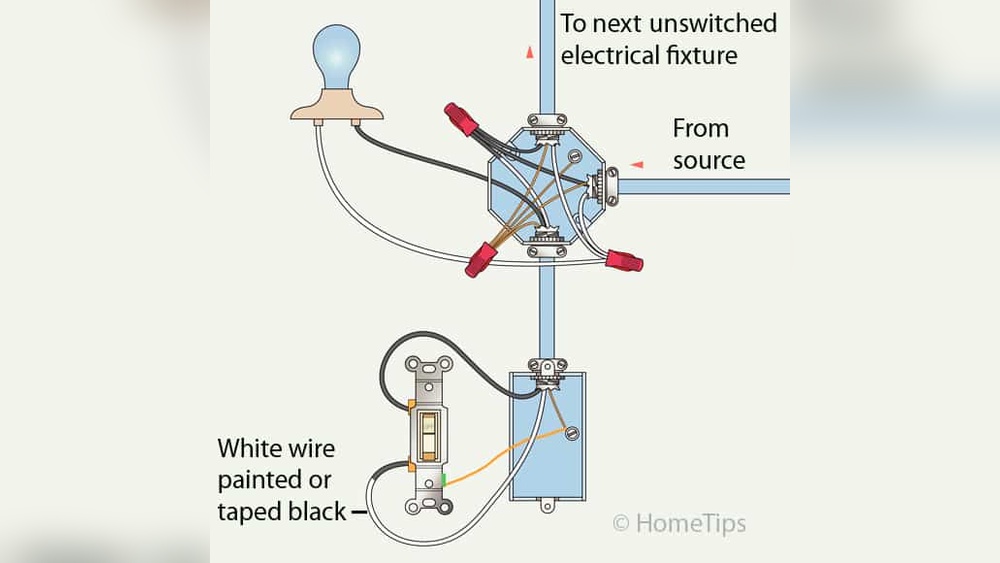
Credit: www.hometips.com
Restore Power And Test
Restoring power and testing the single pole light switch is the final step. It ensures the switch works safely and correctly. Take your time to check everything carefully. This step prevents electrical problems later.
Turn On The Circuit Breaker
Find the circuit breaker that controls the switch. Flip it back to the ON position. This restores electricity to the light switch and the connected light fixture.
Test The Light Switch
Press the switch up and down. Watch the light carefully. It should turn on and off smoothly. If it does, the wiring is correct.
Check For Any Issues
Look for flickering lights or buzzing sounds. These signs mean a loose wire or a bad connection. Switch off the breaker again and double-check your wiring.
Troubleshooting Tips
Troubleshooting a single pole light switch can save time and prevent mistakes. Problems often come from loose wires or wrong connections. Checking these details helps ensure the switch works safely and correctly.
Follow these simple tips to find and fix common issues quickly. Understanding the basics makes the process easier and less frustrating.
Check Power Supply First
Always turn off the power at the breaker before starting. Use a voltage tester to confirm no electricity flows to the switch. This step protects you from electric shock and prevents damage.
Inspect Wire Connections
Look closely at the wires connected to the switch. Loose or disconnected wires cause the switch to fail. Tighten any loose screws and ensure wires fit securely under the terminals.
Test The Switch Itself
Sometimes the switch is faulty. Use a multimeter to test for continuity. Replace the switch if the meter shows no connection when toggled.
Check For Damaged Wires
Wires can break or wear out inside the wall. Inspect visible wiring for cuts or damage. Replace any damaged sections to restore proper function.
Confirm Correct Wiring Setup
Verify the wiring matches the single pole switch diagram. The hot wire should connect to the switch’s brass terminal. The neutral wire usually bypasses the switch and connects directly to the light.
Frequently Asked Questions
How Do I Wire A Single Pole Light Switch?
To wire a single pole switch, connect the incoming hot wire to one terminal. Attach the outgoing wire to the other terminal. Secure ground wires to the switch’s ground screw. Turn off power before starting to avoid shock or injury.
Can I Replace A Single Pole Switch Myself?
Yes, you can replace a single pole switch if you follow safety steps. Turn off the circuit breaker and test for power. Remove the old switch, connect wires to the new one, and secure everything properly. Always use a voltage tester for safety.
What Tools Do I Need To Connect A Single Pole Switch?
You need a screwdriver, wire stripper, voltage tester, and electrical tape. These tools help you safely strip, connect, and secure wires. A voltage tester ensures power is off before you start working on the switch.
Why Is My Single Pole Switch Not Working?
A single pole switch may fail due to loose connections, faulty wiring, or a broken switch. Check for power at the switch with a tester. Tighten all wire terminals or replace the switch if needed.
Conclusion
Connecting a single pole light switch is simple with the right steps. Always turn off the power before starting. Follow the wiring instructions carefully and use the correct tools. Double-check your connections to avoid problems. A properly connected switch controls your light safely and easily.
Take your time and stay safe. Now, you can enjoy your well-lit room with confidence.