Are you tired of struggling with that old fan light switch that just won’t work right? Changing a fan light switch might seem tricky, but it’s easier than you think—and you don’t need to call an electrician.
Imagine flipping your switch and having your fan light come on instantly, every time. In this guide, you’ll discover simple, step-by-step instructions to replace your fan light switch safely and quickly. Keep reading, and by the end, you’ll have the confidence to fix it yourself and brighten up your space without any hassle.
Tools And Materials Needed
Changing a fan light switch requires some basic tools and materials. Having the right items ready makes the task easier and safer. This section lists everything needed for the job.
Safety Gear
Safety gear protects you from electrical shocks and injuries. Use insulated gloves and safety goggles. These prevent accidents during the switch replacement.
Screwdrivers
A set of screwdrivers is essential. A flat-head and a Phillips-head screwdriver are most common. They help remove and attach screws on the switch and cover plate.
Voltage Tester
A voltage tester checks if the power is off. Always test wires before touching them. This tool ensures you work safely on the switch.
Replacement Switch
Buy the correct fan light switch that fits your fixture. Check the switch type and voltage rating. Using the right switch avoids future problems.
Wire Strippers
Wire strippers remove the insulation from wires. They help prepare wires for connection. Choose a tool that matches your wire size.
Electrical Tape
Electrical tape insulates wire connections. It prevents short circuits and protects wires. Wrap it around exposed wires after connecting.
Wire Nuts
Wire nuts secure wire connections together. Use the right size for your wires. They keep wires safe and stable inside the switch box.
Safety Precautions
Changing a fan light switch requires care and attention to safety. Electricity can be dangerous if proper steps are not followed. Taking safety precautions helps prevent accidents and injuries. Always prepare well before starting the task.
Turn Off The Power
Switch off the power at the circuit breaker. Do not rely on the wall switch alone. Use a voltage tester to confirm no electricity flows to the wires. This step is essential to avoid electric shocks.
Use Insulated Tools
Choose tools with insulated handles. These tools reduce the risk of electric shock. Avoid using metal tools without insulation. Safety is a priority while working with electrical parts.
Wear Safety Gear
Wear rubber-soled shoes for good grip and insulation. Use safety glasses to protect your eyes. Gloves can also protect your hands from sharp edges and electrical hazards.
Work In A Dry Area
Make sure the workspace is dry and free of moisture. Water conducts electricity and increases danger. Avoid working in damp or wet conditions. This lowers the risk of electric shock.
Follow Instructions Carefully
Read the switch instructions before starting. Follow each step methodically. Proper installation ensures safe operation and avoids damage. Taking time to understand the process helps avoid mistakes.
Turn Off Power
Turning off the power is the first and most important step before changing a fan light switch. It protects you from electric shock and keeps the work safe. Never skip this step, even if you think the switch is off.
Power can come from different sources in your home. Knowing where to cut power makes the process easier and safer.
Locate The Circuit Breaker
Find your home’s circuit breaker panel. It is usually in the basement, garage, or utility room. Open the panel door to see the switches. Each switch controls power to different parts of your house.
Turn Off The Correct Breaker
Look for the breaker labeled for the fan or the room where the fan is. Flip this breaker to the OFF position. This stops electricity from reaching the fan light switch.
Double-check Power Is Off
Use a voltage tester or a simple light tester on the fan switch. Make sure no electricity flows. If the tester shows no power, you are safe to continue.
Inform Others In The House
Tell everyone in your home about the power off. This prevents anyone from turning the breaker back on by accident. Safety first.
Remove The Old Switch
Removing the old fan light switch is the first step in the replacement process. It requires care and attention to ensure safety and ease. This part explains how to take out the old switch without damaging wires or the wall.
Turn off the power at the circuit breaker before starting. This prevents electric shocks and makes the work safe. Use a voltage tester to double-check that no power flows to the switch.
Unscrew The Switch Cover Plate
Use a screwdriver to remove the screws holding the cover plate. Keep the screws safe for later use. Gently pull the cover plate away from the wall to expose the switch.
Remove The Switch Mounting Screws
Locate the screws that fix the switch to the electrical box. Unscrew them carefully and keep them aside. Pull the switch out slowly to see the wires behind it.
Identify And Label The Wires
Take note of how the wires connect to the switch. Label each wire with tape or a marker. This helps connect the new switch correctly and avoids confusion.
Disconnect The Wires From The Old Switch
Loosen the screws or release the clips holding the wires. Carefully detach each wire from the switch terminals. Keep the wires straight and avoid letting them touch each other.
Identify Wiring
Identifying the wiring is the first step to change a fan light switch safely. Knowing which wire does what helps avoid mistakes. This process ensures the new switch works correctly.
Before touching any wires, turn off the power at the circuit breaker. Safety first. Use a voltage tester to double-check no electricity flows to the switch.
Locate The Switch Wires
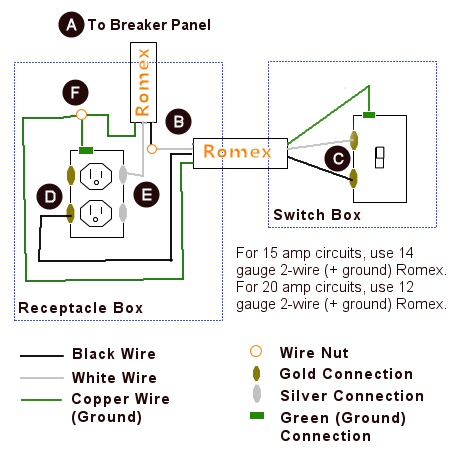
Remove the switch cover plate carefully. Look inside the switch box. You will see several wires connected to the switch. Usually, there are black, white, and ground wires.
Understand Wire Colors
Black wires usually carry power. White wires are neutral. Green or bare copper wires are ground wires. These colors help identify each wire’s role.
Test Each Wire
Use a voltage tester to check each wire. Test the black wire first to see if it has power. Test the white and ground wires to confirm their function.
Label The Wires
Label wires with tape and marker. Mark each wire clearly. This step helps during reinstallation. It prevents confusion and wiring errors.
Connect The New Switch
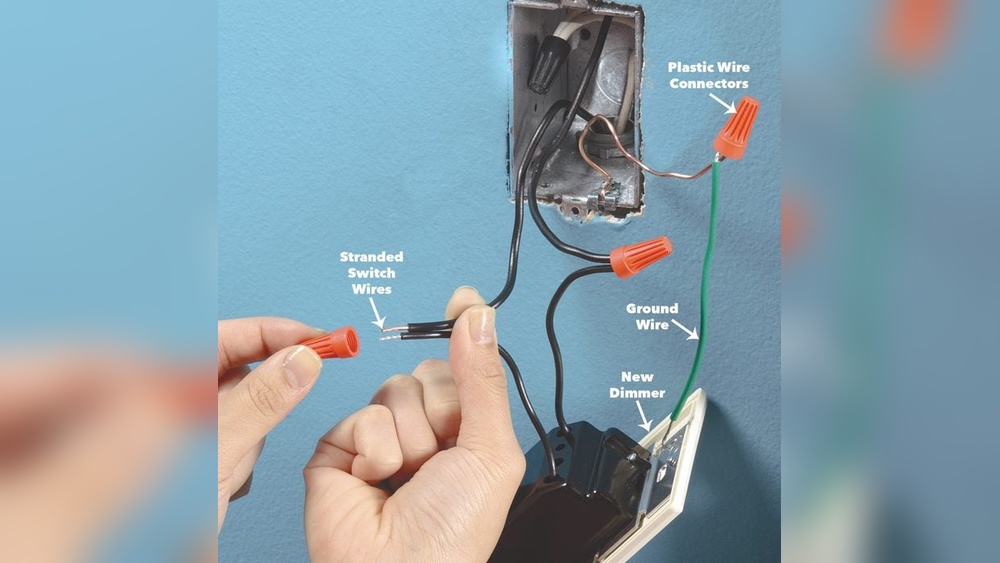
Start by turning off the power to avoid shocks. Next, remove the old switch and carefully connect the new one’s wires to the matching terminals. Secure the switch in place before restoring power and testing the fan light.
Prepare The Wires For Connection
Start by stripping about half an inch of insulation from each wire. Use a wire stripper for a clean job. Make sure the wires are straight and not frayed. This helps create a strong connection with the new switch.
Match The Wires To The Switch Terminals
Identify the wires by color and function. Typically, black or red wires connect to the switch terminals. The green or bare copper wire is for grounding. Connect each wire to the correct terminal to ensure safety and proper operation.
Secure The Wires To The Switch
Wrap the wire ends clockwise around the terminal screws. Tighten the screws firmly but avoid over-tightening. This prevents loose connections that can cause flickering or failure. Double-check that all wires are secure and cannot pull loose.
Test The Connection Before Final Assembly
Turn the power back on at the breaker. Use the switch to test the fan light operation. Confirm the light turns on and off without issues. If it works properly, turn off the power again before finishing the installation.
Secure The Switch And Cover Plate
Securing the switch and cover plate is the last step in changing a fan light switch. It keeps everything in place and safe. A loose switch can cause problems or even be dangerous. Properly fixing the switch ensures it works well and looks neat.
Align The Switch With The Electrical Box
Start by placing the switch inside the electrical box. Make sure it fits evenly and the screw holes line up. The switch should sit flat against the wall without tilting or gaps. This keeps the switch stable and ready for screws.
Tighten The Switch Screws
Use a screwdriver to tighten the screws on the switch. Turn each screw slowly until the switch feels secure. Avoid over-tightening to prevent cracking the switch or wall. Tight screws hold the switch firmly and stop it from moving.
Attach The Cover Plate
Place the cover plate over the switch. The plate should fit flush against the wall. Insert the screws into the holes on the plate. Tighten the screws just enough to hold the plate tight. A well-secured cover plate hides wires and adds a clean look.

Credit: www.youtube.com
Restore Power And Test
After installing the new fan light switch, restoring power is the next step. This step ensures the switch works properly and the fan lights turn on safely. Testing the switch helps find any problems early before regular use.
Safety is important. Make sure the circuit breaker is back in the ON position. This sends power back to the switch and fan light fixture. Once power is restored, you can check the switch functions.
Turn On The Circuit Breaker
Locate the circuit breaker panel in your home. Find the breaker that controls the fan light circuit. Flip the breaker switch to the ON position. You might hear a click or feel resistance when it resets.
Do not rush this step. A proper reset is necessary for the switch to get power. If unsure, use a voltage tester to confirm power is back.
Test The Fan Light Switch
Flip the fan light switch to the ON position. Watch the fan light to see if it turns on. Try turning the switch off and on a few times.
Check for any flickering or unusual sounds. The light should stay steady and the fan should respond smoothly. If the light does not turn on, turn off the breaker and review your wiring connections.
Ensure Safe Operation
Observe the switch and fan for a few minutes. Make sure there is no heat or burning smell. The switch should feel solid and not loose.
Testing confirms the switch is installed correctly. It also keeps your home safe from electrical hazards.
Troubleshooting Tips
Troubleshooting a fan light switch can save time and avoid extra costs. Simple checks often fix the problem quickly. These tips help find the cause and guide you to the right solution.
Check The Power Supply
Start by making sure the power is on. Look at the circuit breaker or fuse box. Switches need power to work. No power means no light or fan movement.
Test The Switch Function
Press the switch several times. Listen for clicks or feel any resistance. A faulty switch might not click or feel loose. This shows it may need replacement.
Inspect The Wiring Connections
Turn off the power before checking wires. Loose or disconnected wires cause failures. Tighten any loose screws and reconnect wires firmly. Proper connections restore switch function.
Examine The Fan And Light Bulbs
Check if the light bulbs are burned out. Replace old bulbs with new ones. Also, make sure the fan blades spin freely. Blocked blades can stop the fan.
Use A Voltage Tester
A voltage tester can check if electricity reaches the switch. It helps find wiring or switch problems. No voltage means a wiring issue or power loss.
Credit: www.oneprojectcloser.com

Credit: www.reddit.com
Frequently Asked Questions
How Do I Turn Off Power Before Changing A Fan Light Switch?
Always switch off the circuit breaker to cut power. Use a voltage tester to confirm no electricity flows. This ensures safety and prevents electric shock during the switch replacement.
What Tools Are Needed To Change A Fan Light Switch?
You need a screwdriver, voltage tester, wire stripper, and replacement switch. These tools help safely remove and install the fan light switch quickly and correctly.
Can I Replace A Fan Light Switch Myself?
Yes, with basic electrical knowledge and safety precautions, you can. Always turn off power and follow step-by-step instructions for a safe replacement.
How Do I Identify The Fan Light Switch Wires?
Typically, black or red wires are hot, white is neutral, and green or copper is ground. Label wires before disconnecting to ensure proper reconnection.
Conclusion
Changing a fan light switch is simple and saves money. Turn off the power first for safety. Take your time and follow steps carefully. Use the right tools and check connections well. Test the switch before finishing the job. Enjoy your fan and light working perfectly again.
You can handle small repairs like this easily. Keep learning and fixing things around your home. It feels good to do it yourself.