Are you tired of fumbling for two switches every time you want to turn on your bathroom fan and light? Imagine controlling both with just one simple flick.
Connecting your bathroom fan to the light switch not only saves you time but also makes your space more efficient and convenient. In this guide, you’ll discover easy steps to make this smart upgrade yourself—even if you’re not an expert.
Stick with me, and by the end, you’ll know exactly how to get it done safely and quickly. Ready to simplify your bathroom routine? Let’s dive in!
Tools And Materials Needed
Connecting a bathroom fan to a light switch requires specific tools and materials. Having the right items ready makes the job easier and safer. This section lists everything needed for the task.
Electrical Tools
Essential electrical tools include a voltage tester to check power status. Wire strippers help remove insulation safely. A screwdriver set is needed for screws and terminals. Needle-nose pliers assist in bending wires. A drill can be useful for new holes or mounting.
Materials For Wiring
Use electrical wires rated for bathroom use, typically 14 or 12 gauge. Wire nuts secure wire connections firmly. Electrical tape insulates and protects connections. A junction box may be required to house wire splices. A light switch compatible with your fan and wiring is essential.
Safety Gear
Wear insulated gloves to protect against electric shocks. Safety goggles shield eyes from dust and debris. Use a sturdy ladder or step stool for reaching high places. Turn off power at the circuit breaker before starting work.
Credit: www.youtube.com
Safety Precautions
Safety is the top priority when connecting a bathroom fan to a light switch. Electrical work can be risky without the right care. Taking proper safety steps protects you from shocks and fires. It also keeps your home safe and sound.
Before starting, understand the basics of electrical safety. Always use tools designed for electrical work. Wear rubber-soled shoes to reduce shock risk. Never work with wet hands or in damp areas.
Turn Off Power At The Circuit Breaker
Find the correct circuit breaker for your bathroom. Switch it off to cut power completely. Test the switch or wires with a voltage tester. Confirm no electricity flows before touching any wires.
Use Proper Tools And Equipment
Use insulated screwdrivers and wire strippers. Avoid using tools with worn handles. Have a voltage tester handy to check wires. Use electrical tape and wire nuts for secure connections.
Follow Wiring Codes And Instructions
Read the fan and switch manuals carefully. Match wire colors correctly—usually black for hot, white for neutral. Connect ground wires to the green screw or grounding wire. Follow local electrical codes strictly to avoid hazards.
Wear Protective Gear
Wear safety goggles to protect your eyes. Use gloves to avoid cuts and shocks. Keep your workspace clean and well-lit. Clear the area of water and clutter before starting.
Locating Existing Wiring
Locating existing wiring is the first step in connecting your bathroom fan to a light switch. Knowing where wires run saves time and keeps you safe. It helps you avoid damaging walls or cutting into wires by accident.
Start by turning off the power at the breaker box. This step protects you from electric shock. Use a voltage tester to double-check no current flows through the wires.
Identify The Light Switch Box
Find the switch that controls your bathroom light. Remove the switch cover carefully using a screwdriver. Look inside the box for wires connected to the switch. Note how many wires are there and their colors.
Trace Wiring In The Ceiling
Check the ceiling where the fan will go. Remove the light fixture or existing fan if needed. Look for wires coming from the ceiling junction box. These wires usually connect to the light switch below.
Use A Circuit Tester
Use a circuit tester or voltage detector to locate wires inside walls. Hold the tester near the wall to sense live wires. Mark wire positions with a pencil for easier access later.
Check The Electrical Panel
Look at your home’s electrical panel to find the breaker for the bathroom. Label the breakers if needed. This step helps you control power flow during installation.
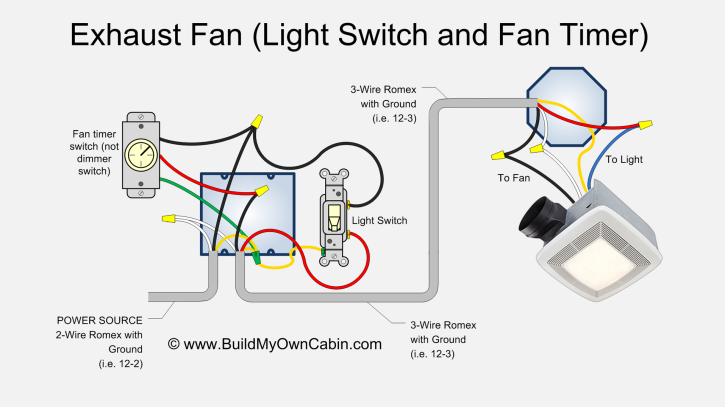
Credit: www.buildmyowncabin.com
Turning Off Power
Turning off the power is the first step in connecting your bathroom fan to the light switch. It keeps you safe from electric shock. Always treat electricity with respect. Even a small mistake can cause injury or damage.
Before starting any work, switch off the main power at the breaker box. This stops electricity from flowing to your bathroom circuits. Double-check that the power is off using a tester. Never rely on the switch alone.
Locate The Correct Circuit Breaker
Find the breaker that controls your bathroom lights and fan. It may be labeled in the breaker box. Turn it off to cut the power supply. If you are not sure, turn off the main breaker to be safe.
Use A Voltage Tester
Test the wires with a voltage tester to ensure power is off. Touch the tester to each wire carefully. No light or sound means no electricity. This step confirms safety before touching wires.
Inform Others In The Home
Tell others about the power shutdown. This prevents someone from turning the breaker back on by mistake. Place a note or warning sign on the breaker box. Safety involves everyone in the household.
Wiring The Fan To The Switch
Wiring the bathroom fan to the light switch lets you control both with one switch. This saves space and adds convenience. The process is simple if you understand the wiring steps. Safety is key. Turn off the power at the breaker before starting.
Identifying Wire Types
First, find the wires in your fan and switch boxes. Most homes use three main wires: black, white, and green or bare copper. Black is the hot wire. It carries power from the switch to the fan. White is the neutral wire. It completes the circuit back to the electrical panel. Green or bare copper is the ground wire. It protects against electrical faults.
Check the fan’s wiring instructions. Some fans have extra wires for light kits. Label these wires to avoid confusion. Use a voltage tester to confirm wires are not live before touching them.
Connecting Fan And Switch Wires
Match the wires from the fan to the switch wires. Connect black to black. This links the hot wire to the switch. Join white wires together for the neutral connection. Attach the green or bare copper wires for grounding. Use wire nuts to secure each connection. Wrap connections with electrical tape for safety.
For fans with a light, connect the fan’s light wire to the switch’s black wire if controlled separately. Tighten all screws firmly. Push wires neatly into the boxes. Attach the switch and fan cover plates. Restore power and test the switch.
Mounting The Fan
Mounting the bathroom fan is a key step in the installation process. This part ensures the fan stays secure and works well. Proper mounting helps reduce noise and vibration. It also makes the fan last longer. Follow these steps carefully to mount the fan safely and correctly.
Choose The Right Location
Pick a spot on the ceiling near the shower or tub. The fan should cover the area where moisture builds up most. Avoid placing it too close to light fixtures or vents. Make sure there is enough space above the ceiling for the fan housing.
Prepare The Ceiling Opening
Mark the fan size on the ceiling using the template provided. Cut the hole carefully with a drywall saw. Check that the hole is smooth and fits the fan snugly. Remove any debris or dust from the edges before mounting.
Secure The Fan Housing
Insert the fan housing into the ceiling hole. Align it so it sits flush with the ceiling surface. Use screws or mounting brackets to fix the housing to the ceiling joists. Tighten all fasteners firmly but avoid over-tightening.
Check For Stability
Gently shake the fan to test its stability. The fan should not move or wobble. If it does, tighten the screws again or add extra support. Proper stability prevents noise and damage over time.
Testing The Setup
Testing the setup is a key step after wiring your bathroom fan to the light switch. It ensures both the fan and the light work correctly. This step helps avoid future problems and keeps you safe.
Turn On The Power
Start by turning the power back on at the circuit breaker. This reactivates the electrical flow to your bathroom. Check that the switch and wires are ready for testing.
Switch The Light On
Flip the light switch to the ON position. The bathroom light should turn on immediately. If the light stays off, there might be a wiring issue.
Check The Fan Operation
With the light switch on, listen for the fan noise. The fan should start running at the same time as the light. No sound means the fan is not connected properly.
Test The Switch Off Position
Turn the switch OFF. Both the light and fan must stop working. If either stays on, double-check your wiring connections.
Inspect For Unusual Sounds Or Smells
While testing, listen for strange noises or smells. These signs may indicate electrical problems. Turn off the power immediately if you notice anything unusual.
Troubleshooting Common Issues
Troubleshooting common problems helps keep your bathroom fan working well. Small issues can stop the fan from turning on or cause it to run without control. Fixing these problems saves time and money. It also keeps your bathroom fresh and dry.
Check The Power Supply
Start by making sure the fan has power. Look at the circuit breaker or fuse box. A tripped breaker or blown fuse can cut power to the fan. Reset the breaker or replace the fuse if needed. Also, confirm the wall switch is not damaged.
Inspect The Wiring Connections
Loose or wrong wiring causes many fan problems. Turn off the power at the breaker. Remove the switch cover and fan cover. Look for loose wires or poor connections. Tighten any loose wire nuts and check that wires match the correct terminals.
Test The Wall Switch
Sometimes the switch itself is faulty. Use a voltage tester to see if power flows when the switch is on. Replace the switch if it does not send power. A new switch is cheap and easy to install.
Examine The Fan Motor
A broken fan motor will not run properly. Listen for unusual noises or no sound at all. If the motor does not turn, it may need replacement. Cleaning dust and debris can also help the motor run better.

Credit: diy.stackexchange.com
Frequently Asked Questions
How Do I Wire A Bathroom Fan To A Light Switch?
To wire a bathroom fan to a light switch, connect the fan’s black wire to the switch’s output wire. Link the fan’s white wire to the neutral wire. Ensure power is off before starting for safety. Use wire nuts to secure connections.
Can I Control Bathroom Fan And Light With One Switch?
Yes, you can control both with one switch by wiring them in parallel. Connect the fan and light black wires to the switch output. Both devices will turn on or off together using a single switch.
What Tools Do I Need To Connect Fan To Light Switch?
You will need a screwdriver, wire stripper, voltage tester, wire nuts, electrical tape, and possibly a drill. These tools help safely strip wires, test power, and secure connections during installation.
Is It Safe To Connect Bathroom Fan To Light Switch?
Yes, it is safe if you follow electrical codes and turn off power before working. Properly secure all wire connections and use the correct wire gauge for safety and functionality.
Conclusion
Connecting a bathroom fan to a light switch helps save space and adds convenience. It lets you control both with one switch. Make sure to follow safety steps and local rules. Use the right tools and double-check your wiring. Taking your time prevents mistakes and keeps everyone safe.
This simple project can improve your bathroom’s comfort and airflow. Give it a try and enjoy the benefits of combined control.