Have you ever tried installing a new switch or outlet only to find the light switch box too small or set too deep in the wall? It’s a common problem that can make your project frustrating and even unsafe.
But don’t worry—you can fix this quickly and easily by extending your light switch box. In this guide, you’ll learn simple, step-by-step methods to extend your box safely and effectively. Keep reading, and you’ll gain the confidence to handle this task like a pro, saving time and avoiding costly mistakes.
Your next home improvement project just got a whole lot easier!
Tools And Materials Needed
Extending a light switch box requires specific tools and materials. Using the right items makes the job safer and easier. Prepare everything before starting to save time and avoid mistakes.
Basic Tools
You need a screwdriver to remove the switch cover and screws. A wire stripper helps remove insulation from wires. A voltage tester ensures the power is off. A drill may be necessary to make holes for the extension. A measuring tape helps check the box size and space.
Safety Gear
Wear insulated gloves to protect against electric shock. Safety glasses shield your eyes from dust and debris. Use a dust mask if drilling into walls. Closed-toe shoes protect your feet. Always work in a well-lit area.
Extension Kits
Extension kits include box extenders and mounting brackets. Choose the right size for your existing box. Some kits come with screws and wire connectors. Pick kits made of durable materials like plastic or metal. Check the package instructions for compatibility.
Preparing The Work Area
Preparing the work area is the first step to safely extend a light switch box. A clean and organized space helps prevent accidents and makes the job easier. Follow these simple steps before starting any electrical work.
Power Shutoff
Turn off the power to the circuit you will work on. Use the main breaker or fuse box to cut electricity. Double-check that the power is off before touching any wires. This step protects you from electric shock.
Clearing The Space
Remove furniture and objects near the switch box. Clear dust and dirt around the area. Keep tools and materials within reach but not in the way. A tidy space helps you focus and work safely.
Testing For Live Wires
Use a voltage tester to check if wires are live. Touch the tester to each wire carefully. Confirm the power is off before proceeding. This test is crucial to avoid electric shocks and ensure safety.
Removing The Existing Switch Box
Removing the existing switch box is the first step to extend it safely. Careful handling is key to avoid damage or injury. Follow these simple steps to remove the switch box properly.
Turn off the power at the circuit breaker. This stops electric shock risks during the process.
Unscrewing The Cover
Start by removing the switch cover plate. Use a screwdriver to take out the screws. Keep the screws safe to use later. Gently pull the cover away from the wall. This exposes the switch and wiring inside.
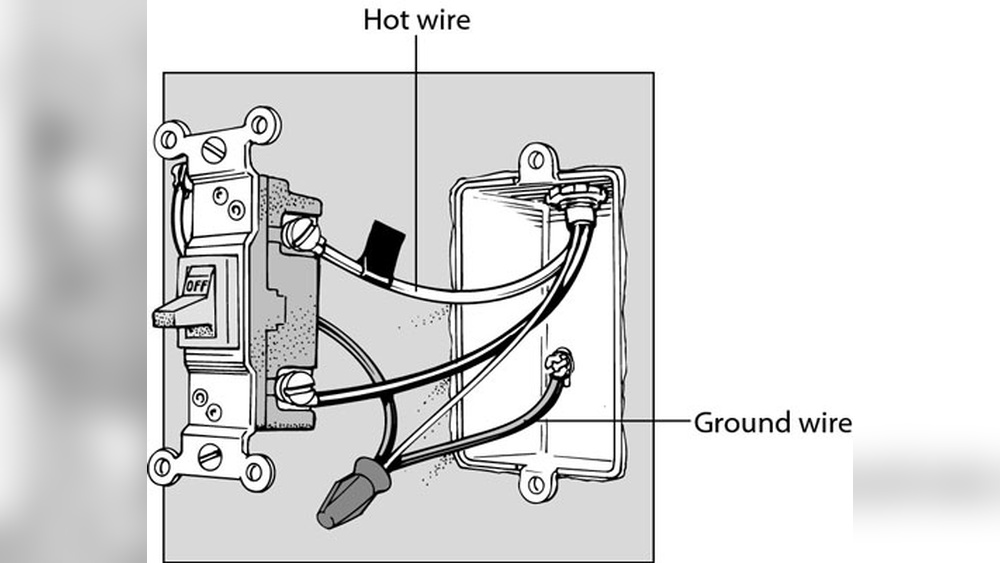
Disconnecting Wires
Next, check the wiring connected to the switch. Use a voltage tester to confirm power is off. Unscrew or unclip the wires carefully. Note how wires connect for reinstallation later. Use electrical tape to cover wire ends if needed.
Extracting The Box
Look for screws or nails holding the box in place. Remove these fasteners with a screwdriver or pliers. Pull the box slowly out of the wall cavity. Watch for any attached wires or nails. Make sure the box comes out cleanly without breaking.
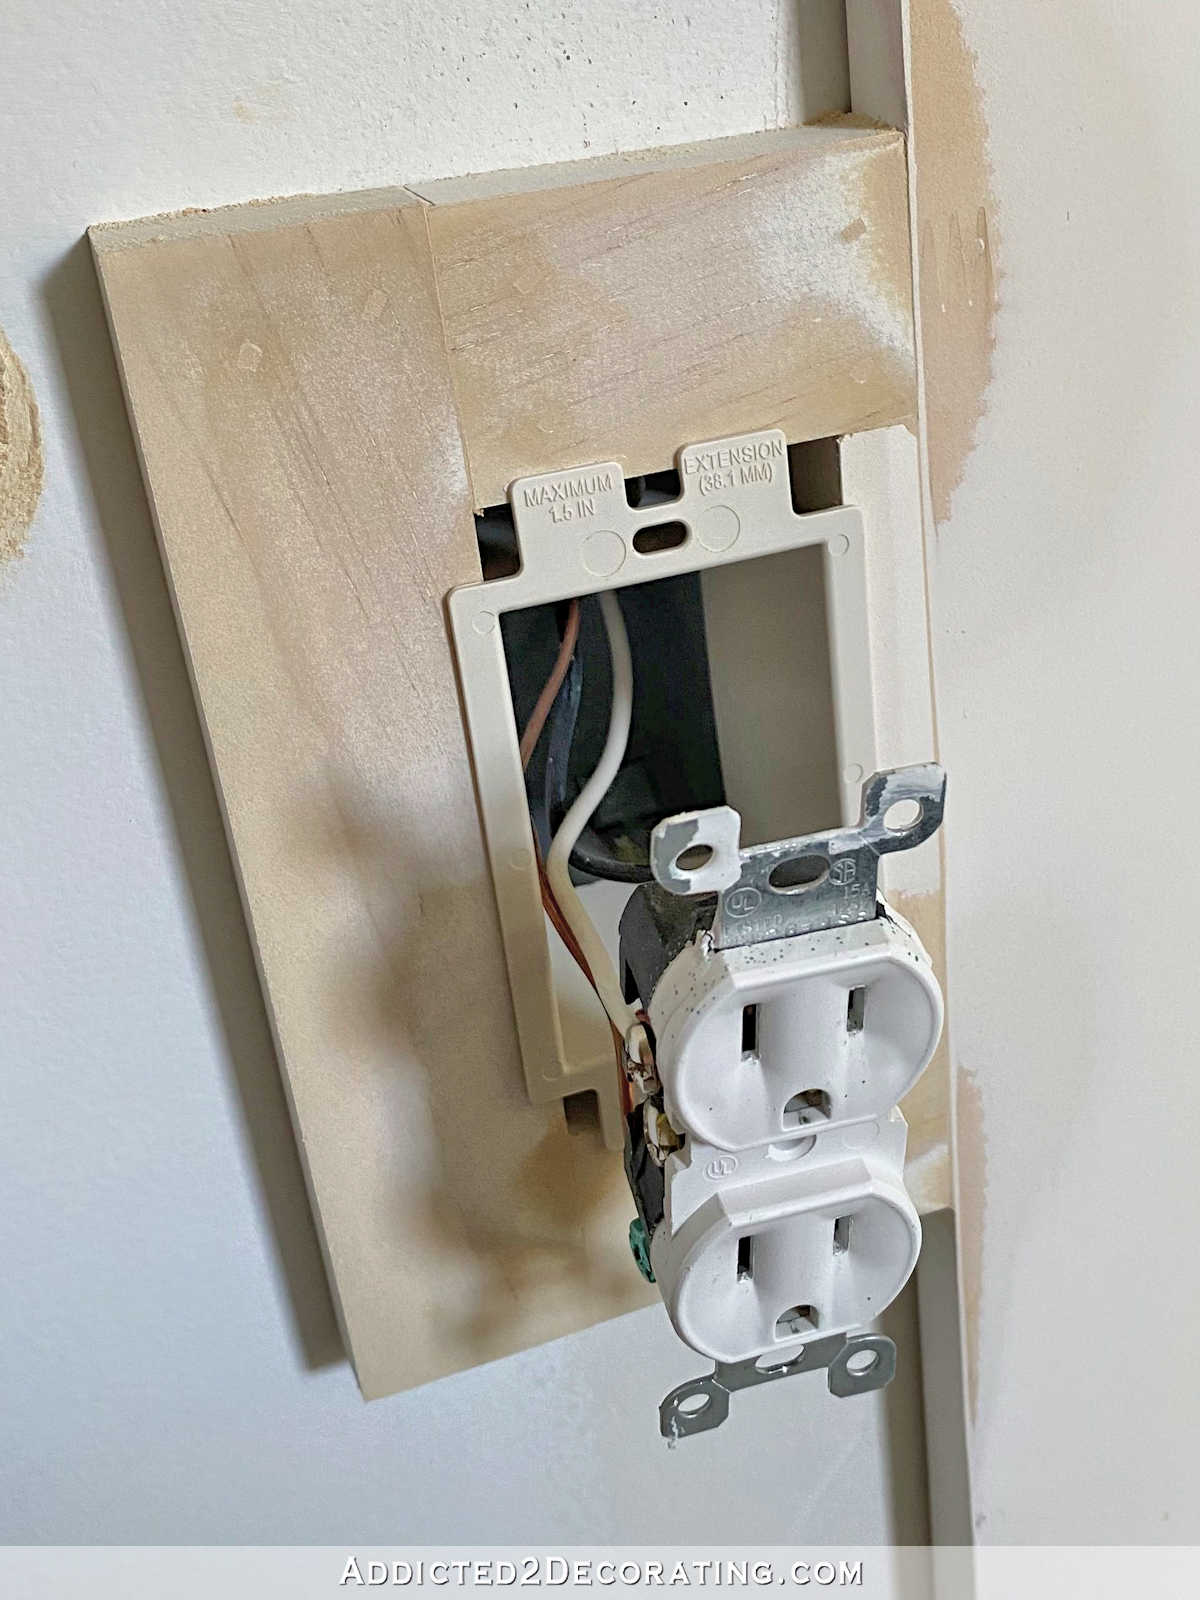
Credit: www.addicted2decorating.com
Choosing The Right Extension Box
Choosing the right extension box is key to a safe and neat light switch installation. The box must fit well and match your existing setup. The right choice helps avoid electrical problems and keeps your walls looking clean.
Sizing Options
Extension boxes come in different sizes. Choose one that matches your current box size or is slightly bigger. The box should allow enough space for wires and connections. Too small a box can cause crowding and overheating.
Material Types
Extension boxes are usually made from plastic or metal. Plastic boxes are easy to cut and install. Metal boxes offer more durability and better grounding. Pick a material that suits your wall type and electrical needs.
Compatibility Factors
Check if the extension box fits your wall thickness and switch type. Some boxes work better with certain switches or wall materials. Make sure the extension box seals tightly with the existing box to prevent dust and moisture.
Installing The Extension Box
Installing the extension box is a key step in extending a light switch box. It creates extra space to hold wires safely. The process requires care to fit the box well and keep the wall neat. Follow these steps to install the extension box properly.
Positioning The Box
Place the extension box so it lines up with the existing box. Check the depth so the switch cover fits flush with the wall. The box should not stick out or sit too deep. Hold it steady before moving to the next step.
Securing To Studs
Attach the box firmly to the wall studs. Use screws that fit the box holes well. Tighten the screws without bending the box. This keeps the extension steady and safe for wiring. A loose box can cause problems later.
Aligning With Wall Surface
Make sure the front edge of the box matches the wall surface. Use a level to check the alignment. Adjust if needed to avoid gaps or unevenness. Proper alignment helps the wall plate sit flat and look clean.

Credit: www.youtube.com
Connecting Wires Safely
Connecting wires safely is the key step when extending a light switch box. Proper wire connection avoids electrical faults and keeps your home safe. Careful handling and following basic rules protect you from shocks and fire risks.
Focus on clean wire preparation, secure connections, and correct grounding. These actions ensure the wiring works well and lasts long.
Wire Preparation
Start by turning off the power at the circuit breaker. Use a wire stripper to remove about half an inch of insulation from each wire end. Make sure wires are clean, without any damage or corrosion. Twist the exposed copper strands together for a tight, neat end. This step ensures a strong electrical connection.
Using Wire Connectors
Choose the right wire connector for your wire size and number of wires. Insert the twisted wire ends into the connector and turn it clockwise until tight. Tug gently on each wire to check if it is secure. Avoid loose connections as they can cause sparks or heat buildup. Use electrical tape around connectors for extra safety if needed.
Ensuring Proper Grounding
Grounding protects against electric shock by directing electricity safely to the earth. Connect the ground wires together and attach them to the metal box or grounding screw. Use a wire connector or grounding clip designed for this purpose. Double-check that the ground connection is solid and free of rust or paint. Proper grounding is a must for safe light switch wiring.
Reassembling The Switch
Reassembling the switch is the final step after extending the light switch box. This part must be done carefully to ensure the switch works safely and properly. Take your time to put everything back in place.
Mounting The Switch
Start by placing the switch back into the extended box. Align the screw holes with the box holes. Use a screwdriver to tighten the screws. Do not overtighten; the switch should be snug but not forced. Check that the switch sits flat and does not wobble.
Attaching The Cover Plate
Next, position the cover plate over the switch. The plate should fit flush against the wall or box extension. Insert the screws and tighten them evenly. Make sure the plate is secure and has no gaps. A well-fitted cover plate protects the wiring behind it.
Final Safety Checks
Before restoring power, double-check all connections. Ensure no wires are loose or exposed. Test that the switch moves smoothly without resistance. Confirm the cover plate is firmly attached. Turn the power back on and test the switch operation carefully.
Testing The Extended Switch
After extending a light switch box, testing the switch is crucial. It ensures safety and confirms the switch works properly. Testing helps catch wiring mistakes early. It prevents electrical hazards and saves time on repairs. Follow these clear steps to test the extended switch with confidence.
Restoring Power
Turn the main power back on at the circuit breaker. Wait a few seconds for the electricity to stabilize. Use a voltage tester to check if power is present at the switch. Make sure no wires are loose or exposed before touching the switch. Safety first.
Functionality Test
Flip the switch to the “on” position. Observe if the connected light or fixture turns on. Switch it off and check if the light goes out. Test the switch several times to ensure consistent operation. Listen for any unusual sounds from the switch. Smooth action means a good connection.
Troubleshooting Tips
If the light does not turn on, double-check your wiring connections. Tighten any loose screws on terminals. Confirm the wires match the switch’s instructions. Use a multimeter to test continuity inside the switch. Replace the switch if it feels damaged or faulty. Call a professional if issues persist.
Common Mistakes To Avoid
Extending a light switch box can be a simple task. Yet, many make errors that cause problems later. Avoiding these common mistakes saves time and keeps your home safe. Understanding these errors helps you work with confidence and care.
Overtightening Screws
Too much force on screws can crack the box. It may also strip the threads, making the switch loose. Tighten screws just enough to hold parts firmly. Use a screwdriver with good grip for better control.
Ignoring Wire Gauge
Using the wrong wire size is risky. Thin wires carry less current and can overheat. Check the wire gauge matches your circuit needs. Proper wire size ensures safety and better performance.
Skipping Safety Procedures
Turning off power before work is crucial. Forgetting this step can cause electric shocks. Wear safety gloves and use insulated tools. Follow safety rules to protect yourself and others.
Credit: www.do-it-yourself-help.com
Frequently Asked Questions
How Do I Extend A Light Switch Box Safely?
To extend a light switch box safely, turn off power first. Use a compatible box extender kit. Secure it properly to the wall. Ensure wire connections stay tight and insulated. Finally, test the switch to confirm safety and functionality.
What Tools Are Needed To Extend A Light Switch Box?
You need a screwdriver, wire stripper, voltage tester, box extender, and electrical tape. These tools help safely remove, extend, and secure the switch box. Always follow safety guidelines when handling electrical components.
Can I Extend A Light Switch Box Without An Electrician?
Yes, you can if you follow safety steps. Turn off power at the breaker, use the right extender, and secure wires properly. If unsure, consult a professional to avoid risks and ensure code compliance.
Why Should I Extend A Light Switch Box?
Extending a light switch box provides extra space for wiring. It prevents overcrowding and reduces fire hazards. It also allows easier access for repairs or upgrades. Proper extension ensures electrical safety and code compliance.
Conclusion
Extending a light switch box is easier than it seems. With the right tools, anyone can do it safely. Always turn off power before starting work. Measure carefully and choose the right box size. This simple fix improves safety and makes room for wiring.
Take your time and follow steps closely. A well-extended box fits perfectly and lasts long. Now, your switch is ready for use without any hassle. Try it yourself and see the difference.